
Use and Care Manual


Copyright © 2009 Bluworld of Water, LLC. All rights reserved.
INSTRUCTIONS FOR SET UP OF WALL FOUNTAINS
1. Decide where you want to install your fountain
** It is critical that your waterfall is level as this will ensure even water flow **
a. Due to the light-weight nature of your new fountain, it is not necessary to mount it directly into
wall studs.
b. Mount indoors only and in a place that is not in direct sunlight.
c. We recommend that you install your waterfall above an electrical outlet. A Ground Fault Interrupt
(GFI) outlet or a dedicated circuit breaker is preferred.
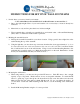
2. Marking the waterfall location
a. Hold up the assembled waterfall in your chosen location. Using a pencil, draw a light line on the
wall indicating the top of the waterfall.
b. Using the light line you drew from step A, measure from that line down approximately 9” (refer to
the instructions that came with your fountain as this can vary with each model) and draw another
line to indicate the bottom of the wall bracket. Using a level, hold the Mounting Bracket to the
wall with the top angled towards you. Mark the mounting holes on the wall. Remember to double
check your measurements and that your marks are level.
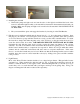
3. Mounting the wall bracket
a. When using anchors, you must use the provided EZ Ancors™. Each EZ Ancor™ has a weight
capacity of up to 50 pounds. Plastic anchors are not an acceptable substitute. To install the EZ
Ancors
™, gently tap or press the tip into the drywall and slowly screw the anchors into the wall.
Make sure the flat side of the anchor is flush with the wall. Do not over tighten the anchors. If
you encounter a wall stud while installing an EZ Ancor
™, use the mounting screw without the
anchor.
b. Install the Mounting Bracket using the 1” screws provided.