
Instructions / Assembly

635 W. Michigan Street Orlando, FL 32805 · PH 407-426-7674 · Fax 407-426-7721
Page 4 of 8
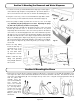
Fig 3.1
Fig 3.3
Fig 3.4
Fig 3.2
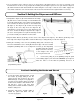
1. Locate the reservoir (L) and the EVA Cushion Strips (O). Peal the paper
off the adhesive strip and place each pad about 1” up from the bottom of
the reservoir and 2” in from each side as shown in the drawing (Fig 3.1).
2. Hang the reservoir (L) on the reservoir wall bracket (D). Make certain
the reservoir (L) is well seated and centered on the bracket (Fig 3.2).
3. Place the pump assembly (H) inside the reservoir (L) close to the right
edge. DO NOT plug the pump (H) into an outlet. Operating the pump
dry will void any warranty and burn out the pump.
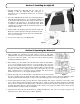
4. The water disperser (E) will sit in the bracket pockets on the stone wall
bracket (B). Until the stone is mounted it will need to be placed
temporarily above the bracket so the stone can be position on the bracket
cleat. Place one Pocket Clip (M) inside each of the wall bracket pockets
(B) (Fig 3.3). The curved end of the Pocket Clip should be up and facing
the wall. Next slide the tabs on the disperser (E) behind each Pocket clip
(M) so it is holding up the disperser (E) (Fig 3.4); you may need to pull the
clip out from the wall to slide the tab behind as it should be a very tight fit.
Do not push the disperser (E) all the way down; just enough so that is
doesn’t fall.
5. Place the vinyl tubing
inside the tube clip. It
should be loose so the
tube can slide freely
up and down when
the disperser is moved.
6. Make certain the vinyl
tubing and plumbing
hang straight down into
the reservoir.
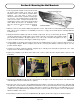
1. Remove the stone from the box. Due the weight you will need 1 or 2 people to assist with the installation. Your
stone ships face down. Notice the bracket that has been anchored to the back of the slate. This will hook onto the
cleat of the stone wall bracket (B). The cut angle is the top of the stone. Using two strong people lift the slate up
from the pallet and
carefully move the
stone to the installation
area. Position the
stone so it is centered
in front of the reservoir
(L). You may wish to
rest the stone on scrap
wood so you can grip
under the stone when
lifting to mount it on
the bracket.
Section 3: Mounting the Reservoir and Water Disperser
Section 4: Mounting the Stone