
Instructions / Assembly

635 W. Michigan Street Orlando, FL 32805 · PH 407-426-7674 · Fax 407-426-7721
Page 5 of 8
Fig 5.1
Fig 5.2
Fig 6.2
Fig 6.1
Fig 5.3
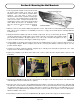
2. It is a good idea to have someone spot you on the position of the bracket and to see if you are centered or not
inside the basin. Lift the stone up just past the mounting cleat and tip the top back so it is just under the disperser
(E) and then tilt the bottom back towards the wall clearing the reservoir lip. Lower the stone until it engages the
cleat. Make certain the stone is well seated on the cleat and centered from left to right inside the reservoir (L).
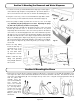
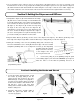
1. Gently lift the disperser (E) from behind the Pocket Clips
(M) and remove each Pocket Clip out of the Wall bracket
pocket (B). Slide the tabs on the disperser (E) behind the
stone and into the bracket pockets on the wall bracket
(B) (Fig 5.1). The disperser (E) should sit evenly along
the angle on the stone edge. Press the disperser (E)
down firmly to ensure there are no gaps between it and
the stone. Center the Disperser (E) from left to right on
the stone. You may want to keep the Pocket Clips should
you need to install your fountain in a new location.
2. Drop the water diffuser (F) directly over the center of the disperser hole Fig 5.2) . The diffuser (F) will clip on the
back edge of the disperser (E). Make certain the diffuser (F) is sitting directly over the hole (Fig 5.2).
3. During the mounting of the stone the plumbing tubing and connection may
have moved behind the stone. Gently lift the bottom edge of the stone forward
and pull the plumbing down so it is resting in the reservoir (L). The vinyl tubing
should be inside the rounded
bump out in the reservoir (L)
so the weight of the stone
does not pinch it closed.
4. Connect the pump (H) to the plumbing using the quick
connect fitting (Fig 5.3). The flow valve should be open. Open is
when the valve is in line with the plumbing. Closed is in
perpendicular position.
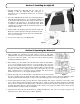
1. Locate the Header and Shroud (G). Install
the Header by simply sliding it into the
support pocket clips located on the stone
wall bracket (B). It may be a very tight fit so
you may need to pull the disperser forward
to allow for the header to slide down into the
clip (Fig 6.1). Take a few steps back
looking at the fountain and make certain the
header is sitting level.
2. Install the Shroud by carefully sliding it
behind the panel and down onto the
reservoir (L) (Fig 6.2).
Section 5: Setting the Disperser and Diffuser
Section 6: Installing the Header and Shroud