
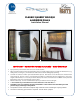
Instructions / Assembly

635 W. Michigan Street Orlando, FL 32805 · PH 407-426-7674 · Fax 407-426-7721
Page 6 of 8
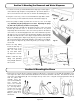
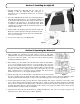
Fig 7.2
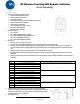
Fig 8.1
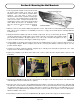
1. Carefully unwrap the LED light bar (K). Take care in
handling so that the LED strips and connections to
transformers are not disturbed. Remove the tie from the
electrical cord.
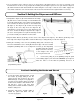
2. Place the LED light bar (K) inside the header (G) with the
LED strip facing down (Fig 7.1). It is designed to simply rest
on the header held up by the 2 tabs located on either side of
the light bar (G). The back of the light kit hangs down
covering the castellated stainless steel disperser (E). Make
certain it does not interfere with the water flow and does not
touch the disperser (E).
3. Take the light cord and plug it into the transformer (Fig 7.2).
Drape the cord through the header (G) and down the side
where you will plug it in. Tuck the exposed cord behind the
stone so it is concealed.
4. You are now ready to use your LED light bar.
1. After mounting your fountain to the wall, fill the reservoir (L) with water
(distilled water is strongly recommended). The water level must be maintained
at least 1/2” above the pump. If the water level drops below the pump,
splashing and damage may occur.
2. Before turning on your fountain for the first time make certain the flow adjustor
is not closed, having the flow valve in a closed position puts excessive
pressure on the pump and may cause it to overheat and break. The flow valve
lets you increase or decrease the amount of water flowing over the waterfall
(Fig 8.1). You will need to adjust the flow valve to the proper rate for solid
water coverage but not so fast that is causes splashing. Turn the flow valve
down if the pressure is too strong and splashing occurs.
3. Plug in the pump cord. As water begins to flow down the surface there may be
dry spots. Starting at the top guide the water with your hand or sponge over the dry areas pulling the water
streams together until the water flows evenly over the entire waterfall surface. It may take a few minutes.
4. If after turning down the flow you may still notice small splashing. This may be caused by a hard edge on the
stone surface and the water is kicking off this edge. This is easily corrected. Note where the water is splashing
from on the stone and turn off the pump. Take a small chisel or flat head screw driver and gently smooth or ease
the hard edge down where the water is jumping off. Be careful to not gouge the fountain surface. Once smooth
the water will be less likely to jump off and splash.
5. Install the Rock Tray (N) and spread Rocks (I) equally throughout the tray. Do not sit or pile any stones up
against the stone slab as this may cause minor splashing.
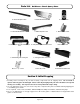
Section 7: Installing the Light Kit
Section 8: Operating the Waterfall
Fig 7.1