User Manual 10.
Contents Frame Overview ................................................1 Getting Started ..................................................3 Uploading Photos and Videos ...........................4 Key Features ....................................................13 Multiple Functions ............................................15 General Settings ..............................................15 Trouble Shooting ..............................................18 Contact Us ....................................
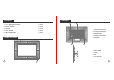
CONTENTS 1. 10.1” digital photo frame 2. AC/DC adapter 3. Bracket 4. User Manual 5. Micro USB Cable FRAME FEATURES CONTENTS 1 piece 1 piece 1 piece 1 piece 1 piece 1. Motion sensor lens 2. Power on/off button 3. Bracket hole 4. Wall mounted hole 5. Speaker 1. Micro USB 2. USB 3. DC 4.
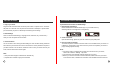
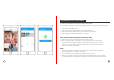
GETTING STARTED UPLOADING PHOTOS AND VIDEOS 1. Plug in your frame Upload Photos and Videos Via VPHOTO App Plug the socket in the back and connect the photo frame to a power source. The frame 1. Download the VPhoto App Please download and install the VPhoto app on your mobile device by searching VPhoto on the App Store or Google Play. will power on in seconds. You can place the frame either in landscape or portrait mode (we recommend you place it in landscape mode during the first setup). 2.
UPLOADING PHOTOS AND VIDEOS 4. Upload Photos and Videos to Your Frame After connecting the App to your frame, you can start adding photos and videos to your frame anywhere and anytime as below two ways: ① Select the photos or videos of your Albums of your phone to upload and choose the frame to send. Click the Next Step, you can write caption for each photo and choose the frame you want to send.Click the right arrow icon to confirm.
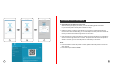
UPLOADING PHOTOS AND VIDEOS 5. Invite Your Families & Friends to Connect Your Frame Your families and friends can share their happy moments to your frame by following steps: ① ② ③ ④ Download and install the app. # # $ Get the connection code shared by you to connect to your frame. Start sending the photos and videos to your frame. Here are two ways to share you connection code: 1) Take a picture of the connection code on the frame to send.
UPLOADING PHOTOS AND VIDEOS Upload Photos and Videos Via Email You and your friends can also send photos and videos to the frame via Email. 1. Connect your Email address to the frame via two methods: ① % & ' * + ; ! inform your binding request is completed and the way to send photos and videos to the frame. ② * + *< = * > > ( For Example bd1234576789).
UPLOADING PHOTOS AND VIDEOS 2. Upload Photos and Videos to Your Frame After adding your email address to the frame, you can email photos and videos to the mailbox of the frame. Your photos and videos will be received in minutes, you can check the photo or video library on the frame. Each video clip is limited to 200MB. Upload Photos and Videos Via USB Drive/TF Card The frame can also support some external drive to add photos and videos to the frame. 1.
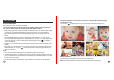
KEY FEATURES Pictures Slideshow During the slideshow, you will have more tools to customize the slideshow just by touching the screen. You can tap [ ! [ Z % [ You will find [All], [Internal Storage], [TF Card], [USB], [Folder], [Favorites] and user list; you can check all pictures of each playlist and operate in batch. \ # + ! @
MULTIPLE FUNCTIONS Music > Weather Forecast > | ^ đ and [ē ! * & [ ! ^ Clock > > ^ ^ ^ ^ Alarm > # ^ #
Set the date and time according to your preference. Set the Auto-On/Off time, as Sleep Schedule, to make the display automatically turn on and off at a specific time. Turn on this button, the frame will turn off when the room is empty for energy saving. With auto-rotate screen button on, you can place it in portrait and landscape, the < ! " Choose to be notified new message with sound or not.
5. Can I share photos and videos to the frame? Yes, you can share both photos and videos (up to 200MB) to the frame. 6. Can I cycle pictures and videos together? You could only play photos or videos separately. 7. Can this frame automatically turn on/off at a specific time? CONTACTING US For any inquiries with ( ) products, please feel free to contact us, we will respond within 24 hours. E-mail: support@gkdytech.com You can go to the Sleep setting and set the auto on/off time as you want. 8.