
Owner manual


SAM 935™ Instruction Manual 19
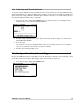
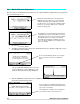
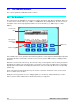
The value shown on this screen is the alarm trigger; an alarm will be generated and saved when-
ever any monitored target exceeds this value:
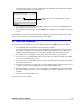
6. Use the arrow keys to move from digit to digit, and to increase or decrease the highlighted value.
Press E
NTER to save the change.
7. Press R
ETURN (F1) until you are out of the Utilities menu and back to the Surveillance monitoring
screen.
If the SAM 935 is operated in another mode (Monitor or Detail), you may want to configure other Setup
options. See Section 6.1 for more information about the other options.
3.4 Dose Rate Calibration
To perform a Dose Rate Calibration, select
Area Monitor Setup
from the Utilities menu. Press ENTER.
1. Select
Calibrate Dose Rate
from the menu and again press ENTER:
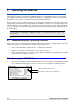
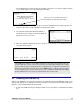
The current value will be 1.00 if no Dose Rate Calibration has been done before. At this point, you
may either press E
DIT (F3) to enter the previously determined calibration factor or CALIB (F2) to
calibrate the unit with a10 µCi Cs137 source whose calibration date and activity are known.
2. Press Calib. This screen will time out after about 10 seconds or when you press E
NTER:
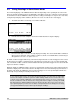
3. The next screen is a standard number input screen for the user to input the activity of the calibra-
tion source. Press E
NTER when correct:
4. The next screen is a standard Date edit screen. Key in the calibration date of the Cs137 standard.
Press E
NTER when correct:
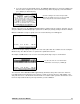
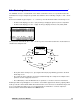
5. The next screen prompts you to place the source 20 cm away from the end of the detector. 20 cm
is equal to 7.87 inches. Press OK (F2) when ready to start the calibration run:
6. When the calibration is complete, a screen showing the new calibration factor is presented. Write
this number down for future use in case the instrument is reset and the calibration source is not
available.
7. Return to the normal operating screen.
See Section 6.1.5 for more details.
Allowable range is 0.001 to 999.999 in units of mR/hr or
mSv/hr.