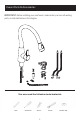
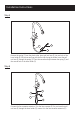
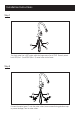
Faucet Parts & Accessories IMPORTANT: Before installing your new faucet, make certain you have all working parts, as indicated below in the diagram.
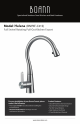
Product Information Product Dimensions 3
Installation Instructions Step 1 2” (50.8mm) The deck hole should be 1 3/8” (35mm) and the deck thickness should be no more than 2” (50.8mm). Step 2 Shank Rubber Seal Hot Cold Pull Out Hose Install the faucet through the deck mounting hole. Be sure to align the faucet in the direction desired. Please note the rubber seal is pre-attached to the faucet.
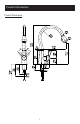
Installation Instructions Step 3 1 2 3 4 Install the plastic base (1), gasket (2) and washer (3). Make sure the plastic base is installed with the flat side facing the deck. Next, install the metal base clamp (4). Step 4 1 Use the provided screws by screwing them into the metal base clamp (1). Screw them tightly without stripping the screw heads.
Installation Instructions Step 5 1 2 3 Remove the spring (1) from the plastic tube. Insert pull out hose (2) into one hole of the hose holder (3). Attach one end cap with the flat side facing the holder. Insert the pull out hose (2) through the spring (1). Place the second end cap between the spring (1) and the second hole of the hose holder (3). Step 6 2 1 4 3 Connect the line converter extension (1) to the line converter (2).
Installation Instructions Step 7 2 1 The short water line is HOT water, while the longer water line is COLD. Securely attach both HOT (Red - 1) and COLD (Blue - 2) water hoses to the faucet. Step 8 1 1 Connect the water hoses (1) onto the water valves (we recommend using plumbers tape to prevent leakage). Turn on water valves.
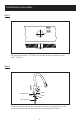
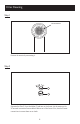
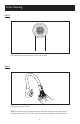
Filter Cleaning Step 1 Faucet Aerator Remove the aerator by unscrewing it. Step 2 1 2 Separate the filter (1) from the holder (2) and turn on the faucet. Let the water run for 30 seconds to ensure all excess debris flushes out of the faucet. Also, check all faucet connections to ensure there are no leaks.
Filter Cleaning Step 3 Reassemble the aerator and reattach onto faucet head. Step 4 Enjoy the use of your faucet! Note: A small amount of water may run from the spout or drip for a very short period after the faucet is shut off. This is a natural occurrence caused by long, flexible hoses.
Boann Manufacturer Warranty All Boann products are manufactured and tested with the highest quality standards and rigorous quality control process. This warranty is limited to the non-commercial use of Boann products purchased and installed in the United States and Canada.
Boann Manufacturer Warranty responsible for any default breakage, or damages caused thereby or resulting thereof, either directly or indirectly. This warranty does not apply to Products that have not been installed or operated in accordance with instructions supplied by Boann and all applicable rules, regulations, and legislation pertaining to such installations. This warranty does not apply to Commercial or Industrial applications of Boann products.