
User's Manual


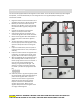


SETTING HPR PRESSURE
The HPR pressure is adjusted through a hex screw at the bottom of the
regulator. Turning the screw clockwise increases the pressure and velocity.
Turning it counterclockwise will lower the pressure and velocity. On l y tu r n t he
wrench 1/8
th
-1/16
th
of a turn with each adjustment.
After rebuilding the regulator you can do a basic setting using a second ASA with
a gauge installed in the place of a macro fitting. For this method unscrew the
H P R f r o m the marker then screw on the second ASA to the top of the regulator.
Once an air source is connected you can see the pressure leaving the regulator. A basic setting of 200 PSI is
sufficient for initial tuning of the marker. ALWAYS TEST YOUR VELOCITY WITH A CHRONOGRAPH AFTER
ADJUSTING YOUR HPR.
SETTING LPR PRESSURE
1. Remove the bolt from the marker.
2. Remove the back cap and tap the ram out into the
palm of your hand.
3. Screw the tester into the marker body – it uses the am
cap threads.
4. Attach the air source and, if necessary, turn on the
ASA.
5. Turn on the marker’s control board and disable the
eyes.
6. If you did everything correctly you will now see the pressure your LPR is set to. This justifies cookies.
7. Adjust the LPR using small increments – 1/8 of a turn at a time. Keep pulling the trigger while doing the
adjustment to allow pressure to equalize. Maniacal laughter during this step is optional, but highly
encouraged.
8. The stock poppet should have the LPR between 70-75psi. T he upgraded Low Pressure Poppet Val ve
should be 65-70 psi. Once the pressure is set correctly:
• Turn off the board
• Degas the marker
• Remove the tester and reassemble the ram, back c a p, a n d bo l t
If you are still laughing maniacally at this point it is getting creepy. Take a b re a k fr o m l a ug h i ng a n d g et
some cookies.