BRITAX RÖMER Kindersicherheit GmbH Blaubeurer Straße 71, 89077 ULM, Germany SPORT UTILITY STROLLER DUALLIE IRONMAN DUALLIE ENGLISH Owner’s Instruction Manual READ AND UNDERSTAND THESE INSTRUCTIONS COMPLETELY! IMPORTANT - KEEP THESE INSTRUCTIONS FOR FUTURE REFERENCE Before attempting to assemble or use your new stroller, read and understand these assembly and use instructions completely, as well as the warnings at the beginning and throughout this document, to ensure proper assembly and operation.
WARNINGS • If your stroller is to be used by other people who are not familiar with it (such as grandparents),always show them how the stroller is used. • Accessories which are not approved by BOB shall not be used. • This product is not suitable... - as a substitute for a bed or cot. Strollers and pushchairs may only be used for transport. - for more than two children. - for commercial use. - as a travel system in combination with other infant carriers.
WARNINGS • • • • • changing the seating position of your children. When seat is fully reclined, backward tip over is more likely. Do not exceed the maximum weight limit of 1 kg for each of the backrest pockets. Do not exceed the maximum weight limit of 4 kg for the shopping basket. Do not let your children play with this product. This seat unit is not suitable for children under 6 months.
TABLE OF CONTENTS WARNINGS Page 26 TABLE OF CONTENTS Page 28 STROLLER ANATOMY Page 29 AGE RECOMMENDATIONS Page 30 STROLLER ASSEMBLY Page 30 Unpack Stroller Page 30 Wheels Page 30 Adjust Quick Release Page 31 Rear Wheel Installation Page 31 Removing Rear Wheel Page 33 Front Wheel Secondary Retention Devices Page 33 Front Wheel Installation Page 34 Removing Front Wheel Page 35 Hand Brake Page 36 Unfold Stroller Page 37 Fold Stroller USING Stroller for jogging off-road mode Page
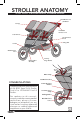
STROLLER ANATOMY SPORT UTILITY STROLLER DUALLIE, IRONMAN DUALLIE Hand Brake Lever Handlebar Canopy Handlebar Release Lever Seat Harness Shock Release Knob Swing Arm Fender Quick Release Lever Brake Caliper Assembly Low Boy Cargo Basket Wrist Strap Seat Back Pocket CONGRATULATIONS Congratulations on your purchase of the BOB Sport Utility Stroller ® ® Duallie or IRONMAN Duallie Stroller. For updates to this manual, warranty and other recent product notifications, please visit www. bobgear.
AGE RECOMMENDATIONS Your child should be at least 6 months old before riding in a BOB Duallie® stroller. For jogging/off-road stroller use, children should be at least 9 months old. This pushchair is designed for children up to 3 years or maximum 17 kg weight. FENDER INSTALLATION Before installing the front wheel, you will need to attach the fender. 1. Remove Mounting Screws Two fender mounting screws can be found already installed in the stroller frame. Remove the two fender mounting screws.
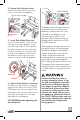
WHEELS ADJUST QUICK RELEASE Before attempting to install wheels, read and understand warnings and instructions completely. The rear wheels are correctly clamped in place by the force generated when the quick release lever is closed and the cam action pulls the axle against the dropout, securing it in place. Using your stroller with an improperly adjusted wheel quick release can allow the wheel to vibrate, wobble or become detached from the stroller.
2. Rotate Quick Release Lever Rotate the quick release lever so it curves away from the dropout. FULLY CLOSED Tension Adjusting Nut Quick Release Lever 3. Insert Rear Wheel Stub Axle Insert the rear wheel’s stub axle into the hole in the rear dropout. If the axle does not slide in easily, loosen the quick release tension adjusting nut by hand. Re-insert the axle fully into the rear dropout until the axle shoulder or snap ring on the axle comes in contact with the dropout.
If the quick release lever cannot be rotated to the FULLY CLOSED position, rotate the lever to the FULLY OPEN position and turn the tension adjusting nut a quarter turn counterclockwise. Repeat the closing process. To LOOSEN tension adjusting nut, turn counterclockwise. FULLY CLOSED FRONT WHEEL SECONDARY RETENTION DEVICES Your stroller fork utilizes secondary wheel retention devices designed to help keep the wheel from disengaging from the fork if the quick release is incorrectly adjusted and tightened.
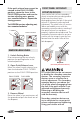
Make a periodical routine check of adequate wheel fixing and clamping. If the wheel is not fully engaged and slightly moves to the outside the wheel has to be fixated instantly. FRONT WHEEL INSTALLATION 1. Install Front Wheel Quick Release Lever Remove Tension Adjusting Nut from quick release rod and take off first spring. Slide quick release rod through front wheel axle, place spring back on quick release rod, small side toward axle, and thread tension adjusting nut back on. 3.
contacting the top of the dropouts on both sides and the wheel is centered left to right. Fork Blade FULLY CLOSED Dropouts FULLY OPEN While maintaining the wheel in this position, rotate the quick release upward and into the FULLY CLOSED position. When properly closed, the curve of the quick release will be pointing toward the wheel and parallel to the fork blade. To generate enough clamping force it is necessary to wrap your fingers around the fork blade while closing the quick release lever.
HAND BRAKE HAND BRAKE 1. Align Brake Pads If brakes are misaligned, use a 10mm wrench to loosen brake pad nuts, slide pads into correct position and tighten securely. CL OS E Brake Caliper Brake Pad Aligned With Rim 2. Adjust Cable Tension The cable tension is pre-adjusted at the factory, but the brake cable will need periodic adjustment (as the cable stretches slightly and the black cable housing compresses over time).
If you do not understand these instructions, or feel the brake is adjusted incorrectly, take the stroller to your dealer for proper adjustment. If your brake pads are worn, see your dealer for replacements. SNAP UNFOLD STROLLER Care must be taken when folding and unfolding the stroller to prevent finger entrapment or injury. 2. Rotate Handlebar Lift handlebar up and back until it “snaps” into locked and upright position.
3. Attach Seat Retention Strap Loop seat retention strap around cross tube and secure with buckle. Do not loop seat retention strap around or over brake bar. Seat retention strap must be correctly attached before loading stroller. Correctly Attached Seat Retention Strap FOLD STROLLER 1. Lock Parking Brake Set parking brake in locked position. 2. Remove Child From Seat 3. Empty Stroller Remove contents from low boy cargo basket and pockets. 4.
7. Secure Folded Stroller Use wrist strap buckle to secure stroller in folded position. Handlebar 5. Lift Red Frame Release Handle Using a short, quick tug, lift red frame release handle up. Keep tires on ground as stroller collapses toward front wheel. 8. Make It Smaller Take off the front and rear wheels to make it even smaller. See Removing Rear Wheel and Removing Front Wheel sections.
Always go jogging/off-road with the stroller seat in the fully upright position. Going jogging/off-road with the seat in reclined positions may result in a loss of stability and injury. STROLLER ADJUSTMENTS CHECK TIRE PRESSURE Plastic wheels are rated to a maximum tire inflation pressure of 2 bar. The maximum inflation pressure is embossed on the wheel next to the valve stem. Inflating tires above 2 bar can damage the wheel and/ or tire resulting in loss of control and injury.
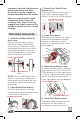
Tracking Knobs Rotate Axle 90° 7. Perform Roll Testing If the stroller still consistently pulls to the left or right when pushed straight, proceed to next step. 8. Reorient The Front Wheel Open the front wheel and front brake quick releases. Remove the front wheel and flip it around so the quick release lever is on the opposite side. Reinstall the front wheel, secure the wheel and brake quick release levers. See Removing Front Wheel and Front Wheel Installation sections. If Stroller Pulls RIGHT 1.
Position 2: HARDER LEFT Knob 3. Repeat Roll Test If stroller still pulls to the left, repeat steps 1 and 2. SELECT SHOCK SETTING 1. Remove Children From Seats 2. Set Shock Setting To Position 2 Depress shock release knob and simultaneously pull toward back of stroller, sliding knob into position 2. Knob will “snap” into place when in correct position. REPEAT on opposite side. CLICK NOTE: Every time stroller is folded, stroller shocks default SOFTER position.
To ensure the brake is set properly, attempt to roll the stroller fore and aft after setting the brake. If the stroller will not roll, the brake is set properly. 2. Place Child In Seat Slip one shoulder strap over each shoulder. Position crotch strap between legs. To release the parking brake, lift up on the red foot pedal with your foot until the brake bar springs up into the fully unlocked position.
RECLINE SEAT Set parking brake before making any seat adjustments. Hold the backrest securely while you adjust the stroller seat. 6. Tighten Lap Straps Adjust lap straps to fit snug and be comfortable. 1. Recline Seat Pull up on seat recline buckle to loosen recline straps. Seat Recline Buckle Lap Strap ATTACH WRIST STRAP The wrist strap is designed to help prevent the stroller from rolling away should you lose your grip on the stroller.
2. Retract Canopy Push canopy toward handlebar. When seat/seats is/are fully reclined, backward tip over is more likely to occur and may result in an accident or injury, as seat/seats and/or passenger may contact ground before handlebar. Always go Jogging/Off-Road with the stroller seat in the fully upright position. Going Jogging/Off-Road with the seat/seats in reclined positions may result in a loss of stability and injury.
2. Stow Window Cover Stow window cover in pocket to expose canopy straps. After installing Weather Shield, confirm vents on Weather Shield are aligned with space above seat back and all other vents are free of obstruction. C CARE AND MAINTENANCE ARN MAINTENANCE 3. Pull Canopy Straps Pull canopy straps and secure to Velcro strips on back of canopy. 4. Store Canopy Position rear canopy stay against handlebar and fold canopy flap up and over canopy, connecting Velcro strips.
STORAGE It is best to store your stroller indoors when it is not in use. This will prolong its attractive appearance. Extended exposure to the sun’s ultraviolet rays can fade and damage the fabric, tires, and plastic parts. CARGO The stroller is equipped with four small seat pockets for your children, 2 seat back pockets and a low boy cargo basket under the stroller.
improper use. WARRANTY OR NOT? Fabrics: All our fabrics meet the highest requirements in terms of colour fastness to UV radiation. However, all substances fade if they are exposed to UV radiation. This is not a material defect, but normal wear and tear for which no warranty is given. Buckle: If any problems occur on the buckle, these are often due to dirt that can be washed out. For warranty service, please contact your dealer immediately. You will be given advice and assistance.