
Installation Sheet


DO NOT OVERTIGHTEN
Once the nut is tightened, Add a second nut to insure the WingIt will never loosen.
Picture Above Shows the inside of the wall after the WingIt
has been installed.
12. Insert Grab Bar into 1-1/4" (30mm)
holes – Hold down firmly allowing the tape
to adhere to tile wall.
13. Remove the Bobrick Grab Bar, and the
front of the WingIt is visible.
Picture Above Shows the WingIt as it
would look inserted into the wall.
14. Verify the length of the nut from the
WingIt faceplate is correct (step 8) – Then
hit the WingIt firmly with a rubber ham-
mer.
Picture on Left shows the WingIt after it
is pushed through the wall. The wings are
automatically actuated as they spring out.
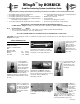
11. Attach WingIts to
Grab Bar – Picture on
Left.
15. Pull on the bolt and tighten the nut by hand.
Use a Nutdriver (screwdriver with a 7/16'' (11mm)
socket), this will insure that you do not overtighten.
When using a cordless drill make sure to set the clutch
setting to a slow speed.
When using a 7/16'' (11mm) wrench tighten only until you
feel the WingIt is secure.
9. Measure out the thickness of the
wall on the WingIt and back off the
nut accordingly. For example, picture
#8 shows a wall thickness of 3/4"
(19mm). In this example you would
back off the nut 3/4" (19mm) on the
WingIt. This will allow adequate
clearance.
10. Attach WingIt to
Grab Bar – Picture
on Left.
In the U.S.A.: BOBRICK WASHROOM EqUIPMENT, INC.
200 Commerce Drive, Clifton Park, New York 12065-1350 • Tel: (518) 877-7444 • FAX: 518-877-5029
6901 Tujunga Avenue, North Hollywood, California 91605-5882 • Tel: (818) 982-9600 • FAX: 818-503-1102
or email: customerservice@bobrick.com
In Canada: BOBRICK WASHROOM EqUIPMENT COMPANY
45 Rolark Drive, Scarborough, Ontario M1R 3B1(877) 423-8555
© 2015 by Bobrick Washroom Equipment, Inc.
Form No. 251-4 r6/30/15 Printed in U.S.A.