Operating Instructions Before Starting Software (For Panasonic Printing System PostScript3) DP-180/190/1520P/1820P/1820E/2330/3030/3530/4530/6030 Before operating this software, please read these instructions completely and keep these operating instructions for future reference. English Appendix Troubleshooting Troubleshooting Printer Section Model No.
The following trademarks and registered trademarks are used throughout this manual: Microsoft, MS-DOS, Windows and Windows NT are registered trademarks of Microsoft Corporation in the USA and other countries. i386, i486 and Pentium are trademarks of Intel Corporation. Centronics is a registered trademark of Centronics Data Computer Corporation. The USB-IF Logos are trademarks of Universal Serial Bus Implementers Forum, Inc. TrueType is a registered trademark of Apple Computer, Inc.
Table of Contents Before Starting System Requirements.................................................................................................... 5 Printer Section Installing the Printer Driver ........................................................................................... 6 Installation Procedures................................................................................... 6 Windows................................................................................................
Table of Contents Troubleshooting Troubleshooting ............................................................................................................. 144 Printing Operation Failure .............................................................................. 144 Documents Not Printing Correctly.................................................................. 145 Appendix Appendix ....................................................................................................................
Before Starting Before Starting System Requirements • Personal Computer : IBM PC/AT and compatibles (CPU Pentium II or greater) • Operating System : Windows 98*1 , Windows Me*2 , Windows NT 4.0 *3 (Service Pack 3 or later is required), Windows 2000*4, Windows XP *5 , Windows Server 2003*6 , Macintosh OS 8.6-9.2.2 (Adobe PS 8.8 or higher), OS X10, OS X10.1, OS X10.2.1, OS X10.
Printer Section Installing the Printer Driver Installation Procedures This manual provides examples of instructions for installing, configuring and using the printer driver for your version of Windows OS. To use as a USB Printer: Windows 98 Windows Me Windows NT Windows 2000 Windows XP/ Windows Server 2003 Mac 8.6/9x Mac OS X : : : : : Follow the procedures on pages 16 to 19. (Connecting with a USB Cable) Follow the procedures on pages 20 to 23.
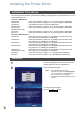
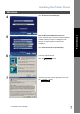
Installing the Printer Driver 4 Click Printer Driver (PostScript3). 5 Note for Windows 98/Windows Me users: If your computer does not have the LPR Port Monitor installed, please proceed to "Installing the LPR Monitor" on page 36 before continuing this installation. Printer Section Windows Click Install Printer Driver (PostScript3). 6 The setup wizard will start. 7 Read the End User License Agreement, then click Click the the Continued on the next page... Next ACCEPT button. button.
Installing the Printer Driver Windows 8 Select Local Printer, then click the 9 Select a printer port, normally LPT1 for local printers. 10 button. Click the Next button. The Select Printer Model window appears. Click the Note: 11 Browse... button. A screen will appear with Generic PostScript Printer highlighted. Do not select this printer. The Browse for Printer screen appears. Select the folder directory where the PPD files are stored.
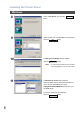
Installing the Printer Driver Windows 12 Choose your machine’s model and click the 13 Specify whether the printer will be shared with other network users. Click Shared and enter a shared name, or click Not shared. Click the Note: 14 button. Next Printer Section Next button. This screen does not appear in Windows 98/ Windows Me. Sharing information is specified during Network Settings. Printer Information screen appears. You can accept the default printer name shown or change it as you wish.
Installing the Printer Driver Windows 16 The Printer Configuration screen appears. Select Yes, to configure your printer now. 17 Click the Next Click the OK button to return to the setup wizard. Note: 18 button. For printer properties, refer to "Configuring the Printer Driver Settings". (See pages 52 - 85) Select Yes, if you want to view the ReadMe file. Click the Finish button.
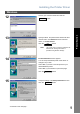
Installing the Printer Driver Mac OS 8.6/9.x 1 2 Exit from all applications, then insert the Panasonic Printing System CD into the CD-ROM drive. Note: Installation instructions A ".hqx" ".sit" ".sea" file on a Macintosh, use StuffIt Deluxe or StuffIt Expander by Aladdin Systems (http://www.aladdinsys.com/) to access the file's contents. StuffIt Expander is available as a freeware product. 3 The setup screen will be displayed.
Installing the Printer Driver Mac OS 8.6/9.x 6 A progress bar indicates that the printer driver is being installed. 7 Click the Quit button. After completing the installation of the AdobePS Printer Driver, you must copy the PostScript printer description (PPD) file into the System Folder as follows: 8 Open the following folder within your Macintosh. System Folder > Extensions > Printer Descriptions 9 Open the Mac folder within the CD-ROM.
Installing the Printer Driver 10 Select the Apple Menu, then select Chooser. 11 Click the AdobePS icon as shown in the illustration. Select your printer "Panasonic DP-xxxx" on the right. Click the 12 Create button. Confirm and/or change the Installable Options settings for your printer. Click the OK button. 13 If you close Chooser, skip to Step 15. 14 Click the If you click the OK Setup... button, go to Step 15. button. Close Chooser.
Installing the Printer Driver Mac OS X A PostScript printer driver is already provided in Mac OS X. You need to install the PostScript printer description (PPD) file into your system for printing. To manage the Account Management with the Accounting Manager software, it is essential to setup the Department Code with the PS Driver Security Utility before the Printer Driver is installed.
Installing the Printer Driver 4 Click on the Printer Model pull-down menu, and select "Panasonic DP-xxxxx PS". 5 Click the 6 Your machine is added to the Printer List. Printer Driver Mac X END Add Printer Section Mac OS X button.
Installing the Printer Driver Connecting with a USB Cable (Windows 98) To use the printer by means of a USB cable connection, install the printer driver by following the steps below. 1 Connect the printer to the PC with a USB cable. Turn the Power Switch of your machine ON. (Rear View) DP-180/190 (Right Side View) DP-1520P/1820P/1820E (Left Side View) DP-2330/3030 2 The New Hardware Found dialog box appears for a brief moment, followed by the Add New Hardware Wizard dialog box.
Installing the Printer Driver Connecting with a USB Cable (Windows 98) 3 Select Search for the best driver for your device. 4 5 Next button. Printer Section Click the Insert the CD-ROM included with the Option. Select Specify a location and type D:\English\PS\Setup\Windows\Ps_106_E\ WinUsbDrv (where "D:" is your CD-ROM drive). Click the Next button. 6 Click the Next button. 7 Click the Finish button. Continued on the next page...
Installing the Printer Driver Connecting with a USB Cable (Windows 98) 8 The New Hardware Found dialog box appears for a brief moment, followed by the Add New Hardware Wizard dialog box. Click the 9 11 18 button. Select Search for the best driver for your device. Click the 10 Next Next button. Select Specify a location and type D:\English\PS\Setup\Windows\Ps_106_E\ Windows (where "D:" is your CD-ROM drive). Click the Next button. Click the Next button.
Installing the Printer Driver Connecting with a USB Cable (Windows 98) 12 Enter the Printer name and click the 13 Click the Finish button. 14 Click the Finish button. Printer Section button.
Installing the Printer Driver Connecting with a USB Cable (Windows Me) 1 Connect the printer to the PC with a USB cable. Turn the Power Switch of your machine ON. (Rear View) DP-180/190 (Right Side View) DP-1520P/1820P/1820E (Left Side View) DP-2330/3030 2 The New Hardware Found dialog box appears for a brief moment, followed by the Add New Hardware Wizard dialog box. Select Specify the location of the driver. Click the 3 20 Next button. Insert the CD-ROM included with the Option.
Installing the Printer Driver Connecting with a USB Cable (Windows Me) 4 Click the Next button. 5 Click the Next button. 6 Click the Finish button. 7 Printer Section Select Specify a location and type D:\English\PS\Setup\Windows\Ps_106_E\ WinUsbDrv (where "D:" is your CD-ROM drive). The New Hardware Found dialog box appears for a brief moment, followed by the Add New Hardware Wizard dialog box. Select Specify the location of the driver. Click the Continued on the next page... Next button.
Installing the Printer Driver Connecting with a USB Cable (Windows Me) 8 9 22 Select Specify a location and type D:\English\PS\Setup\Windows\Ps_106_E\ Windows (where "D:" is your CD-ROM drive). Click the Next button. Click the Next button. 10 Enter the Printer name and click the 11 Click the Next button. Finish button.
Installing the Printer Driver Connecting with a USB Cable (Windows Me) Click the Finish button.
Installing the Printer Driver Connecting with a USB Cable (Windows 2000) 1 Connect the printer to the PC with a USB cable. Turn the Power Switch of your machine ON. (Rear View) DP-180/190 (Right Side View) DP-1520P/1820P/1820E (Left Side View) DP-2330/3030 2 The Found New Hardware Wizard dialog box appears. Click the 24 Next button.
Installing the Printer Driver Connecting with a USB Cable (Windows 2000) 3 Select Search for a suitable driver for my device. Next button. 4 5 Insert the CD-ROM included with the Option. 6 Type D:\English\PS\Setup\Windows\Ps_106_E\ Win2000 (where "D:" is your CD-ROM drive). Select Specify a location. Click the 7 Continued on the next page... Next button. Click the OK button. Click the Next button.
Installing the Printer Driver Connecting with a USB Cable (Windows 2000) 26 8 Click the Yes button. 9 Click the Finish button.
Installing the Printer Driver Connecting with a USB Cable (Windows XP/Windows Server 2003) 1 Connect the printer to the PC with a USB cable. Turn the Power Switch of your machine ON. (Rear View) Printer Section DP-180/190 (Right Side View) DP-1520P/1820P/1820E (Left Side View) DP-2330/3030 2 Select No, not this time and click the Next Continued on the next page... button.
Installing the Printer Driver Connecting with a USB Cable (Windows XP/Windows Server 2003) 3 The Found New Hardware Wizard dialog box appears. Select Install from a list or specific location (Advanced). Click the 4 button. Select Include this location in the search. Type D:\English\PS\Setup\Windows\Ps_106_E\ WinXP-2003 (where "D:" is your CD-ROM drive). Insert the CD-ROM included with the Option. Click the 5 Next Next button.
Installing the Printer Driver Connecting with a USB Cable (Windows XP/Windows Server 2003) Click the Continue Anyway 7 Click the Finish button. Printer Section 6 button.
Installing the Printer Driver Connecting with a USB Cable (Mac 8.6/9x) 1 Connect the printer to the PC with an USB cable. Turn the Power Switch of your machine ON. (Rear View) DP-180/190 (Right Side View) DP-1520P/1820P/1820E (Left Side View) DP-2330/3030 2 30 Extract the DP-xxxxx PS from the DP-xxxxx PS.sit in the CD-ROM and paste it onto the System Folder > Extensions.
Installing the Printer Driver Connecting with a USB Cable (Mac 8.6/9x) 3 Activate the Desktop Printer Utility on the Adobe PS Components within your Macintosh. Note: If the Desktop Printer Utility is not on the 4 Select AdobePS from With menu and select the Printer (USB) on the Create Desktop... menu. Click the 5 Click the button. button on the USB Printer Selection. Continued on the next page... 31 Printer Section Adobe PS Components, follow the steps 1 to 7 on page 11 and 12.
Installing the Printer Driver Connecting with a USB Cable (Mac 8.6/9x) 6 Select your machine and click the button. 32 7 Click the 8 A status bar indicates that the printer driver is being installed. button on the PostScript Printer Description (PPD) File.
Installing the Printer Driver Connecting with a USB Cable (Mac 8.6/9x) 9 Click the 10 Click the button. 11 Click the button. 12 A status bar indicates that the printer driver is being installed. 13 The driver creates a new desktop printer icon for your device. USB-MAC8.6/9X END NOTE Printer Section button. 1. Click the Set_Default Printer in the Printing menu when your machine is set to the default printer.
Installing the Printer Driver Connecting with a USB Cable (Mac OS X) 1 Connect the printer to the PC with an USB cable. Turn the Power Switch of your machine ON. (Rear View) DP-180/190 (Right Side View) DP-1520P/1820P/1820E (Left Side View) DP-2330/3030 2 34 Open the Printer Center and click the Add Printer…from the Printers menu.
Installing the Printer Driver Connecting with a USB Cable (Mac OS X) 1. Select USB. 2. Select your printer. 3. Select Auto Select or Panasonic_DPxxxxx.ppd from the Printer Model menu. 4. Click the 4 NOTE button. Printer Section 3 Your machine is shown on the Printer List. Close the Printer Center. USB-MAC OSX END 1. Open the Printer Center and click your machine, then select Make Default from the Printers menu when your machine is set to the default printer.
Installing the LPR (Line Printer Remote) Monitor Windows 98/Windows Me 1 2 Insert the Panasonic Printing System CD-ROM. Click on the desired language. Note: 1. If the CD-ROM does not launch automatically, double click the My Computer icon on the Desktop or on the Start menu, then double click the CD-ROM icon. 2. The language screen differ depending on the models. 36 3 Click the 4 Click Printer Driver (Post Script3). 5 Click Install LPR Monitor. Next button.
Installing the LPR (Line Printer Remote) Monitor Windows 98/Windows Me 6 The M-LPR Port Monitor Setup dialog box appears. 7 The required files are copied. 8 The setup program copies the necessary files onto the hard disk of your PC. When the setup process is completed, a screen is displayed prompting you to restart your computer. It is recommended that you restart your computer now so that the LPR Monitor can be started. OK button. Printer Section Click the Click the 9 Finish button.
Installing the LPR (Line Printer Remote) Monitor Windows 98/Windows Me 10 The printer properties dialog box appears. The following step registers the LPR Port for network printing. Before proceeding, ensure that the printer is installed, connected to the network, turned ON and is operating properly. 11 38 Select the Details tab and click the button. Add Port...
Installing the LPR (Line Printer Remote) Monitor Windows 98/Windows Me The Add Port dialog box appears. Click the Other radio button, select M-LPR Port Monitor from the "Click the type of port you want to add:" list, and click the 13 button. OK The M-LPR Port Monitor dialog box appears. Type the IP Address of the machine in the Host name or IP address: text box and the queue name (e.g. New105) in the Queue name: text box. Click the OK button.
Installing the LPR (Line Printer Remote) Monitor Windows NT 4.0 Logon using an account with administrator rights. 1 Click the Start button, select Settings, and click Control Panel. The Control Panel window appears. Double-click on the Network applet. The Network dialog box appears. 2 Click on the Services tab. Verify whether the LPR Service is already installed. (Indicated by Microsoft TCP/IP Printing shown in the Network Services list.) If it is already installed, skip to Step 7.
Installing the LPR (Line Printer Remote) Monitor Windows NT 4.0 3 Click the Add... button to display the Select Network Service dialog box, and select Microsoft TCP/IP Printing. 4 OK button. Printer Section Click the The Windows NT Setup dialog box appears. Insert the Windows NT 4.0 CD-ROM, and type D:\i386 (where "D:" is your CD-ROM drive). Click the 5 Continue button. After the files have been copied into the Hard Drive of your PC, the display returns to the Network dialog box.
Installing the LPR (Line Printer Remote) Monitor Windows NT 4.0 7 After your computer has rebooted, log on with an account with Administrator Priviledges, click the Start button, select Settings, and then click Printers. The Printers folder appears. Right-click on the desired printer icon and select Properties from the pop-up menu. 8 The following step registers the LPR Port for network printing.
Installing the LPR (Line Printer Remote) Monitor Windows NT 4.0 10 The Add LPR compatible printer dialog box appears. Enter the IP Address of the printer in the upper text field, and "lp" for the print queue name in the lower text field. OK button. (Please wait while the wizard verifies the IP Address and connectivity to the network. 11 The Printer Ports dialog box appears. Click the 12 Close button. Select the printer port and click the OK button.
Installing the LPR (Line Printer Remote) Monitor Windows 2000/Windows XP/Windows Server 2003 Logon using an account with administrator rights. 1 Open the Printers (Windows XP/Windows Sever 2003: Printers and Faxes) folder. . Right-click on the desired printer icon and select Properties from the pop-up menu. The printer properties dialog box appears. 44 2 Select the Ports Tab and click the 3 Select Standard TCP/IP Port and click the Add Port... button. New Port... button.
Installing the LPR (Line Printer Remote) Monitor Windows 2000/Windows XP/Windows Server 2003 4 Click the 5 Enter the IP Address and the Port Name and click Next Note: 6 button. button. The Port Name is automatically entered together with the IP Address. You may need to change it as required. Select Custom and click the Settings... button. or Select Standard and click the Next button. Then, go to step 9. Continued on the next page..
Installing the LPR (Line Printer Remote) Monitor Windows 2000/Windows XP/Windows Server 2003 7 1. In the Protocol section, select LPR. 2. In the LPR Settings section, enter the Queue Name (e.g. LPR1) and select the LPR Byte Counting Enabled. 3. Click the 46 OK 8 Click the Next 9 Click the Finish button. button. button.
Installing the LPR (Line Printer Remote) Monitor 10 Click the Close button. 11 Click the Apply button. Click the OK button. The printer properties dialog box closes and you have now configured the printer as a network printer.
Installing the PS Driver Security Utility Windows If you wish to use the Mailbox and Secure Mailbox functions, it is essential that you setup the Utility settings first. To control the Charge Management with the Accounting Management application, it is essential that you setup the Utility settings first. 1 2 Exit from all applications, then insert the Panasonic Printing System CD into the CD-ROM drive. Select the desired language. Note: 1.
Installing the PS Driver Security Utility Windows Select Install PS Driver Security Utility. 6 Click the Next button. 7 Click the Yes button if you want to place a 8 The required files are copied. Printer Section 5 shortcut to PS Security Utility on your desktop. Continued on the next page...
Installing the PS Driver Security Utility Windows 9 Click the Finish button. The PS Driver Security Utility folder has been added to the Program menu, and the installation has now completed.
Installing the PS Driver Security Utility Mac OS 1 Exit from all applications, then insert the Panasonic Printing System CD into the CD-ROM drive. Double-click the CD icon on the desktop. For OS 8.6/9.x: Browse to folder English > PS > Setup > Mac > Tool For OS X : Browse to folder English > PS > Setup > Mac > Tool > OSX_only Copy PsSecure.sit to your hard disk. Note: 2 If PsSecure.sit does not automatically decompress, install a suitable decompression utility. Please decompress PsSecure.
Configuring the Printer Driver Settings Windows 98/Windows Me To change the printer settings, open the printer properties by performing the following steps. 1 2 Click the Start button, select Settings, and then click Printers. Right-click the desired printer icon in the Printers folder, and select Properties in the popup menu. The printer properties dialog box appears.
Configuring the Printer Driver Settings Windows 98/Windows Me Printer Section General Tab 1. Comment Enter comments regarding the properties, if any. If another user sets up this printer on his or her computer when sharing the printer, the comment specified here will also appear on that computer. However, the comment displayed for an existing user will remain unchanged even if the comment is modified later. 2. Separator page This feature is not available on these machines. 3.
Configuring the Printer Driver Settings Windows 98/Windows Me Details Tab 1. Print to the following port Displays either the port where the printer is connected or the path to the network printer. To change the printing destination, either select the printing destination port from the list or enter the network path here. 2. / Delete Port... button Adds/deletes new port or new network path. Add Port... 3. Print using the following driver Displays the type of the printer driver.
Configuring the Printer Driver Settings Windows 98/Windows Me 7. Timeout settings - Transmission retry (For LPT Port only) Specify the amount of time (in seconds) allowed to elapse before the printer is ready for printing. If the printer is not ready for printing within this duration, an error message will be displayed. Increase this value if a timeout error occurs when printing a large document. 8. button Specify the method of sending (spool) documents from the program to the printer. 9.
Configuring the Printer Driver Settings Windows 98/Windows Me Sharing Tab 1. Not Shared/Shared As Select whether to display or share this printer with other computers. 2. Share Name Specify the name of the shared printer. The displayed name can be used as it is or a new name may be entered. The name specified here will be displayed when other users view information about the printer on the network. 3.
Configuring the Printer Driver Settings Windows 98/Windows Me Printer Section Paper Tab 1. Paper size Select a document size. 2. Orientation Select the print orientation (Portrait/Landscape). 3. Paper control Controls printer outputs and groups pages. Select Collate if you wish each set of multiple copies collated when you print them. Otherwise, each page is printed in individual groups. The Duplex menu specifies whether and how the printer should print the document on both sides of the paper. 4.
Configuring the Printer Driver Settings Windows 98/Windows Me 58 7. button About... Displays version and copyright information for this printer driver. 8. button Displays the help window for this printer driver. 9. button Sets the values of all options in the current dialog box to the default values specified in the PPD file.
Configuring the Printer Driver Settings Windows 98/Windows Me Printer Section Graphics Tab 1. Resolution Select the resolution you want for printing (300/600/1200dpi Enhanced). 2. Special Prints a negative image and/or mirror image of your document. Click these options to view an example. 3. Paper handling Specify the layout pattern for printing multiple documents on a single sheet of paper and whether page borders are used. Select these options to view an example. 4.
Configuring the Printer Driver Settings Windows 98/Windows Me Fonts Tab 1. Substitute printer fonts for TrueType fonts when applicable Tells the driver to determine which PostScript fonts to substitute for TrueType fonts. Instead of sending all TrueType fonts to your printer, this option substitutes a PostScript printer font for the common TrueType fonts used in your document.
Configuring the Printer Driver Settings Windows 98/Windows Me Printer Section Device Options Tab (DP-180/190/1520P/1820P/1820E) 1. Available printer memory Specifies the amount of available printer memory. The driver uses this information when performing printing tasks, such as sending fonts from the computer to the printer. 2. Available font cache Displays the amount of font cache memory now available to Type 32 fonts (bitmap font format).
Configuring the Printer Driver Settings Windows 98/Windows Me • Toner Save (For DP-180/190 only) This setting saves toner by reducing its consumption, and it is cost-effective when printing many draft copies prior to the final document. • Secure Select Mailbox or Secure Mailbox if storing the print data into the mailbox of the machine. Available if the optional Hard Disk Drive Unit (DA-HD18/HD19/HD30/HD60) is installed. Note: 1.
Configuring the Printer Driver Settings Windows 98/Windows Me Device Options Tab (DP-2330/3030/3530/4530/6030) Printer Section 1. Available printer memory Specifies the amount of available printer memory. The driver uses this information when performing printing tasks, such as sending fonts from the computer to the printer. 2. Available font cache Displays the amount of font cache memory now available to Type 32 fonts (bitmap font format).
Configuring the Printer Driver Settings Windows 98/Windows Me • Staple Select the staple position. Available if the optional Finisher (DA-FS300, FS330, FS355, FS600 or FS605) is installed. Available for up to 30 sheets (Letter/A4).
Configuring the Printer Driver Settings Windows 98/Windows Me Printer Section • Punch (For DP-3530/4530/6030 only) Select the punch position. Available if the optional Punch Unit is installed. • Secure Select the Mailbox or Secure Mailbox if storing the print data into the mailbox of the machine. Available if the optional Hard Disk Drive Unit (DA-HD30/HD60) is installed. Note: The PS Driver Security Utility must be installed in order to use the user ID password.
Configuring the Printer Driver Settings Windows 98/Windows Me 4. Installable options Specifies the following printer settings: • Number of Paper Trays Select the number of available paper trays if optional Paper Feed Module(s) are installed. • Large Capacity Paper Tray (LCT) (For DP-3530/4530/6030 only) Select if a Large Capacity Paper Tray is installed. • Finisher (For DP-3530/4530/6030 only) Select the type of Finisher if a Finisher is installed.
Configuring the Printer Driver Settings Windows 98/Windows Me Printer Section PostScript Tab 1. PostScript output format Specifies the format for the PostScript files. Generally, use PostScript (Optimize For Speed) for printing a document. 2. PostScript header Specifies whether to send header information to the printer each time you print a document; this is an advanced feature to be used only if you have experience working with headers. 3.
Configuring the Printer Driver Settings Windows 98/Windows Me Watermarks Tab 1. Select a watermark Lists and displays the available watermark definitions. Click an entry on the list to delete or edit it. The list. New button displays the New Watermark dialog box, that allows you add a new watermark to the 2. Print watermark Specifies the watermark form and style. 3. 68 button Displays the Help window for this printer driver.
Configuring the Printer Driver Settings Windows NT 4.0 (Administrator) Printer Section General Tab 1. Comment Enter comments regarding the properties, if any. If another user sets up this printer on his or her computer when sharing the printer, the comment specified here will also appear on that computer. However, the comment displayed for an existing user will remain unchanged even if the comment is modified later. 2. Location Specifies the printer location. 3. Driver Displays the printer driver type.
Configuring the Printer Driver Settings Windows NT 4.0 (Administrator) Ports Tab 1. Print to the following port(s) Displays a list of available ports for printing (Port), their status (Description) and printers that are connected to these ports (Printer). 2. / button Delete Port Add Port... Adds/deletes a new port or a new network path. 3. Configure Port... button Configures the selected port. In case of a parallel port, Transmission Retry should be specified. 4.
Configuring the Printer Driver Settings Windows NT 4.0 (Administrator) Printer Section Scheduling Tab 1. Available Schedules when the printer is available for operation. Specify operating hours when From-To is selected. 2. Priority Sets printing priority. The slider allows the priority to be adjusted from 1 through 99. 3. Spool print documents... / Print directly to the printer Specify how documents should be sent from an application to the printer. 4.
Configuring the Printer Driver Settings Windows NT 4.0 (Administrator) Sharing Tab 1. Not Shared/Shared Select whether to display or share this printer with other computers. 2. Share Name Specify the name of the shared printer. The displayed name can be used as is or a new name may be entered. The name specified here will be displayed when other users view information about the printer on the network. 3. Alternate Drivers (The PS Printer Driver is not available in this menu.
Configuring the Printer Driver Settings Windows NT 4.0 (Administrator) Printer Section Security Tab 1. button Set printer access privileges. 2. button Displays the users who have used this printer and how they used it. 3. button Set the ownership of the printer. Permissions Auditing Ownership NOTE 1. In order to utilize these features, first you need to select Audit... from User Manager's Policies and enable File and Object Access in the Audit Policy dialog box.
Configuring the Printer Driver Settings Windows NT 4.0 (Administrator) Device Settings Tab (DP-180/190/1520P/1820P/1820E) Specifies the following printer settings and options: • Form To Tray Assignment Specifies the paper size of each available tray. • Font Substitutuion Table Specifies which PostScript fonts to substitute for TrueType fonts. Instead of sending all TrueType fonts to your printer, this option substitutes a PostScript printer font for the common TrueType fonts used in your document.
Configuring the Printer Driver Settings Windows NT 4.0 (Administrator) • Wait timeout Specifies the maximum number of seconds that the printer will wait for the computer to send data before canceling the job. A value of zero means that the job is never canceled. If your printer is shared, do not specify a value of zero. • Minimum Font Size to Download as Outline Specifies the minimum font size to download as Outline. Increasing this value can speed up printing.
Configuring the Printer Driver Settings Windows NT 4.0 (Administrator) Device Settings Tab (DP-2330/3030/3530/4530/6030) Specifies the following printer settings and options: • Form To Tray Assignment Specifies the paper size of each available tray. • Font Substitutuion Table Specifies which PostScript fonts to substitute for TrueType fonts. Instead of sending all TrueType fonts to your printer, this option substitutes a PostScript printer font for the common TrueType fonts used in your document.
Configuring the Printer Driver Settings Windows NT 4.0 (Administrator) • Wait timeout Specifies the maximum number of seconds that the printer will wait for the computer to send data before canceling the job. A value of zero means that the job is never canceled. If your printer is shared, do not specify a value of zero. • Minimum Font Size to Download as Outline Specifies the minimum font size to download as Outline. Increasing this value can speed up printing.
Configuring the Printer Driver Settings Windows 2000/Windows XP/Windows Server 2003 (Administrator) General Tab 1. Printer Name Name of the printer specified upon installation is displayed. 2. Location Specifies the printer location. 3. Comment Enter comments to the properties, if any. If another user sets up this printer on his or her computer when sharing the printer, the comment specified here will also appear on that computer.
Configuring the Printer Driver Settings Windows 2000/Windows XP/Windows Server 2003 (Administrator) Sharing Tab Printer Section 1. Not shared/Shared as (Do not share this printer/Share this printer) Select whether to display or share this printer with other computers. For sharing a printer, specify the share name of a printer to be shared. A name specified here appears when other users view the printer information on a network. 2.
Configuring the Printer Driver Settings Windows 2000/Windows XP/Windows Server 2003 (Administrator) Ports Tab 1. Print to the following port(s) Displays a list of available ports for printing (Port), their status (Description) and printers that are connected to these ports (Printer). 2. / button Delete Port Adds/deletes a new port or a new network path. 3. button Configures the selected port. In case of a parallel port, Transmission Retry should be specified. Add Port... Configure Port... 4.
Configuring the Printer Driver Settings Windows 2000/Windows XP/Windows Server 2003 (Administrator) Printer Section Advanced Tab 1. Always available/Available from Schedules when the printer is available for operation. Specify operating hours when From-To is selected. 2. Priority Sets printing priority. The slider allows the priority to be adjusted from 1 through 99. 3. Driver Displays the printer driver type.
Configuring the Printer Driver Settings Windows 2000/Windows XP/Windows Server 2003 (Administrator) 10. Printing Defaults... button Specifies standard (default) values for the properties (print settings) specifiable for each user. If a local printer is shared, the settings here are used as printing defaults for other users. Refer to "Printing from Windows Applications" for detailed settings. (See page 113) 82 11. button Print Processor...
Configuring the Printer Driver Settings Windows 2000/Windows XP/Windows Server 2003 (Administrator) Printer Section Security Tab Displays a list of users and groups to whom printer access is assigned to. A list of standard permissions for each group or user is displayed. Check the checkboxes for permitting or prohibiting access. Gray checkbox indicates the permission inheritance. 1. / Remove button Add or delete a user or group from the list. 2. button Specify access to a printer, audit, and owner.
Configuring the Printer Driver Settings Windows 2000/Windows XP/Windows Server 2003 (Administrator) Device Settings Tab (DP-180/190/1520P/1820P/1820E) Specifies the following printer settings and options: • Form To Tray Assignment Specifies the paper size of each available tray. • Font Substitutuion Table Specifies which PostScript fonts to substitute for TrueType fonts.
Configuring the Printer Driver Settings Windows 2000/Windows XP/Windows Server 2003 (Administrator) • Wait timeout Specifies the maximum number of seconds that the printer will wait for the computer to send data before canceling the job. A value of zero means that the job is never canceled. If your printer is shared, do not specify a value of zero. • Minimum Font Size to Download as Outline Specifies the minimum font size to download as Outline. Increasing this value can speed up printing.
Configuring the Printer Driver Settings Windows 2000/Windows XP/Windows Server 2003 (Administrator) Device Settings Tab (DP-2330/3030/3530/4530/6030) Specifies the following printer settings and options: • Form To Tray Assignment Specifies the paper size of each available tray. • Font Substitutuion Table Specifies which PostScript fonts to substitute for TrueType fonts.
Configuring the Printer Driver Settings Windows 2000/Windows XP/Windows Server 2003 (Administrator) • Wait timeout Specifies the maximum number of seconds that the printer will wait for the computer to send data before canceling the job. A value of zero means that the job is never canceled. If your printer is shared, do not specify a value of zero. • Minimum Font Size to Download as Outline Specifies the minimum font size to download as Outline. Increasing this value can speed up printing.
Configuring the Printer Driver Settings (Macintosh) To change the printer settings, open the printer properties by performing the following steps. 1 2 Select the File menu > Print. Select the Panasonic printer. In print window, you will see a number of titles in the pop-up menu. The appropriate operating system shows different titles in the window. Mac OS 8.6/9.x: Click the Save Settings button to save the current settings for the default values.
Configuring the Printer Driver Settings (Macintosh) Mac OS 8.6/9.x Printer Section General Menu 1. Copies Specify the number of copies to be printed. 2. Pages Specify the range of printing pages. 3. Paper Source Specify where the paper you want to use is located in the device. If you choose Auto Select, the printer driver will automatically select an appropriate tray according to the Paper Size selected. Note: 1. If no paper size match is found, the printer drive will select the Tray 1. (DP-180/190) 2.
Configuring the Printer Driver Settings (Macintosh) Mac OS 8.6/9.x Background Printing Menu 1. Print in Select Foreground or Background printing. Foreground printing ties-up your Macintosh while it prints the job. Printing is completed more quickly, and the document takes less disk space when preparing for printing. The Background selection causes your Macintosh to write your job to the hard disk before printing it.
Configuring the Printer Driver Settings (Macintosh) Mac OS 8.6/9.x Printer Section Cover Page Menu NOTE: This feature is not available on these machines.
Configuring the Printer Driver Settings (Macintosh) Mac OS 8.6/9.x Color Matching Menu NOTE: This feature is not available on these machines.
Configuring the Printer Driver Settings (Macintosh) Mac OS 8.6/9.x Printer Section Layout Menu 1. Pages per sheet Specify the number for printing multiple documents on a single sheet of paper. Select this option to view an example. 2. Layout direction Specify the layout direction for printing multiple documents on a single sheet of paper. Select this option to view an example. 3. Border Specify whether page borders are used when printing multiple documents on a single sheet of paper. 4.
Configuring the Printer Driver Settings (Macintosh) Mac OS 8.6/9.x Error Handling Menu 1. If there is a PostScript error Specifies how to send PostScript error information with every document that you print. 2. If the paper tray is out of paper (For DP-2330/3030/3530/4530/6030 only) Specify what will happen if paper runs out in the chosen paper tray.
Configuring the Printer Driver Settings (Macintosh) Mac OS 8.6/9.x Printer Section PostScript Settings Menu 1. Format Specifies the format for the PostScript files. Generally, use PostScript job for printing a document. 2. PostScript Level Specifies the level for the PostScript. 3. Data Format Specifies the data format to the printer. Only use this option if you are an advanced user with experience working with PostScript. 4. Font Inclusion Specifies the font inclusion for the PostScript print.
Configuring the Printer Driver Settings (Macintosh) Mac OS 8.6/9.x Output Menu 1. Collation This feature is not available on these machines. 2. Finisher Bin/Output Tray (For DP-2330/3030/3530/4530/6030 only) Specifies which output bin to use for your printed document. Some printer models have more than one output bin you can use for sorting your documents. 3. Sort Select whether to Stack or Sort when printing multiple copies.
Configuring the Printer Driver Settings (Macintosh) Mac OS 8.6/9.x Printer Section Quality Menu 1. Media Type Select the paper type. Note: If selecting other than Plain Paper for the Media Type, the printer driver will select the Bypass Tray if Auto Select Tray was selected as the Paper source within the General menu (see page 89). 2. Resolution Select the resolution you want for printing (300/600/1200dpi Enhanced). 3.
Configuring the Printer Driver Settings (Macintosh) Mac OS 8.6/9.x Printer Specific Options Menu 1. Secure Select Mailbox or Secure Mailbox if storing the print data into the mailbox of the machine. Available if the optional Hard Disk Drive Unit (DA-HD18/HD19/HD30/HD60) is installed. Note: 1. The PS Driver Security Utility must be installed in order to use the user ID password. 2. DA-HD18: For DP1520P/1820P/1820E; DA-HD19: For DP-180/190; DA-HD30: For DP-2330/3030; DA-HD60: For DP-3530/4530/6030. 2.
Configuring the Printer Driver Settings (Macintosh) Mac OS X Printer Section With Macintosh OS X, such functions as Staple, Punch and Secure cannot be used because Print Center > Printers > Configure Printer... is grayed out and Device Options cannot be selected. For details, refer to Support on Apple’s website (http://www.info.apple.com/).
Configuring the Printer Driver Settings (Macintosh) Mac OS X Copies & Pages Menu 1. Copies Specify the number of copies to be printed. 2. Collated This feature is not available on these machines. 3. Pages Specify the range of printing pages.
Configuring the Printer Driver Settings (Macintosh) Mac OS X Layout Menu Printer Section 1. Pages per Sheet Specify the number for printing multiple documents on a single sheet of paper. Select this option to view an example. 2. Layout Direction Specify the layout direction for printing multiple documents on a single sheet of paper. Select this option to view an example. 3.
Configuring the Printer Driver Settings (Macintosh) Mac OS X Duplex Menu (For Mac OS X10, X10.1, X10.2.1 only) Print on Both Sides / Binding Specify whether and how the printer should print the document on both sides of the paper.
Configuring the Printer Driver Settings (Macintosh) Mac OS X Printer Section Output Options Menu Save as File / Format Select to save your document as a file. You can specify the file format. The document will not be send to the printer.
Configuring the Printer Driver Settings (Macintosh) Mac OS X Paper Feed Menu All pages from / First page from Specify where the paper you want to use is located in the device. If you choose Auto Select, the printer driver will automatically select an appropriate tray according to the Paper Size selected. Note: 104 1. If no paper size match is found, the printer drive will select the Tray 1. (DP-180/190) 2. If no paper size match is found, the printer drive will select the Bypass Tray.
Configuring the Printer Driver Settings (Macintosh) Mac OS X Printer Section Error Handling Menu 1. PostScript Errors Specifies how to send PostScript error information with every document that you print. 2. Tray Switching For uninterrupted printing, this setting allows automatic tray switching to another tray with same paper size, when the paper runs out of selected tray.
Configuring the Printer Driver Settings (Macintosh) Mac OS X Printer Features Menu Output Tab: 1. Finisher Bin/Output Tray (For DP-2330/3030/3530/4530/6030 only) Specifies which output bin to use for your printed document. Some printer models have more than one output bin you can use for sorting your documents. 2. Sort Select whether to Stack or Sort when printing multiple copies. Note: Paper must be loaded into the machine in both directions when using the Rotate Stack and Rotate Sort functions (i.e.
Configuring the Printer Driver Settings (Macintosh) Mac OS X Printer Section Quality Tab: 3 1. Media Type Select the paper type. Note: If selecting other than Plain Paper for the Media Type, the printer driver will select the Bypass Tray if Auto Select was selected as the All pages from: within the Paper Feed Menu (see page 104). 2. Resolution Select the resolution you want for printing (300/600/1200dpi Enhanced). 3.
Configuring the Printer Driver Settings (Macintosh) Mac OS X Miscellaneous Tab: (DP-180/190/1520P/1820P/1820E) 1. Secure Select Mailbox or Secure Mailbox if storing the print data into the mailbox of the machine. Available if the optional Hard Disk Drive Unit (DA-HD18/HD19/HD30/HD60) is installed. Note: 1. The PS Driver Security Utility must be installed in order to use the user ID password. 2.
Configuring the Printer Driver Settings (Macintosh) Mac OS X Miscellaneous Tab: (DP-2330/3030/3530/4530/6030) Printer Section 1. Secure Select the Mailbox or Secure Mailbox if storing the print data into the mailbox of the machine. Available if the optional Hard Disk Drive Unit (DA-HD30/HD60) is installed. Note: The PS Driver Security Utility must be installed in order to use the user ID password. 2.
Configuring the Printer Driver Settings (Macintosh) Mac OS X Summary Menu Functions and settings of the printer are displayed.
Configuring the PS Driver Security Utility Windows 98/Me/NT/2000/XP/Server 2003 PS Printer Driver PS Driver Security Utility from Programs on the Start Printer Section Selecting Panasonic menu. • Printer Select the printer. • User ID Input the user ID (8-digit number maximum) to be used for Mailbox or Secure Mailbox. • Password Input the password (4-digit number) to be used for Secure Mailbox. • Department Code Input the department code (8-digit number maximum) to be used by the accounting manager.
Configuring the PS Driver Security Utility Mac OS 8.6/9.x/X If you are using Mac OS X, use the PS Driver Security Utility to change the setting before adding the printer. If you have already added the printer, delete it, change the setting using the PS Driver Security Utility, then add the printer. • Printer Select the printer. • User ID Input the user ID (8-digit number maximum) to be used for Mailbox or Secure Mailbox. • Password Input the password (4-digit number) to be used for Secure Mailbox.
Printing from Windows Applications If the printer driver is installed properly and a printer is selected as the default printer in the printer setup, printing can be accomplished from any Windows application with simple operations. • Printing After selecting the page range to be printed and the number of copies, click the printing. OK button to start While documents are being printed, a printer icon appears in the System Tray near the clock on the bottom right hand corner of the screen.
Printing from Windows Applications Windows 98/Windows Me Paper Tab Refer to "Configuring the Printer Driver Settings" for details on settings (see page 57).
Printing from Windows Applications Windows NT 4.0 (User) Printer Section Page Setup Tab 1. Paper Size Select a document size. 2. Paper Source Specify where the paper you want to use is located in the device. If you choose Automatically Select, the printer driver will automatically select an appropriate tray according to the Paper Size selected. Note: 1. If no paper size match is found, the printer drive will select the Tray 1. (DP-180/190) 2.
Printing from Windows Applications Windows NT 4.0 (User) Advanced Tab 1. Printer Features • Sort Select whether to Stack or Sort when printing multiple copies. Note: Paper must be loaded into the machine in both directions when using the Rotate Stack and Rotate Sort functions (i.e. Letter and Letter-R, A4 and A4-R). • Toner Save (For DP-180/190 only) This setting saves toner by reducing its consumption, and it is cost-effective when printing many draft copies prior to the final document.
Printing from Windows Applications Windows 2000/Windows XP/Windows Server 2003 (User) Printer Section Layout Tab 1. Orientation Select the print orientation (Portrait/Landscape/Rotated). (The Rotated output is the same as that of Landscape.) 2. Print on Both Sides (Duplex) (DP-180/190/1820E/2330/3030/3530/4530/6030 only) Specify whether and how the printer should print the document on both sides of the paper. 3. Page Order Specify page order when printing multiple pages. 4.
Printing from Windows Applications Windows 2000/Windows XP/Windows Server 2003 (User) Paper/Quality Tab (DP-180/190/1520P/1820P/1820E) 1. Paper Source Specify where the paper you want to use is located in the device. If you choose Automatically Select, the printer driver will automatically select an appropriate tray according to the Paper Size selected. Note: 1. If no paper size match is found, the printer drive will select the Tray 1. (DP-180/190) 2.
Printing from Windows Applications Windows 2000/Windows XP/Windows Server 2003 (User) button Advanced... Specifies advanced printer settings and options. Printer Section 3. • Sort Select whether to Stack or Sort when printing multiple copies. Note: Paper must be loaded into the machine in both directions when using the Rotate Stack and Rotate Sort functions (i.e. Letter and Letter-R, A4 and A4-R).
Printing from Windows Applications Windows 2000/Windows XP/Windows Server 2003 (User) Paper/Quality Tab (DP-2330/3030/3530/4530/6030) 1. Paper Source Specify where the paper you want to use is located in the device. If you choose Automatically Select, the printer driver will automatically select an appropriate tray according to the Paper Size selected. 2. Media Select the paper type. 3. 120 button Advanced... Specifies advanced printer settings and options.
Printing from Windows Applications Windows 2000/Windows XP/Windows Server 2003 (User) • Output Tray Specifies which output bin to use for your printed document. Some printer models have more than one output bin you can use for sorting your documents. • Sort Select whether to Stack or Sort when printing multiple copies. • Secure Select the Mailbox or Secure Mailbox if storing the print data into the mailbox of the machine.
Printing from Macintosh Applications If the printer driver is installed properly, printing can be accomplished from any Macintosh application with simple operations. Printing from most Macintosh applications, select File menu > Print, the Print dialog box appears. • Printing After selecting the page range to be printed and the number of copies, click the printing. Print button to start • Printer Settings In print window, you will see a number of titles in the pop-up menu.
Printing on Network For sharing a printer by connecting two computers via a crossover cable or using a hub, a connection among computers must be established. Establishing a connection among computers can be verified by displaying the connected computers in Network Neighborhood on the desktop. The settings for printer sharing are specified by performing the following steps: Printer server (PC connected to a printer) Install the printer driver on the computer to be connected to the machine.
Printing on Network Remote (PC that uses another computer's printer) 1 2 3 4 Click the Start button, select Settings, and then click Printers. Double-click Add Printer in the printers folder. Add Printer Wizard appears. Click the Next button. Select Network Printer. Click the Next button. Specify the other computer's printer by entering the network path. Then, complete the installation following instructions of the Add Printer Wizard.
Internet Printing Protocol (IPP) Printing General Description Prints documents from a machine located in a remote area via the Internet without its access being blocked by a proxy server. This feature is only available on the Windows 2000, Windows XP or Windows Server 2003.
Internet Printing Protocol (IPP) Printing Setting the IPP Printing 3 Select Connect to a printer on the Internet or on your Intranet and type the IP address of the remote machine and /printer in the URL window. (e.g. http://10.74.229.176/printer) Click the 4 Next button. Click the OK button if this message is shown. If not, skip to Step 11. 5 1. Insert the CD-ROM included with the Option. 6 The Install From Disk dialogue box appears. 2. Click the Click the Have Disk...
Internet Printing Protocol (IPP) Printing Setting the IPP Printing 8 Click the 9 Select the remote machine. 10 OK button. button. Printer Section Click the OK Click the Yes button. Click the Continue Anyway Continued on the next page... button.
Internet Printing Protocol (IPP) Printing Setting the IPP Printing 11 Select Yes if you would like to change your current 12 Click the default printer and click the Finish Next button. button. The IPP Printer Driver has been installed, and the Printer icon has been added to the Printer folder.
IPX-SPX Setup Wizard If you wish to use your machine as a printer on the NetWare environment, install the set-up utility fist using the Custom installation menu for the Panasonic Document Management System. Compatible Models • DP-2330/3030 with IPX/SPX Printer Module (DA-GC601, PC301, MC301) • DP-3530/4530/6030 with IPX/SPX Printer Module (DA-GC601, PC602, MC602) Note: DA-GC601 is not available in the USA and Canada. 1 The machine(s) that are available on the NetWare environment are shown on the list.
IPX-SPX Setup Wizard 4a Set the Tree, Context, Print server name, Printer server password and Print port name for the NDS Printer Server and click the Next button. Note: Logon to the NetWare using an account with administrator rights. Enter the Print queue name and click the Next button. Enter the Queue volume and click the Next 130 button.
IPX-SPX Setup Wizard 4b Set the File server, Print server name and Print server password for the Bindery print server and click the Next button. Note: Logon to the NetWare using an account Printer Section with administrator rights. Enter the Print queue and click the Next 4c button. Set the Printer port name for the Remote printer and click the 5 Next button. The settings are shown on the list. Click the Continued on the next page...
IPX-SPX Setup Wizard 132 6 Click the 7 Click the OK button to apply the settings. Finish button.
Specifications Available Paper Type and Paper Size DP-1520P/1820P/1820E Plain Paper Transparency Label Envelope Paper Size Print from Paper Tray Print from Sheet Bypass Print from Optional Paper Trays Print by 2-Sided Print Mode Ledger Yes Yes Yes Yes Letter Yes Yes Yes Yes Legal Yes Yes Yes Yes Invoice Yes Yes Yes Yes FLS1 Yes Yes Yes Yes FLS2 Yes Yes Yes Yes A3 Yes Yes Yes Yes B4 Yes Yes Yes Yes A4 Yes Yes Yes Yes B5 Yes Yes Yes Yes A5 Yes Yes
Specifications Available Paper Type and Paper Size DP-180/190 Paper Type Plain Paper Thick Paper Cotton Paper Transparency Label Envelope Paper Size Print from Print from 2nd Sheet Bypass Paper Tray (Optional) Print by 2-Sided Print Mode Letter Yes Yes Yes Yes Legal Yes Yes Yes Yes Invoice No Yes No No FLS1 No Yes No No FLS2 No Yes No No A4 Yes Yes Yes Yes B5 Yes *1 Yes Yes *1 Yes *1 A5 Yes *1 Yes No No Letter No Yes No No Legal No Yes No No Invoi
Specifications Available Paper Type and Paper Size DP-2330/3030 Plain Paper Thick Paper Transparency Label Paper Size Print from Paper Tray Print from Sheet Bypass Print from Optional Paper Trays Print with 2-Sided Print Mode Ledger Yes Yes Yes Yes Letter Yes Yes Yes Yes Legal Yes Yes Yes Yes Invoice Yes Yes Yes Yes FLS1 Yes Yes Yes Yes FLS2 Yes Yes Yes Yes A3 Yes Yes Yes Yes B4 Yes Yes Yes Yes A4 Yes Yes Yes Yes B5 Yes Yes Yes Yes A5 Yes Yes Yes
Specifications Available Paper Type and Paper Size DP-3530/4530/6030 Paper Type Plain Paper Thick Paper Transparency Label 136 Paper Size Print from Paper Tray Print from Sheet Bypass Print from Optional Paper Trays Print with 2-Sided Print Mode Ledger No Yes Yes Yes Letter Yes Yes Yes Yes Legal No Yes Yes Yes Invoice No Yes Yes Yes FLS1 No Yes Yes Yes FLS2 No Yes Yes Yes A3 No Yes Yes Yes B4 No Yes Yes Yes A4 Yes Yes Yes Yes B5 No Yes Yes Yes A5
Specifications Available Paper Weight and Capacity DP-1520P/1820P/1820E Print from Paper Tray Print from Sheet Bypass Print from Optional Paper Trays Print with 2-Sided Print Mode 16 –24 lb (60 – 90 g/m2 ) 15 –34 lb (55 – 133 g/m2 ) 16 –24 lb (60 – 90 g/m2 ) 17 –24 lb (64 – 90 g/m2) Paper Weights Plain Paper Paper Capacity Plain Paper 20 lb (75 g/m2) 550 sheets 50 sheets 550 sheets 550 sheets Transparency No 10 sheets No No Label No 10 sheets No No Envelope No 5 sheets No No P
Specifications Available Paper Weight and Capacity DP-2330/3030 Paper Type Paper Weights Paper Capacity Print from Paper Tray Print from Sheet Bypass Print from Optional Paper Trays Print with 2-Sided Print Mode Plain Paper 16 –24 lbs. (60 – 90 g/m2) 15 –24 lbs. (55 – 90 g/m2) 16 –24 lbs. (60 – 90 g/m2 ) 17 –24 lbs. (64 – 90 g/m2 ) Thick Paper No 15 –34 lbs.
Specifications Transparencies and Labels You may also print on high quality labels and transparencies that are made specifically for Laser printers. We recommend using the following types.
Specifications Envelopes (For DP-180/190/1520P/1820P/1820E) It is recommended that you purchase only high quality envelopes with diagonal seams as shown below. High quality envelopes have the following characteristics: • A thin, sharply creased leading edge. • Paper weight of 24 lb (90 g/m2). • Flat, free of curls, wrinkles, nicks, etc. It is not recommended that you use envelopes with any of the following characteristics (using these may result in paper jams or print quality problems).
Specifications Envelopes (For DP-180/190/1520P/1820P/1820E) Figure 1 Figure 2 Always test a sample of the envelopes you are thinking of buying. Confirm that the envelope performs acceptably. For best printing results • Avoid printing in high humidity. High humidity may cause the envelope to curl and pick up excess toner. High humidity may also cause the envelope to seal. • Envelope storage is very important.
Specifications Loading the Envelopes (For DP-180/190/1520P/1820P/1820E) DP-1520P/1820P/1820E Flap Printing side down DP-180/190 Flap Flap Printing side up Printing side up (International C5opening on the shorter edge) 142
Specifications Printing Speed DP-1520P : DP-180 : DP-1820P/1820E : DP-190 : DP-2330 : DP-3030 : DP-3530 : DP-4530 : DP-6030 : 15 sheets/minute (A4/Letter size plain paper, simplex printing) 18 sheets/minute (A4 size plain paper, simplex printing) 18 sheets/minute (A4/Letter size plain paper, simplex printing) 19 sheets/minute (A4/Letter size plain paper, simplex printing) 23 sheets/minute (A4 size plain paper, simplex printing) 30 sheets/minute (A4 size plain paper, simplex printing) 35
Troubleshooting Troubleshooting Printing Operation Failure If the printing operation fails, check the following items first: • The connection cable (Parallel Printer Cable or Ethernet LAN Cable) is properly connected. • Power of the device is turned ON. • Paper is loaded properly in the device. • An error message is not displayed on the device. The above points can be verified by printing a test page.
Troubleshooting Documents Not Printing Correctly Problem Possible Cause / Solution(s) Characters are not printed in the correct positions or the • Check and specify the paper size and orientation characters near the edges of the page are missing. settings in the printer driver to coincide with the application. • The characters are outside the printing area of the machine. • Check whether the selected font is installed on the PC. Printing stops in the middle of the run.
Appendix Appendix Printing Area When printing to the device, there is a 0.2 inches (5.0 mm) non-printable margin on all 4 sides. Top 0.2 (5.0) 0.2 (5.0) 0.2 (5.0) 0.2 (5.
Appendix Font Table Symbol Set 1 Albertus ‡ 2 Albertus Italic ‡ 3 Albertus Light ‡ 4 AntiqueOlive Bold § 5 AntiqueOlive Compact § 6 AntiqueOlive Itallic § 7 AntiqueOlive Roman § 8 Apple Chancery ¤ 9 Arial ‡ 10 Arial Bold ‡ 11 Arial Bold Italic ‡ 12 Arial Italic ‡ 13 ITC AvantGarde Gothic Book ° 14 ITC AvantGarde Gothic Book Oblique ° 15 ITC AvantGarde Gothic Demi ° 16 ITC AvantGarde Demi Oblique ° 17 Bodoni 18 Bodoni Bold 19 Bodoni Bold Italic 20 Bodoni Italic 21 Bo
Appendix Font Table No.
Appendix Font Table Symbol Set 82 Letter Gothic Bold 83 Letter Gothic Bold Slanted 84 Letter Gothic Slanted 85 ITC Lubalin Graph Book ° 86 ITC Lubalin Graph Book Oblique ° 87 ITC Lubalin Graph Demi ° 88 ITC Lubalin Graph Demi Oblique ° 89 Marigold ° 90 ITC Mona Lisa Recut ° 91 Monaco ¤ 92 New Century Schoolbook Bold † 93 New Century Schoolbook Bold Italic † 94 New Century Schoolbook Italic † 95 New Century Schoolbook Roman † 96 NewYork ¤ 97 Optima † 98 Optima Bold † 99 Op
Appendix Font Table No.
Printer Section memo 151
USA Only WARRANTY PANASONIC DIGITAL DOCUMENT COMPANY MAKES NO WARRANTIES, GUARANTEES OR REPRESENTATIONS, EXPRESSED OR IMPLIED, TO THE CUSTOMER WITH RESPECT TO THIS PANASONIC MACHINE, INCLUDING BUT NOT LIMITED TO, ANY IMPLIED WARRANTY OF MERCHANTABILITY OR FITNESS FOR A PARTICULAR PURPOSE.