F1-ACE Digital Set -Top Box for Free-To-Air User's manual Remote Control Unit 1~2 Specification 3~4 Support & Copyright 5 Safety 6 STB Connections 7~11 Reference 11 Guide of Functions 12~16 Guide of Main Menu 17~33 Motorised System 34~37 Trouble Shooting Guide 38~39 Menu Tree 40
Remote Control Unit 1.Remote Control Unit (RCU) i Information key Displays the programme information box on the screen and is also used as the RED key in the menus. Soundtrack key Selects the soundtrack list for the current service and is also used as the GREEN key in the menus. Subtitle key Selects the subtitle language list for the current service and is also used as the YELLOW key in the menus. UHF UHF key Sets the UHF menu and is used as the BLUE key in the menus.
Remote Control Unit Standby key Switches between Operation and Standby mode. TV/SAT This key is not available for F1-ACE. 0 ~ 9 Numeric key Used to select the service and enter the channel information and PIN Code. TV/Radio key Receiver Switches: TV/ Radio receive mode Mute key Used to enable or disable the audio. EXIT V+ / V- Returns to the previous menu and screen. Volume Up/Down key Used to increase or decrease the volume.
Specification 2. STB’S Specification The concept OSD is for On-Screen-Display ; means that Menu displays on the Screen of TV. Tuner & Channel Input Connector Frequency Range Input Impedance Signal Level IF Frequency IF Band width LNB Power & Polarisation 22 KHz Tone DiSEqC Control Demodulation Input Symbol Rate FEC Decoder : : : : : : F-type, IEC 169-24, Female 950 MHz to 2150 MHz 75Ω unbalanced -25 to -65dBm 480 MHz 36 MHz : Vertical : +13.
Specification A/V & Data In/Out VIDEO AUDIO R/L RS232C : RCA/Cinch Video Output(CVBS) : Cinch volume and Mute Control (Resolution : 20bit DAC, max 2 Vrms) : Transfer rate 115,200 bps 9 pin D-sub Type RF-Modulator RF-Connector Frequency Output Channel TV Standard Preset Channel Test Pattern : 75 , IEC 169-2, Male/Female : 470MHz to 860MHz : CH21-69 or CH 28-69 or CH13-62 for the Remodulator : PAL B/G/I selectable by Menu : CH36(or TBD).
Support & Copyright First and foremost, our knowledge of the set-top box marketplace along with technical expertise differentiates HUMAX. Moreover, we maintain very close working relationships with our customers. We take a highly disciplined engineering approach to product design, manufacture, testing, acceptance, and to technical and maintenance support.
Safety This STB has been manufactured to satisfy the international safety standards. Please read the following recommended safety precautions carefully. MAINS SUPPLY : 190 ~ 250V AC 50/60Hz. OVERLOADING : Do not overload wall outlets, extension cords or adapters as this can result in fire or electrical shock. LIQUIDS : Keep liquids away from the STB. CLEANING : Disconnect the STB from the wall socket before cleaning it.
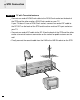
STB Connection There are several ways of connecting the STB to your existing Audio/TV system. We recommend using one of the following set-up for best results: Set-up 1 TV only Connect one end of RCA/Cinch cable to the RCA/Cinch socket on the back of the STB and the other end to a RCA/Cinch socket on your TV. If your TV doesn’t have a RCA/Cinch socket, connect one end of RF cable to the RF OUT on the back of the STB and the other end to a RF input socket on your TV.
STB Connection Set-up 2 With Hi Fi System Connect an RCA/Cinch stereo cable from the AUDIO L, R sockets on the back of the STB to the LINE, AUX, SPARE OR EXTRA input sockets on your Hi Fi System.
STB Connection Set-up 3 TV with Terrestrial antenna Connect one end of RCA/Cinch cable to the RCA/Cinch socket on the back of the STB and the other end to a RCA/Cinch socket on your TV. If your TV doesn’t have a RCA/Cinch socket, connect one end of RF cable to the RF OUT on the back of the STB and the other end to a RF input socket on your TV. Connect one end of RF cable to the RF IN on the back of the STB and the other end to a terrestrial antenna connection or the socket for public antenna on the wall.
STB Connection Set-up 4 TV with Motorised System (DiSEqC 1.2) Connect one end of RCA/Cinch cable to the RCA/Cinch socket on the back of the STB and the other end to a RCA/Cinch socket on your TV. If your TV doesn’t have a RCA/Cinch socket, connect one end of RF cable to the RF OUT on the back of the STB and the other end to a RF input socket on your TV. Connect one end of your coaxial cable to the LNB IN connector on the STB and the other end to the REC or Receiver connector on the DiSEqC 1.2 motor.
Reference Set-up 5 TV with Motorised System and Positioner Connect one end of RCA/Cinch cable to the RCA/Cinch socket on the back of the STB and the other end to a RCA/Cinch socket on your TV. If your TV doesn’t have a RCA/Cinch socket, connect one end of RF cable to the RF OUT on the back of the STB and the other end to a RF input socket on your TV. Connect the coaxial cable from the LNB of your motorised system to the LNB IN socket on the STB. Connect the motor cables to your positioner.
Guide of Functions LED of STB The message of the LEDs(Lighting-Emitting Diode) on the STB is explained as below. Upgrade via Satellite and Personal Computer To maintain the STB up-to-date, it will be possible to upgrade the software of the STB via satellite and personal computer. New versions of the software may include new or improved functions for the current one. If you want to download and upgrade the software via satellite, first of all tune your signal to ASTRA Satellite.
Guide of Functions Information Box (I-Plate) I-Plate displays when the i key is pressed or when the service is changed. It shows the service part and event part. When you move to another service, the I-Plate should be displayed automatically. The time the I-Plate is displayed on screen is controlled in the Other Setting menu.
Guide of Functions Service Change To change the service, enter the number by using the 0 ~ 9 keys. It is also possible to change the service by using the P+/ P- keys, / keys, Recall, Service list or EPG mode. To switch between the video and audio service, press the key. To select the previously viewed service list, press the RCL key in the normal A/V playback mode. Volume Control To control the volume, press the / keys.
Guide of Functions Subtitle The display of the subtitle are tramitted from the EBU teletext specification and DVB Bitmap. Press the key to bring up the subtitle language list for the current service. Use the / keys to select the desired language. Then press the OK key to select the highlighted language, the subtitles will now be displayed. To cancel the subtitle mode, press the key or EXIT key again.
Guide of Functions In the advanced Service List, it is possible to list All or Favourite service list by using the colour keys as follows: - Service List All i (red) key (green) key - Favourite A. Service All The / keys moves the highlight bar to the previous or next service, using the / keys moves the higlight bar forwards or backwards by 10 services. Select the desired service by using the / / / keys. Press the OK key to view the selected service.
Guide of Main Menu Main Menu The contents of main menu are as follows: move the cursor open the sub menu go to the selected menu exit from the menu screen 1. TV GUIDE page 18~19 page 19 page 19 ~ 33 page 33 It shows the programme information and the timer programming process of the service. Select the TV Guide mode by pressing the EPG key in the Video/Audio playback mode. 2.
Guide of Main Menu 1. TV GUIDE You can set the reservation and view the programme (event name) for each service in the TV Guide mode. To access this mode press the EPG key or select the TV Guide in the Main Menu. Change between the TV Guide and Radio Guide by pressing the key. In the TV guide mode, you can select between four different modes. i (red) key - Shows Now or Next programmes for the day. (green) key - Shows programme list for one week. (yellow) key - Shows the Reserved programme List.
Guide of Main Menu TV GUIDE-Quick mode. This mode shows in the A/V playback mode. The red line represents the current time and shows the programme progress status using a Black/White progress bar. The time range of the bar is made up from the past one hour and the next two hours. 2. PARENTAL CONTROL In the Parental Control Menu, you can set the censorship classification or change the PIN code. Enter the PIN Code 0 0 0 0 .
Guide of Main Menu A. Language Setting Menu Language You can select the desired language on the language list box by using the / / / keys. Select the language to be used for On Screen Display (OSD) like the menu and banner. You can choose the language from a selection of Czech, Danish, English, French, German, Hungarian, Italian, Portuguese, Spanish, Turkish and more. When transmitting the broadcasting information like event, the selected menu language is applied first.
Guide of Main Menu B. Time Setting Current time To set the current time, input the offset value by using the standardized information of current service area. The time setting will be used as the standardised time for the I-Plate, TV Guide and Wake-up / Sleep timer.
Guide of Main Menu D. UHF Tuning Channel Sets the channel to display the audio and video signal on your TV. If you select channel 36 at this menu, the satellite service will be displayed at channel 36 on your TV. PAL Standard Sets the type of PAL of your TV. This STB supports PAL I/B/G/D/K among PAL Standards. Offset Is for fine tuning of UHF. move the cursor select your preference return to the previous menu exit from the menu screen E.
Guide of Main Menu Move 1. You can move the service to wanted position using the (green) key. 2. The icon( ) will be marked in front of the service number. 3. Select new position with the / / / keys. 4. Press the OK key. 5. If you want to return to the original position, press the EXIT key. Lock move the cursor previous or next page delete the selected service move the desired service lock the selected service skip the wanted service change the service name 1.
Guide of Main Menu Organise Favourite TV Services This mode serves to add and delete services to and from the favourite group. To add services into Favourites, locate the cursor to the desired service and press the OK key. The function of the colour keys is the same as Organise All Services, except for the following differences. When you delete a service in the Favourites window, the service is excluded from the favourite group and the service is still stored in Services window.
Guide of Main Menu C. Organise Networks You can edit the service by using the unit of network. In the above mentioned picture, the network names are displayed on the left side and the TV/Radio services con tained within the highlighted network are displayed on the right side. When the number of TV/Radio services for the network is too many to be displayed in the window, then move the cursor to the right window using the key and move to the next list by using the / and P+/P- keys.
Guide of Main Menu Satellite Name Selects the satellite name that corresponds to the value of the Antenna Alternative. 1. Press the / keys to display the Satellite List box. 2. Select the wanted satellite name. 3. If the desired satellite name is not in the list then select User Defined. 4. The keyboard will appear and you can input the satellite name directly.
Guide of Main Menu Motorized System It is used to set the DiSEqC 1.2 motor by Eutelsat specification. If you wish to use this system, please refer to page 34 for instructions. Service Search OSD If you press the EXIT key during the search, service search stops and the searching menu appears. When you find all the services the following picture appears. Before saving it, you can select the service you want to delete. Found services OSD The picture above shows services that are found after manual search.
Guide of Main Menu B. Manual Search After setting the search parameters like frequency, symbol rate etc., you can find the services manually in the transponder you have selected. Antenna Alternative Select the target antenna for manual search. This antenna alternative number is already set in Antenna Setting menu. Antenna alternative 16 is for SMATV. SMATV Search In case that several generations use Antenna and LNB in common, as the frequency range of signal is input to IRD is down as much as LNB L.O.
Guide of Main Menu Polarisation Select the polarisation of the transponder you want to find. (Horizontal/ Vertical/ Auto.) In horizontal case, 18V and in vertical case, 13V are output through LNB line. Symbol Rate Inputs the symbol rate of the transponder you want to find. FEC (Forward Error Correction) Select the FEC of the transponder you want to find. You can select the value of 1/2, 2/3, 3/4, 5/6, 7/8 or Auto. Network Search You can select Yes or No.
Guide of Main Menu Advanced... Performs a manual search with the ability to enter PID(Video/Audio/PCR) values. This mode is necessary when the signal you search for a signal. The setting of the sub items is the same as Manual Search. Video PID/ Audio PID/ PCR PID You can set the PID to search the service. It is possible that you input PID by decimal or hexadecimal system. You can select this mode with the / keys. You can input a decimal PID value by using the 0 ~ 9 keys on the RCU.
Guide of Main Menu C. Automatic Search When you enter the Satellite Name that is set in Antenna Setting menu, search all of the selected satellite without inputting the extra frequency. move the cursor select the searching parameters and type input the symbol rate directly start the Automatic search return to the previous menu exit from the menu screen Antenna Alternative Select the target antenna for automatic service search.
Guide of Main Menu Automatic Skip Option to search only Free-To-Air services. The above picture tries to search with varying frequency, symbol rate and FEC etc. Note: But, the user should select the satellite name in Antenna Setting menu and when the user inputs the satellite name separately, you should select the Detail mode. Press the OK key anywhere to start automatic search. The picture during searching is as follows. The right picture tries to search with varying frequency, symbol rate and FEC etc.
Guide of Main Menu C. STB Upgrade You can download and upgrade the software of this STB through ASTRA satellite when the software of new version is released. During downloading don’t turn off the STB. In case of power off turn on the STB and the downloading process will be continued. 3-5 Default Setting When you press the OK key at the screen as blow, the data of system setting will be changed into the default values and some free-to-air services will be stored in replacement of all services found.
Motorised System DiSEqC 1.2 User Instructions If you have a DiSEqC 1.2 motorised system, then you can take advantage of the DiSEqC 1.2 functions available. The following instruction describes how to use the DiSEqC 1.2 functions to store the positions of the satellites and to search for the channels(STAB Rotor Sat motor recommended). 1. Satellite Setting Menu Options When DiSEqC Motorised System is Enabled in the Antenna Setting, a new menu is available for configuring the motor.
Motorised System 3. Initial Satellite Position Search This is required when you first set your receiver up to use DiSEqC 1.2, and sets the positions of all preprogrammed satellites. 1. Make sure your motor is installed correctly with the calibrations adjusted for the region you are situated. (Please consult the user manual for your motor.) 2. Make sure your receiver is set up to use DiSEqC 1.2. (see section 2 above). 3.
Motorised System 10. Use the Signal and Strength Quality bar at the bottom of the screen to judge the best position of the dish. 11. Use the / keys to stop the motor when required. 12. When you have the best position of the dish go to the Motor Control option and using the / keys select Store and press the OK key. The position of the satellite should now be stored. 13. If you do not store this position, it will be lost when you exit the menu. 14. Repeat the process for each satellite if required. 5.
Motorised System 7. Automatic Search It is possible to use automatic search for Astra and/or Hotbird using the DiSEqC 1.2 motorised system. 1. Ensure that the positions for Astra and/or Hotbird are correct. (see Section 3 and 4 above) 2. In the Main Menu, select the option channel searching and press the OK key. 3. In the Channel Searching menu, select automatic search and press the OK key. 4. When you search new services, please refer to C.Automatic Search of 31page. 5.
Trouble Shooting Guide Problem Solution About STB Does not display any message on the front panel or STB has no power. Check the main power cable and check that it is plugged into a suitable power outlet. Check whether STB is in Standby mode. No Picture Ensure that the STB is switched on (see above). Check the video output port (VIDEO or RF OUT) is firmly connected to the TV or VCR. Check that you have selected the correct channel or Video Output on your TV. Check the brightness level of the TV.
Trouble Shooting Guide Problem Solution Service Search "No Signal" in manual search Check the "Signal Strength" and the "Signal Quality" in the Signal Status menu. Check the LNB - replace LNB if necessary. Check the cable from the LNB. Check the position of the dish - relign dish if necessary. DiSEqC 1.0 Check that you have connected the LNBs to the correct connections on the switch. Check that you have set the correct settings in the Antenna Setting menu. DiSEqC 1.
40
HRACE.