® O W N E R ’ S M A N U A L
Wa r n i n g , # " . / 6 * " 6 % ' / " # G ! ! % / X [ X J R c X e N S S I c X h X i I N O N K M T I R J I K T _ I M I M N K P K Y O I L f M P ` # & ! ' " # " ' 4 0 K I R P * " - & " - ' ( - ( " / ( ! ( * : * ( # ' . $ ( 9 % / / ) ; # ( " I b I N K R ( M * " / 5 " : # " .
Ta b l e o f C o n t e n t s
I m p o r t a n t k l m o
n l p l q
s
r s r s q t s
u m v l s r w w
x
o o q n y t
z u S a fe t y n { w |
n { } n ~
B e fo r e Û Ü ë Ý Þ ô æ â á ß è Þ à å á õ ò è â ë ê è ã Þ á á ê Þ è ä ö Þ å ÷ â Ü é ñ ä è Û æ æ Ü Ý Ü ó á ç ë è ê õ Ý Þ ç é à ú è ê á Ü ë â õ è ì ê û í Ý ä ë à Û é î ë á ê â ì ç ä ï å â ð ë ç ñ æ è ë Û Ü ã è á è æ ç å õ ã ê ä â Ü Yo u á ò ç ë â æ ó ë æ ë ô ê è é â è ä å ç å á Ý â õ ä å ë # $ % & ' ( ) * + + , ' * # á ê ê ã ê á å ó ë Ü Ý æ Ý ç ë
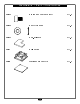
H a r d wa r e / Pa r t Part# _ ` a b Size c a d e _ e f k g p h f ` b i o j ` k j Description a k _ L i s t b ` b l i b a f ` m h j n b g n o n e p k _ f b a g p p n h n b a i f q q q j Quantity f b a d b d p h i r p h b n e f a
H a r d wa r e s t u v w s t u v w s t u v w s t u v s t u v x
y z y z x { x { }
Pa r t | y /
~ ~ x }
s y ~ s
~
I l l u s t r at i o n
s
z z x x
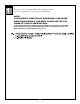
STEP 1 Be careful to assemble all components in the sequence they are presented. NOTE: THIS PRODUCT COMES FULLY ASSEMBLED. PLEASE USE DIRECTIONS BELOW IF YOU NEED TO REPLACE THE TOP FRAME OF YOUR PLYOMETRIC BOX. Finger tighten all hardware FIRST in this step. DO NOT wrench tighten until the END. Some components may be pre-assembled. Nylon lock nuts will not fully screw onto bolts, they must be wrench tighten to fully go on.
STEP 1 ¡ ¢ £ ¤ ¥ ¦ £ § ¦ ¨ ¤ ¡ ¥ ¦ ©
N o t e s
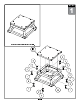
E x p l o d e d V i e w
® www.bodysolid.com Copyright 2009. Body-Solid. All rights reserved. Body-Solid reserves the right to change design and specifications when we feel it will improve the product. Body-Solid machines maintain several patented and patent pending features and designs. All rights reserved on all design patents and utility patents.