® GDR10 Table of Contents " .
B e fo r e Yo u B e g i n Retain this Owner’s Manual for future reference! To maximize your use of the equipment please study this Owner’s Manual thoroughly. Please retain this manual for future reference or parts information. Thank you for purchasing the GDR10. Obtaining Service Please use this Owner’s Manual to make sure that all Unpacking the Equipment parts have been included in your shipment.
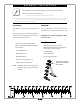
A s s e m b l y I n s t r u c t i o n s Assembly of the GDR10 takes professional installers about ½ hour to complete. Professional installers are highly recommended! If this is the first time you have assembled this type of equipment, plan on significantly more time. However, if you acquire the appropriate tools, obtain assistance, and follow the assembly steps sequentially, the process will take time, but is fairly easy.
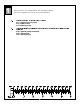
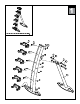
STEP 1 Be careful to assemble all components in the sequence they are presented.
STEP 1 [ \ ] ^ _ ` a ] b ` c d _ e f g ` ` _ h \ i _ j g k j l ] h e i _ d _ p j m q r s t u u v n o
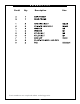
H a r d wa r e Part# Qty L i s t Description Part numbers are required when ordering parts.
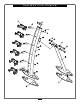
E x p l o d e d V i e w D i a g r am
GDR10 please write your serial number in the boxes below S/N # - - - - ® www.bodysolid.com 2010. Body-Solid. All rights reserved. Body-Solid reserves the right to change design and specifications when we feel it will improve the product. c Copyright Body-Solid machines maintain several patented and patent pending features and designs. All rights reserved on all design patents and utility patents.