BE-6115X-H 2 IN 1 MAGNETIC ELLIPTICAL STRIDER www.body--sculpture.
INDEX ………………… 1 Exploded-View Assembly Drawing ……………….... 2 Important Safety Information Parts List …………….………………………………… 3 Assembly Instruction …..……………………………… 5 Exercise Instructions …………………………………… 9 Exercise Computer Exercise Notes ……….………………………… 11 ……….
Important Safety Information Please keep this manual in a safe place for easy reference. 1. It is important to read this entire manual before assembling and using the equipment. Safe and effective use can only be achieved if the equipment is assembled, maintained and used properly. It is your responsibility to ensure that all users of the equipment are informed of all warnings and precautions. 2.
EXPLODED-VIEW ASSEMBLY DRAWING 2
3
PARTS PART NO. DESCRIPTION LIST QTY PART NO. DESCRIPTION QTY 1. Main Frame 1 29. Washer (Ø28x Ø 8 x 0.3 ) 2 2. Rear Stabilizer 1 30. Carriage Bolt (M8 x 40) 4 3. Rear End Cap 2 31. Connecting Shaft 1 4. Front Stabilizer 1 32. Allen Key Bolt ( M8 x15) 4 5. End Cap 2 33. Upper Wire 1 6. Domed Nut (M8) 8 34. Lower Wire 1 7. Curved Washer ( Ø8) 12 35. Upper Cable 1 8. Bolt (M8 x 60) 4 36. Lower Cable 1 9. Spring Washer (1/2”) 2 37. Front Post 1 10.
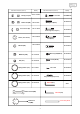
Quantity Parts Name & Actual size (Scale 1:1) Saf ety nut (1/2") NO.10.11X1PC Domed nut (M8) NO.6 X 8PCS Curved washer (Ø8) Quantity Parts Name & Actual size (Scale 1:1) Hex head bolt NO.56X4PCS NO.30X4PCS Carriage bolt (M8*40) NO.7 X 12PCS NO.14X4PCS Pedal hinge bolt (L+R)(1/2") Washer (Ø 28* Ø 8*δ3) NO.29 X 2PCS Washer (Ø8) NO.48 X 2PCS NO.8X4PCS Bolt (M8*60) NO.47X4PCS Bolt (M7*25) Washer (3/8") NO.17 X 4PCS Nut (3/8") NO.16 X 4PCS Spring washer (1/2") NO.
ASSEMBLY INSTRUCTIONS 6 STEP 1 Attach the two stabilizers (2) & (4) to the main frame (1) using four sets of domed nuts (6), washers (7) and M8 X 60 bolts (8). STEP2 Take the Front Post (37) and join the Upper Sensor Wire (34) with Lower Sensor Wire (33). Then connect the bottom of the upper Tension Cable (36) to the Lower Tension Hook (37) (shown in Fig.1). Attach the Front Post (37) using four sets of M8x15mm Key Head Bolt (32), Curved Washers (7). Fig.
STEP 3 Attach the two Pedal (18) & (19) to the Pedal Tubing (21) & (20) using Hex Head Bolt (56), 3/8” washers (17), 3/8” Spring Washer (15) and 3/8” Nut (16). STEP 4 Fixing the left and right pedal assembly and to the Front Post (37) with Wavy Washer (22), Spring washer (29), washer (28) and Fixing Bolt (27).
STEP 5 Fit the Front Handlebar (45) to the Front Post clamp as shown, fix with four sets of washer (48) and Bolt (47). STEP 6 Slide the Right Fixed Handlebar (26) and Left Fixed Handlebar (25) into the Right Handlebar (23) and Left Handlebar (24), and then fix with four sets of Screws (30), Curved Washer (7), Spring Washer (28), and Domed Nut (6). STEP 7 Fix the Seat (55) to the Seat Post (51) using three Washers (54) and three Safety Nut (53), which are located under the seat.
STEP 8 Insert the Seat Post (51) into the frame and line up the holes. Secure the seat in position with the Adjustment Knob (50). The correct height for the seat can be adjusted after the bike is fully assembled. 51 50 z To adjust the seat height, slacken the spring knob on the vertical post stem on the main frame and pull back the knob. Position the vertical seat post for the desired height so that holes are aligned, then release the knob and retighten it.
EXERCISE INSTRUCTIONS Using your ELLIPTICAL STRIDER will provide you with several benefits. It will improve your physical fitness, tone your muscles and, in conjunction with a calorie-controlled diet, help you lose weight. 1.The Warm Up Phase This stage helps get the blood flowing around the body and the muscles working properly. It will also reduce the risk of cramp and muscle injury. It is advisable to do a few stretching exercises as shown below.
TENSION CONTROLL Turn the tension knob by clockwise to increase the resistance. To des-crease the resistance, turn the knob by anticlockwise.
EXERCISE COMPUTER ST-8300-7 FUNCTION BUTTON MODE: Press to select functions, and hold on for 4 seconds to have a total reset. FUNCTIONS SCAN: Automatically scan through each function w/a period of 6 seconds. TIME: Accumulates total working time up to 99.59. SPEED: Accumulates the current speed up to 999.9 Km/H or Ml/H. The values will stay on the monitor constantly. DISTANCE: Accumulates total working distance up to 99.99 Km or Ml from zero.
MAINTENANCE 1. Before using the bike, always make sure all bolts/nuts are fully tightened. 2. A spent battery is hazardous waste, please dispose of it correctly, and do not throw it in the trash. 3. When eventually you want to scrap the machine, you should remove the batteries from the computer, and dispose separately as hazardous waste.
EXERCISE NOTES Use this space to record your own exercise routine results.
COPYRIGHT ©2005 BY BODY SCULPTURE INTERNATIONAL EUROPE LTD ALL RIGHTS RESERVED. UNAUTHORIZED DUPLICATION IS A VIOLATION OF LAW.