Magnetic Bike BODY WORX Model No: AENERGISER Retain this owner’s manual for future reference Read and follow all instructions in this owner’s manual Version A 1
EXPLODE DRAWING -02-
PARTS LIST AND TOOLS -03-
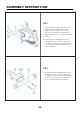
ASSEMBLY INSTRUCTION STEP 1 1. Prepare a clean area. Take the main frame bike with all parts out of the carton and put them on such area. Check the parts with the parts list to make sure there’s no missing part in the carton. 2. Install the front stabilizer (42) with 2 carriage bolts (30), washers (35) and nuts (33) by using the hand tools. Make sure the transportation wheels are in correct direction. STEP 2 1.
ASSEMBLY INSTRUCTION STEP 3 1. Assemble the base tube (34) to the main frame with 5 screws (36) and 1 flat washer (25) and 4 wave washers (35). STEP 4 1. Assemble the straps onto the pedals as the sketches. Adjust the ideal length of the straps according to your size of feet. 2. Install the left pedal (23L) to the left crank arm and screw the right pedal (23R) onto the right crank arm (Set the pedal bolts counter-clock wise).
ASSEMBLY INSTRUCTION STEP 5 1. Release 4 Allen bolts (36) and wave washers (35) which are pre-assembled on the main frame (37). 2. Install the handlebar post (01) onto the main frame (37). Turn the Tension Control Knob back and forward to make sure it is smoothly moving. If not, re-assemble the tension control cables (52, 55). Follow the instruction below to assemble the tension cable. 3. Assemble the cables (53, 54) of the exercise computer between the main frame and the handlebar post. 4.
ASSEMBLY INSTRUCTION STEP 6 1. Install the handlebar (03) onto the bracket of the handlebar post (01). Make sure the pulse cable is outside the top of the handlebar post with the computer bracket (plate) protruded on top. 2. Put the metal cover (04) pressing the handlebar. Then fix handlebar with one flat washer (07), one spring washer (12), and an Allen bolt (11) to fasten them firstly and then assemble the plastic cover to the handlebar by washers (7 & 12) and bushing (09) and T-knob (10). 3.
ASSEMBLY INSTRUCTION STEP 8 1. Slide the computer (13) to bracket. 2. Plug in the cable between the computer and the handelbar post. 3. Plug the cable of hand pulse sensor (02) from handlebar into the computer.
7380D Computer Instruction Manual Buttons: 1. MODE: Press the button to select functions, and hold this button to total reset all function values Fucntions: 1. 2. 3. 4. 5. RPM SPEED: TIME: DISTANCE: CALORIES: PULSE: Display exercise speed. Record exercise time by counting up or down. Record exercise distance by counting up or down. Record calories consumption during exercise. Display heart rate value. High limit could be set as a warning. Operation: 1. 2. 3. 4.
* IMPORTANT SAFETY INFORMATIONS * PLEASE FOLLOW THE SAFETY RULES BELOW TO AVOID INJURY AND/OR ACCIDENTS 1. KEEP THE BIKE AWAY FROM THE ACCESS OF CHIDLREN, DO NOT ALLOW THE CHILDREN TO BE AROUND WHEN USING THE MACHINE. 2. DO NOT RIDE THE BIKE STANDING UP. 3. DO NOT RIDE WHILE WEARING LOOSE ROBES, LOOSE PANTS OR SKIRTS. 4. ALWAYS WEAR RUBBER SOE SHOES OR TENNIS SHOES WHEN RIDING. 5. PLACE THE BIKE ON A SMOOTH HARD SURFACE. 6. THE USER’S MAX WEIGHT IS 100 KGS. 7.
WARM-UP EXERCISE -11-
BODYWORX BODY WORX