Motorised Treadmill Model No: JI1825 BODYWORX BODY WORX Retain this owner’s manual for future reference Read and follow all instructions in this owner’s manual Version A 1
TABLE OF CONTENTS OVERVIEW DRAWING 2 ASSEMBLY STEPS 6 SAFETY INSTRUCTIONS 3 CAUTION 9 GROUNDING INSTRUCTIONS 4 MAINTENANCE 10 PRE-ASSEMBLY CHECK LIST 5 COMPUTER OPERATION INSTRUCTION 11 OVERVIEW DRAWING 2
IMPORTANT SAFETY INSTRUCTIONS When using this product, basic precautions should always be followed, including the following: Please read the instructions carefully before starting to use this product. DANGER – To reduce the risk of electric shock: 1. Always unplug this product from the electrical outlet immediately after using and before cleaning the treadmill. WARNING – To reduce the risk of burns, fire, electric shock, or physical injury: 1. This product should never be left unattended while plugged in.
GROUNDING INSTRUCTIONS This product must be grounded first. If malfunction or breakdown occurs, grounding will provide a path of least resistance for electric current to reduce the risk of electric shock. This product is equipped with a cord having an equipment-grounding conductor and a grounding plug. The plug must be plugged into an appropriate outlet that is properly installed and grounded in accordance with all local codes and ordinances.
PRE-ASSEMBLY CHECK LIST ITEM Description Qty ITEM Description Qty A Frame 1 a Truss Hex Screw: M8xP1.25x40 4 B Decoration Cover - Left 1 b Truss Hex Screw: M8xP1.25x15 2 C Decoration Cover - Right 1 c Round Head Philips Screw M5 x P0.
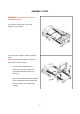
ASSEMBLY STEPS WARNING: Don't untie the loincloth until assembly is finished. If you until the loincloth first, it may cause dangerous consequences. Two persons are required to finish the assembly steps. (Caution!! Please follow exactly the assembly steps below to avoid any injury.) 1. Then put up the handrail tubes of Frame (A) as the arrow shows in the right drawing and tighten with a Hex Screw (A). PS.
2. Put up Upright (L & R) as shown in the right drawing and tighten with Hex Screws (a & b). P.S. To avoid unexpected accidents or injuries, always assemble the treadmill with more than two workers, do not assemble by yourself. 3. After tightening the left and right uprights, insert the left and right decoration covers (B & C) onto the frame and tighten with a Philips Screw (c).
4. Wedge cup holder (F) onto the corresponding positions as shown in the right drawing. 5. Wedge the left and right handrail covers (D & E) onto the corresponding positions as shown in the right drawing and tighten with Truss Philips Screw (g) and washer (h).
CAUTION This treadmill has a foldable mechanism for storage. Stop all the movements (including stopping the running belt and remove the power cord) before storage; then fold the main frame as the direction shown in the right picture. Be sure you hear a “click” sound. On the other hand, if you want to use the treadmill, step on the fixing plate as the direction shown in the right drawing (you must hold the frame to avoid falling).
MAINTENANCE 1. If the belt tends to move off the centre, stop the treadmill. Take the L-shaped Wrench and adjust the Hex Screw in the Rear End Cap. For example, if the running belt is moving towards the left side, tighten the left Hex Screw about 1/4 turn (clockwise); if the running belt is moving towards the right side, tighten the right Hex Screw about 1/4 turn (clockwise). Turn on the treadmill after it has been adjusted.
SILICON SERVICING CHART KM / MILE SPEED SERVICE INTERVAL KM 6 KM / HR Below 1 Year 6 ~ 12 KM / HR 6 Months 12 KM / HR Above 3 Months 4 Mile / HR Below 1 Year 4 ~ 8 Mile / HR 6 Months 8 Mile / HR Above 3 Months MILE Note: This maintenance is intended for household use. If used for business, it is suggested to examine this product every other month.
1) General Operation: ➢ Turn on the treadmill. ➢ Put the safety key in the recess of the console. The beeper will sound. At this time, all windows will display the values. The preset values are 0, not blinking which means the treadmill has entered start / ready status. Under this status, the user can hold the grip pulse sensor to detect heart rate values directly.
➢ Press to start treadmill, the treadmill will start with a speed of 1.0 km / hr, at this time press or buttons keys to increase / decrease speed (also can press fast speed to instantly choose the speed you need), press once to stop your workout ( press one time, all values stop changing. Then press the same button the second time and hold it for 3 seconds, the treadmill will automatically return to the START / READY position. ) ➢ The treadmill has the function of no-segment Incline adjustment.
1.3 At this time, you can press or to start running, or press to set the distance. After finishing, press to go back to the options in the Mode pattern. Pre-set value : 5 km Range of distance : 1 ~ 9.9 km, Step is 0.1 km. PROGRAM : This mode includes 6 patterns, P1 ~ P6, user can choose the pattern you like freely. The operation is shown below: 2.1 Press , when the MANUAL LED light is blinking, press choose any pattern from P1 to P6.
● Height : Pre-set is 170 cm, range : 130 ~ 200 cm, Step is 1 cm, press adjust, after choosing the correct value then press ● Sex : Pre-set value is 1 (Male), press select the correct option, press , , to , into the next value setting. to switch 1 (Male), 0 (Female), to to enter the next value setting.
Annex 1 16
Annex 2 17
Annex 3 18
Annex 4 19
Annex 5 20
Annex 6
BODYWORX Model No: JI1825 To register your warranty, please go to www.gpisports.com.