
Bogart Engineering SC-2030 Technical Manual
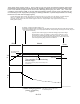
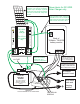

Simplified description for installing Bogart Engineering SC-2030 charger
and TM-2030 Battery Monitor. Illustration on previous page.
WHAT’S INVOLVED IN INSTALLING THE BOGART ENGINEERING TM-2030 monitor:
This is a brief description. See TM-2030 Installer’s instructions for complete description
Additional parts you will need: ●Shunt. ●4 wire cable from battery to meter. ●Short, large cable to go from
shunt to battery.
Mounting the Meter: The TM-2030 is usually installed in the living area. Depending on how you want to mount
it, two styles of TM-2030 are available which perform identically. The label colors are also different. See the
“bogartengineering.com” website: go to “Products”, “TriMetric" for photos and further description.
The TM-2030-RV is most popular, and easiest to mount on a wall using two screws. When mounted on a
wall it is 5 inches high and 3 inches wide and extends from the wall 1 inch.
The TM-2030-A is easier to mount flush on a wall if this is desired. It has a panel that is 4-1/4 by 4-3/4
inches, and extends 1 inch deep. It is designed to fit into a double gang electrical box of sufficient size, or it
can be fastened to a wall with four screws onto a square hole of sufficient size. The panel color is different
from the TM-2030-RV.
Installing the shunt: The shunt is not included with the meter, and must also be purchased with the meter
for about $30. There are two possible choices for shunt, depending on your system size. To decide on which
one, look on the Bogart Engineering web site under “Frequently Answered Questions” in the “shunt” section.
This enables the TM-2030 to measure the battery current. Size: 1-3/4 x3-1/4 x 2 in high. It is located near the
batteries and connects to the TM-2030 with 4 small wires, usually in a plastic jacket.
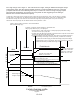
First remove all connections presently connected to the battery system negative pole.
Connect one end of the shunt to the now bare negative pole of the battery system with a short cable
large enough to accommodate the largest current you will have when charging or discharging your batteries
Wires and cables previously connected to the battery negative pole must then be reconnected to the
“load” side of the shunt.
Connect four wires from shunt and battery to Meter: Cable consisting of small wires (#22 up to 100 feet
long) need to connect from the TriMetric to the shunt and batteries.
WHAT’S INVOLVED IN INSTALLING THE BOGART ENGINEERING SC-2030 Solar
Charger: Brief description. Complete description is in the SC-2030 User’s Manual
Additional parts you will need: ●Obviously solar panel(s). ●Two wires from panels to charger and 2 wires from
charger to batteries. ●Telephone cable (4 wire, RJ-14) for communication from SC-2030 to TM-2030. ●Optional
temperature sensor.
The SC-2030 charger is usually located near the batteries, but may be located anywhere between panels
and batteries when being controlled by the TM-2030 since it is monitoring the exact battery voltage and can
compensate for some voltage drop in the wires.
Usually the solar panels will be installed first. For good efficiency with 12 volt battery set, when used with a
PWM type controller, these must be so called “12 volt” panels. These are ones that have a maximum power
voltage (Vpp) of about 17 or 18 volts. Two wires of sufficient size must be run that will carry the current from the
panels to the batteries. A wire table in the SC-2030 instructions tells proper wire size depending on maximum
solar amps and the wire distance from panels to battery.
Install the temperature sensor: For batteries that are not usually at nearly 25° C (77° F), a temperature sensor
is advisable for temperature compensation of the voltage. It should be located in a place in the battery
compartment that is at the temperature of the batteries. It connects to the SC-2030 Solar Charger at the back of
the circuit board. A hole must be drilled in the enclosure at a convenient place in the box to accommodate the
small wire.
Install communication wires from SC-2030 charger to TM-2030 Monitor: This is a 4 wire common telephone
cable between the TM-2030 and SC-2030. This allows control commands from the TM-2030 and Solar data
from the SC-2030. One end plugs into each device. A hole must be drilled in the TM-2030 and SC-2030 cases
at suitable location for your situation to accommodate the wire.
file: Brief Installation Description