
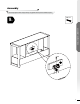
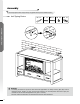
Installation Guide


Care And Maintenance
NOTE: When the heater is not in use, it should be stored in a dry location, away from possible damage. The
power cord should be stored properly to avoid contact with hot or sharp objects.
REPLACING THE REMOTE CONTROL BATTERY:
When the remote control stops operating or its range seems reduced, it is time to replace the batteries.
NOTE: The batteries should be removed if the product is to be left unused for a long time.
CAUTION:
Non-rechargeable battery is not to be recharged. Exhausted battery is to be removed from the product:
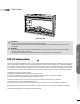
1. The battery compartment is located on the back end of the remote control.
2. Press the small tab inward as you slide the battery door open and remove the old battery.
3. Insert a new CR2025 lithium battery (not included), ensuring the polarities of the battery match the inside of
the battery compartment.
4. Re-insert the battery door.
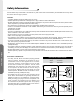
WARNING: Make sure the power is turned off before proceeding. Any electrical repairs or rewiring of this unit
should be carried out by a licensed electrician in accordance with national and local codes.
If repairing or replacing an electrical component or wiring, the original wire routing, color coding and securing
locations must be followed.
WARNING: Electrical outlet wiring must comply with local building codes and other applicable regulations to
reduce the risk of re, electrical shock and injury to persons.
WARNING: Do not use this replace if any part of it has been under water. Immediately call a qualied service
technician to inspect the replace and replace any part of the electrical system.
WARNING: Disconnect the power before attempting any maintenance or cleaning to reduce the risk of re,
electrical shock or personal injury.
WARNING: During any service of this appliance, the power to the unit must be turned off. First turn the main
power switch to the "OFF" position. Then remove the electrical plug from the wall outlet.
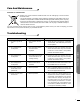
Troubleshooting
Problems
1. No power, logs do not
glow.
2. "E1" is displayed on
control panel.
3. "E2" is displayed on
control panel.
4. "E3" is displayed on
control panel.
5. Fan motor continues
to blow after unit is
powered off.
6. Power cord gets warm
to the touch.
1. The unit does not have
power.
2. The overheat protection
device has been
engaged.
3. The ambient temperature
sensor is broken or not
working correctly.
4. Child Lock function is
activated.
5. Normal operation.
6. Normal operation.
Possible Causes
1. Check that unit is plugged into a standard
120 volt outlet. Then make sure power is set
at "ON" position.
2. Unplug unit, wait 5-10 minutes, then the
sensor will reset itself. Plug the unit back
in and turn on the heater. If the problem
persists, call customer service.
3. Unplug unit, wait 5-10 minutes, then the
sensor will reset itself. Plug the unit back
in and turn on the heater. If the problem
persists, call customer service.
4. To inactivate the Child Lock function, hold
the POWER button for 10 seconds.
5. This is a standard feature; the blower runs
for an additional 20 seconds to ensure heat
will not be trapped inside the unit.
6. This is normal for a heater appliance as it
requires more current to operate. Check the
connections of the appliance cord and the
outlet. Make sure the plug fits tightly into
the outlet. During use, check the plug and
outlet frequently to determine if it is HOT;
if so, discontinue use of the appliance and
consult with a qualied electrician to check
or change the overheating outlet(s).
Solutions
CLEANING INFORMATION:
• Make sure the unit is turned off, unplugged and the heating elements of heater are cool whenever you are cleaning the
heater.
• Clean the metal trim using a water-dampened, soft, and clean cloth. DO NOT use brass polish or household cleaners as
these products will damage the metal trim.
• The motors used on the fan and the flame generator assembly are pre-lubricated for extended bearing life and
require no further lubrication. However, periodic cleaning/vacuuming of the fan/heater and air intake/output vents is
recommended.
GLASS INFORMATION:
• Under no circumstances should this product be operated with broken glass.
• Do not strike or slam the glass.
• Do not use abrasive cleaners to clean the glass.
• This product uses tempered glass. Replacement of the glass supplied by the manufacturer should be done by a qualied
service personnel.
16
FIREBOX OPERATIONS