SP5526 Incultior USER MANUAL Please carefully check the unit and make sure there is no damage when you open the carton. Download App QUESTIONS, PROBLEMS, OR MISSING PARTS? Please Contact Customer Service Before Returning to Store www.soupro.com cs@soupro.
General Information Table of Contents • GENERAL INFORMATION Package Contents 2 Safety Instructions 3 Maximum Load Warning 3 Warranty 4 • ASSEMBLY INSTRUCTIONS Preparation 5 Assembly 7 • FIREBOX OPERATIONS FCC/IC Information 15 Safety Information 16 Operating Instructions 17 Care And Maintenance 20 Troubleshooting 21 Package Contents Fireplace Mantel SP5526 2 Firebox SP2618-HE-FGPB-BT Remote Control
General Information Safety Instructions Please read and understand this entire manual before attempting to assemble, operate or install the product. IMPORTANT NOTICE When using electrical appliances, basic precautions should always be followed to reduce the risk of fire, electric shock and injury to persons, including the following: WARNING: Place this unit in a location that avoids direct sunlight and high temperatures. WARNING: Plastic bags, nails, etc. should be kept out of reach of children.
GENERAL INFORMATION Warranty 1-YEAR LIMITED WARRANTY Source Pro USA Inc. (hereinafter referred to collectively as “the Company”) warrants that your new Bold Flame Electric Fireplace is free from manufacturing and materials defects for a period of one (1) year from date of purchase. Subject to the following conditions and limitations: 1. 2. 3. 4. 5. 6. 7. 8. 9. 10. 11. 12.
Preparation IMPORTANT INFORMATION 1. Before you begin, locate the instructions and hardware. Be sure you have all of the parts and can identify them. 2. To avoid scratching the finish, assemble the product on a soft, non-abrasive surface such as carpet or cardboard. 3. Assembly of this product may require more than one person. Philips Screwdriver Hand Drill ASSEMBLY INSTRUCTIONS Tools Required Hex Key (Tool Included) Hardware Identification Number of spare hardware is indicated in ( ).
Preparation Parts List I K ASSEMBLY INSTRUCTIONS K G F H E J B J D N C N B L M A 6 A Base Panel x1 H B Side Panel x2 C Side Panel, Inner Left Side Panel D Top Side Panel Right x1 I Top Panel x1 x1 J Back Panel x1 Side Panel, Inner Right Side Panel x1 K Back Panel, Top x2 E Center Panel x1 L Door Left x1 F Media Shelf x1 M Door Right x1 G Top Side Panel Left x1 N Adjustable Shelf x2
Assembly Do not fully tighten screws during assembly. Only tighten when all parts are installed in place. 1. BB EE BB EE BB EE BB x 27 BB EE BB BB BB BB EE EE EE BB BB EE BB EE C EE BB EE BB G BB BB BB EE H EE EE EE EE D EE BB EE EE ASSEMBLY INSTRUCTIONS BB EE BB EE BB BB EE B B EE x 27 BB BB EE BB BB 2.
Assembly Do not fully tighten screws during assembly. Only tighten when all parts are installed in place. 3. BB x 11 CC x 2 F ASSEMBLY INSTRUCTIONS BB CC BB BB BB BB BB BB CC 4.
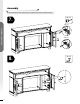
Assembly Do not fully tighten screws during assembly. Only tighten when all parts are installed in place. 5. BB x 4 I ASSEMBLY INSTRUCTIONS BB BB 6.
Assembly Do not fully tighten screws during assembly. Only tighten when all parts are installed in place. 7. RR x 2 Step 7a ASSEMBLY INSTRUCTIONS M L RR Step 7b RR 8.
Assembly Do not fully tighten screws during assembly. Only tighten when all parts are installed in place. 9.
Assembly Do not fully tighten screws during assembly. Only tighten when all parts are installed in place. 10.
Assembly Do not fully tighten screws during assembly. Only tighten when all parts are installed in place. 11.
Assembly Do not fully tighten screws during assembly. Only tighten when all parts are installed in place. Anti-Tipping Device KK x 2 LL x 2 MM x 2 NN x 4 OO x 2 ASSEMBLY INSTRUCTIONS OO NN KK NN MM LL KK WARNING: • If installing the mantel on drywall or other hollow wall applications, the safety mounting tape (KK) must be fastened to studs, headers, or other structural wall members. The included plastic wall anchors (OO) are intended for use with solid wall applications only (tile or concrete).
Firebox Model SP2618-HE-FGPB-BT ATTENTION: • Find a location for the firebox that is protected from direct sunlight. • Failure to read all instructions may result in a possible electric shock, fire hazard and/or injury and will void the warranty. FIREBOX OPERATIONS WARNING: • If the information in this manual is not followed exactly, an electric shock or fire may result causing property damage, personal injury or loss of life.
Safety Information Use this firebox only as described in the manual. Any other use is NOT recommended by the manufacturer and may cause fire, electric shock or injury to persons. FIREBOX OPERATIONS CAUTION: • If possible, ALWAYS unplug this firebox when not in use. • DO NOT operate any firebox with a damaged cord or plug or after the heater malfunctions. • DO NOT operate any firebox if it has been dropped or damaged in any manner.
Operating Instructions Power Button • Press the POWER button to turn ON or OFF the unit. • When the unit is in ON mode, the power icon indicator light will be shown green. • When the unit is in OFF mode, the power icon indicator light will be shown red. When power OFF, unit will be stopped, if heater is working before power OFF the unit, fan will have 20 seconds delay to ensure heat will not be trapped inside the unit.
Fireplace Remote App To Connect 6. Blue dot next to the fireplace name indicates that the fireplace is connected properly and ready to use (Fig. 6) 1. Turn on the fireplace 2. Switch on Bluetooth on your mobile device 3. Tap the side menu icon (Fig. 1) Fig.6 Fig. 1 4. Tap " " icon (Fig. 2) and start searching for the fireplace nearby (Fig. 3) 7. Return to main page by tapping the side menu icon 8. Make sure that the top right corner icon is switched "ON" (Fig. 7) Fig. 2 Fig.
Fireplace Remote App Operating Instructions Timer Screen You can remotely adjust your fireplace settings in the following ways: Control Screen (Fig. 10) • Press " " or " " to adjust the Ember Bed Brightness settings: L0 (dimmest), L1, L2, L3, L4, L5 (brightest). • Press " " or " " to set the Timer from 00:00 to 09:00 in 30-minute intervals. Press "Start" to begin. (Fig. 11) • When the timer reaches 00:00, the fireplace will automatically turn off. To stop the timer, press "Stop". (Fig.
Care And Maintenance CLEANING INFORMATION: • Make sure the unit is turned off, unplugged and the heating elements of heater are cool whenever you are cleaning the heater. • Clean the metal trim using a water-dampened, soft, and clean cloth. DO NOT use brass polish or household cleaners as these products will damage the metal trim. • The motors used on the fan and the flame generator assembly are pre-lubricated for extended bearing life and require no further lubrication.
Care And Maintenance DISPOSAL OF USED BATTERY: A battery may contain hazardous substances that could be endangering to the environment and human health. • This symbol marked on the battery and/or packaging indicates that used battery shall not be treated as municipal waste. Instead it shall be left at the appropriate collection point for recycling. • By ensuring the used battery is disposed of correctly, you will help prevent potential negative consequences for the environment and human health.
DOWNLOAD THE FIREPLACE REMOTE APP Fireplace Remote app gives you full access and control of 1. Go to Apple Store or Google Play Store 3. Click “INSTALL” button 4. Enter your account and password if necessary 5. Installation will be completed automatically Scan QR Code to Download App QUESTIONS, PROBLEMS, OR MISSING PARTS? Please Contact Customer Service Before Returning to Store www.soupro.com cs@soupro.com +1-800-239-0689 Crafted in China Distributed by Source Pro USA Inc.