
Specifications


147
Southwestern Industries, Inc.
TRAK LPM Programming, Safety, & Operating Manual
2. Create a Workgroup name for your computer. For instructions on how to do this, go
to Windows™ Help and search for the topic “Workgroup Names”. If there is a
workgroup name already, write it down. We will make the ProtoTRAK match the
existing name in the next steps below.
3. Share a part of your computer. This will allow the ProtoTRAK to look into the drives
or folders you share. For instructions on how to do this, go to Windows™ Help and
search for the topic “Sharing” or “How to Share a Folder”. In order to allow the
ProtoTRAK to read and write programs to this folder, select “Full Access”.
On the ProtoTRAK PMX Control:
1. Plug a keyboard and mouse into your ProtoTRAK and turn it on. Go to the Select a
Mode screen.
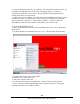
2. On the keyboard press simultaneously: Ctrl + Esc. This will show the Start Menu.
3. From the Start menu, select Control Panel.
4. Double click on the System icon
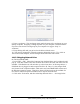
5. Select the Computer Name tab.
6. Do not enter the computer description here. Instead, click the Change button.
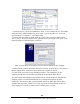
7. Enter a name for the ProtoTRAK PMX in the Computer Name box. We suggest
something descriptive, for example “LPM1”.