
Specifications


148
Southwestern Industries, Inc.
TRAK LPM Programming, Safety, & Operating Manual
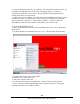
8. Enter a workgroup. This workgroup must match the name of the workgroup on your
desktop computer. Assigning a workgroup name for your computer is discussed above.
If you have not selected a workgroup for your computer we suggest “shop” or
“toolroom”.
9. Keep clicking OK until you get back to the Select a Mode screen.
10. You may be prompted to restart the computer during this process. If so, click on
YES to reboot the computer, and the changes should take effect after reboot.
14.12.3 Mapping Network Drive
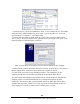
On The ProtoTRAK PMX:
1. Press CTRL + ESC. Select My Computer from the Start Menu, and a window should
pop up. From this window, take note of which drives letters are used, and which ones are
available. USB flash drives will each take up a drive letter here. In the image below, a
USB flash drive is plugged in and recognized as drive D. Drive C is the compact flash
card, located in the computer module, which stores our ProtoTRAK PMX software and
the Windows operation system. These drive letters will obviously not be available for
use, and we will need to pick an available one to map our network drive.
2. Click on the Tools menu, and then select Map Network Drive… See image below.