UNI CAM 3.1 3.1 Mega Pixel Digital Camera User’s Manual Version 1.
User’s Manual UNI CAM 3.1 Digital Camera Overview and Acknowledgments Thank you for purchasing UNI CAM 3.1 Digital Camera. It is with 1.5’ TFT LCD Display, built-in Flash Light and 3X Digital Zoom. Maximum resolution is 2048 x 1536. Supports Snap Shoot, Video Recording and Voice Recording. It is also bundling with powerful photo editing and capturing software – Lover’s Eye 2.0.
User’s Manual UNI CAM 3.1 Digital Camera Inside the Package l l l l l l l l l 1 x UNI CAM 3.1 Digital Camera 2 x AA Re-chargeable Battery 1 x Tripod 1 x Video Cable 1 x USB Cable 1 x CD ROM with Driver and Application Software 1 x User Manual 1 x Traveler Bag 1 x Strap Product Features l l l l l l l l l l l l l l l Maximum 3.1 Mega Pixel (2045 x 1536) Hardware Interpolation Supports Secure Digital (SD) Memory Card 1.
User’s Manual UNI CAM 3.1 Digital Camera Specification Sensor Resolution LCD Display Storage Media Photo Quality Format Zoom Exposure White Balance Flash-light Video Output Interface Power Supply Camera Len Aperture Filed Depth Viewfinder 2.0 Mega Pixel CMOS Sensor Maximum 3.1 Mega Pixel (2048 x 1536) Hardware Interpolation 1.
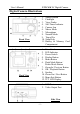
User’s Manual UNI CAM 3.1 Digital Camera Digital Camera Illustrations 1. 2. 3. 4. 5. 6. 7. 8. 9. 10. 11. Front View Shutter Button Flashlight View-Finder Self-Timer Indicator Camera Len Macro Mode Microphone Normal Mode Tripod Fix Strap Hole Battery & Memory Card Compartment 1. 2. 3. 4. 5. 6. View Finder LED Indicator Power Switch Display Button Menu Button Flash Mode Button / Delete Mode Button 7. Zoom-In / Previous Button 8. OK / Playback Button 9. Speaker 10. Zoom-Out / Next Button 11.
User’s Manual UNI CAM 3.1 Digital Camera Operation Instructions A. l Batteries Loading the Batteries Make sure the camera is turned off. Open the Battery and Memory Card Compartment by sliding the lock. Follow the illustration to insert the batteries in the direction shown. Close the battery compartment. l 1. 2. 3. l Low Battery Condition shows the level of battery condition on A battery meter icon the LCD Display.
User’s Manual B. UNI CAM 3.1 Digital Camera Inserting / Removing the Memory Card (Secure Digital) Make sure the camera is turned off. Open the Battery and Memory Card Compartment by sliding the lock. Inset the card as far as it will go in the direction shown at the back of the camera. To remove the card, hold the card with your fingertips and pull it out. Note : Without inserting a memory card, you cannot access any operation. C.
User’s Manual D. l UNI CAM 3.1 Digital Camera Taking Still Pictures Shooting Photos 1. Point the camera towards a subject while viewing through the Viewfinder or the LCD Display. 2. Press the Shutter Button gently to take a picture. 3. The picture will remain on the LCD Display until it is stored in the memory card as JPEG format. When the LCD Display resumes to standby mode, you can take next picture. l Image Quality Setting 1.
User’s Manual l UNI CAM 3.1 Digital Camera Flashlight Setting Press the Flash Button to select one of the 3 flashlight options as below. Flashlight Off Automatic Flashlight Off : Default flashlight setting is at off flashlight is available. Always Fires condition. No on the LCD Automatic : The flashlight icon will change to Display. The flashlight will fire only when taking photos in low-light or backlight conditions.
User’s Manual l 1. 2. l UNI CAM 3.1 Digital Camera Macro Mode Slide the Macro Mode Switch to Macro Mode. It allows you to take pictures at a closer range (around 20cm). To take pictures, follow the steps in Shooting Photos. Digital Zoom While focusing a subject, press Zoom-In / Zoom-Out Button to access Zoom feature. You will see the Zoom Lever to show the level of zooming. The framed image can be zoomed between 1.0X – 3.0X. l 1. 2. 3. 4. Self-Timer Setting 5.
User’s Manual UNI CAM 3.1 Digital Camera F. Viewing Still Pictures / Playing Back Video 1. Press Menu Button and go to Preview Image. Press OK Button. In preview mode, you will see a 3x2 photo album. Select your desired viewing picture / playing back video by pressing Previous Button / Next Button. To view picture, press Playback Button. To play back movie, press the Playback Button twice. To view / playback previous or next picture / video, just press Previous Button / Next Button.
User’s Manual H. l 1. 2. 3. UNI CAM 3.1 Digital Camera Voice Recording Start Recording Voice Press Menu Button and go to Digital Voice. Press OK Button. To start voice recording, press Shutter Button. Timer starts counting recording time. To stop, press again the Shutter Button. The recorded voice will be saved as WAV format in the memory card. Note : In using a 32MB SD memory card, it can record around 64 minutes. l 1. 2. 3. 4. l 1. 2. 3. Voice Playback Press Menu Button and go to Sound Replay.
User’s Manual I. 1. 2. 3. 4. 5. UNI CAM 3.1 Digital Camera Connecting with Your TV / VCR Connect the black plug of the Video Output Cable into the Video Output Port on the camera. Connect the yellow plug of the Video Output Cable to the Video-in Plug on your TV / VCR. Press Menu Button and go to TV Out Mode. Press OK Button. Select either NTSC or PAL to match your TV / VCR system. And now, you can view photos or playback video in your TV with larger view. J. Format Memory Card 1. 2.
User’s Manual UNI CAM 3.1 Digital Camera Driver & Software Application Installation A. Driver Installation 1. Close all working programs before installing the driver, and do NOT connect the camera with the computer. 2. Insert the CD driver into the CD-ROM drive. 3. Open the DRIVER directory and double click STK014.exe. 4. Computer will install the driver automatically. 5. Connect the camera with provided USB cable to one of your PC USB ports.
User’s Manual B. l UNI CAM 3.1 Digital Camera Transferring Files Downloading Files from Camera 1. Connect the camera with the computer through USB cable. 2. A Image Download Utility window (as above) will be pop-up. 3. You can download the files from the camera to the computer by using this utility. l Downloading Files from SD Memory Card You can remove the SD memory card and use a SD memory card reader to transfer files from the SD memory card to computer.
User’s Manual C. UNI CAM 3.1 Digital Camera Software Application Installation : LOVER’S EYE 2.0 1. Close all working programs before installing the driver, and do NOT connect the camera with the computer. 2. Insert the CD driver into the CD-ROM Drive. 3. Open the LOVER’S EYE 2.0 directory and double click Install.exe. A Select language dialogue window pops up. Select the language (English, Traditional & Simplified Chinese) you need and click “OK”. It will automatically install the software. 4.