
Operation Manual

SG880MK-8M 4 Advanced Operations
Page 11
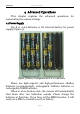
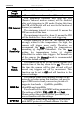
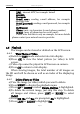
4.2 Insert SD card and SIM card
Open the bottom cover. Insert an SD card into the card slot
with unmarked side upwards. Please note that the SD card is on
the “write” (not locked) position, otherwise the camera will not
function correctly.
When using MMS/SMS/E-mail functions, be sure to insert
an available GPRS enabled SIM card into the SIM card slot with
angle in the upper left.
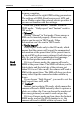
4.3 Power on and Enter ON Mode
Before switching on, please pay attention to the following:
1. Avoid temperature and motion disturbances in front of the
camera such as a big leaf, curtain, air-conditioner, air
outlet of the chimney and other heat sources to prevent
false triggering.
2. The height from the ground for placing the camera should
vary with the object size appropriately. In general, three to
six feet (0.9m to 1.8m) is preferred.
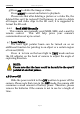
Slide the power switch to the ON position to power on the
camera and enter into the ON mode. Before entering into the
ON mode, you can adjust the camera towards the target
monitoring area by laser pointer.
After switching on the camera, the motion indication LED
(red) light will blink for about 10 seconds. The 10s is a buffering
time before automatically capturing photos or videos, e.g. for
closing and locking the bottom cover, fixing the camera on a
tree and walking away.
In ON mode, it is unnecessary to use the remote control.
The camera will take pictures or videos automatically according
to the default settings or previous custom settings. The camera
has the sound recording function, so the sound will be
embedded in the video clip while capturing a video.