
Operation Manual


33
AE1918CB_Instruction Manual 26.10.16
Stop Operation And Disassembly
1. Set the speed control (10) to “0” position and wait until the
lter / blade (4) has come to a complete standstill.
2. Disconnect from mains power supply.
3. Press the spout (6) upwards to prevent subsequent
dripping.
4. Remove the pusher (1) from the chute (2).
5. Take the juice jug to the side and lower the locking bar (8)
into the disengaged position.
6. Remove the lid (3).
7. Remove the pulp collector (11).
8. Remove the lter / blade unit (4) from the base (9) by
grasping the lter / blade (4) at its upper edge with two
hands.
WARNING risk of cuts!
The lter / blade unit (4) has sharp knives!
Only lift it on its outer edge.
9. Then pull the lter / blade (4) in an upward direction until
the lter / blade unit (4) is separated from the main base (9).
NOTE:
Do not remove screws from the blade (4). The lter and
the blade (4) are one piece. They are not meant to be
separated.
Cleaning
WARNING:
• Before cleaning always disconnect from mains power
supply.
• Under no circumstances should you immerse the appli-
ance in water for cleaning purposes. Otherwise this might
result in an electric shock or re.
• The lter / blade (4) is very sharp! Danger of injury!
CAUTION:
• Do not use a wire brush or any abrasive items.
• Do not use any acidic or abrasive detergents.
• Do not leave the pulp to dry on the lter / blade (4). The
ne pores will clog and become useless.
Tip
• Remove residues in the lter /
blade (4) immediately under
running water. Use a dishwash-
ing brush.
• For cleaning the outside of the
appliance, use only a damp
washing-up cloth.
Pusher (1), Lid (3), Filter / blade (4), Receptacle (5), Pulp
collector (11)
WARNING in regard to risk of cuts!
The lter / blade (4) is sharp!
CAUTION:
The attachments are not suitable for dishwasher. Heat
and aggressive cleaning agents may warp or discolour the
attachments.
• Clean these components in a rinsing bath.
• Clean the lter / blade (4) with a dishwashing brush.
• Rinse with clean water.
• Only assemble the appliance when all parts have been dried.
Storage
• Clean the appliance as described. Let the accessories dry
completely.
• We recommend that you store the appliance in its original
packaging when it is not to be used for a longer period.
• Always store the appliance at a well ventilated and dry
place outside the reach of children.
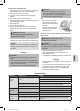
Troubleshooting
Malfunction Possible cause Remedy
The appliance
does not
function.
The appliance is not supplied with
power.
Check the outlet with a different device.
Insert the power plug correctly.
Check your domestic fuse.
The locking bar (8) has not been closed. Check if all components were properly attached.
The appliance is defective. Contact our Service or a specialist.
The juice quanti-
ty is small.
Wrong fruit type. Select a fruit type producing more juice.
Juice cannot be extracted from small berries in the lter / blade (4).
Too much residue in the lter / blade (4). Clean the lter / blade (4).
Loud noise and
imbalance during
operation.
Bad assembly. Check that all components have been installed correctly.
Too much residue in the lter / blade (4). When processing larger quantities clean the lter / blade (4)
in-between.