Owner’s Manual Using the Ducted Evaporative Air Conditioning with Your Touch Pad Control Operating, Installation & Maintenance Please keep this important manual in a safe place. It is the owner’s responsibility to ensure that regular maintenance is carried out on this Evaporative Air Conditioner. Failure to do so will void all guarantees beyond statutory and legal requirements. www.climatetechnologies.com.
Touch Pad Control Navigating the Controls Introduction You have chosen one of the world's most advanced Touch Pad systems incorporating the latest technology. The Touch Pad control is an Australian and world first for its use with ducted heating and cooling systems. Designed exclusively for Climate Technologies, the self-prompting display panel controls your unit’s functions, providing the ultimate cooling flexibility.
Touch Pad Control Table of Contents Table of Contents Introduction.......................................................................................................................................................2 Table of Contents .............................................................................................................................................3 Navigating the Controls ..........................................................................................................
Touch Pad Control Navigating the Controls WATER LEVEL / FLOAT VALVE ......................................................................................................................................... 27 MOTOR AND FAN ............................................................................................................................................................. 27 ELECTRICAL ....................................................................................................................
Touch Pad Control Navigating the Controls Navigating the Controls Introduction The Touch Pad control is an Australian and world first for its use with air conditioning systems. Designed exclusively for Climate Technologies, the self-prompting display panel controls your unit’s functions, providing the ultimate in cooling flexibility. This technologically advanced controller comes with manual and thermostat control, programmable timer, boost function as well pre-cool, pre-fill and dumping setup options.
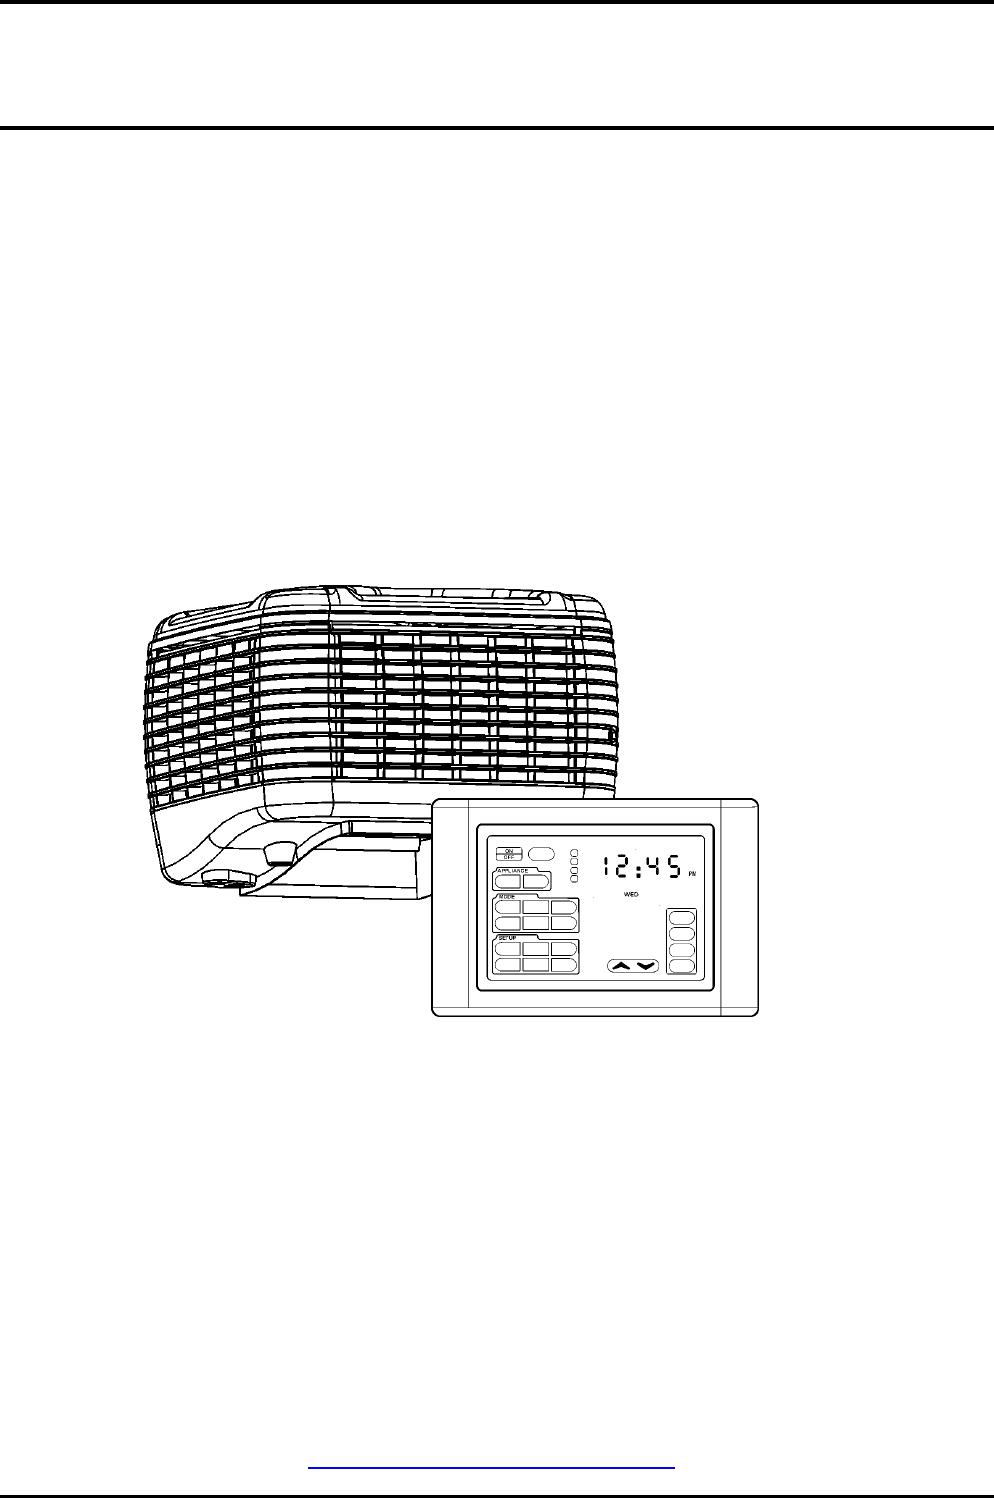
Touch Pad Control Navigating the Controls Number Description Function 1 ON / OFF Turns the unit ON or OFF 2 APPLIANCE Touch any area with the APPLIANCE outline to select product. 3 CLOCK 12 hour clock denoting AM / PM and the day. 4 MODE Touch any area within the MODE outline and the available operating modes will be displayed. 5 SETUP Touch any area within the SETUP outline and the available operating modes will be displayed.
Touch Pad Control Navigating the Controls Touch Pad Functions ON / OFF When pressing the ON / OFF button to turn the unit on, the touch pad control will return to the last used setting. APPLIANCE When unit is turned on the last used appliance will be activated. There is the possibility of having an Ultra High Efficiency gas fired central heater operated from the same control. Press any area within the Appliance area and if there is a heater fitted the option will display COOL or HEAT.
Touch Pad Control Navigating the Controls SETUP To view the SETUP options available, press the touch pad anywhere within the SETUP area. The available functions are: • PGRM – Program setup allows you to create a timed program to start and stop the air conditioner. There are 4 period programs available requiring a minimum of 2 to be set. The program option will only function for 24 hours and then the unit will stop.
Touch Pad Control Ducted Evaporative Air Conditioning Ducted Evaporative Air Conditioning Owners Operating and Maintenance TEK600 Series Control Page 9
Touch Pad Control Ducted Evaporative Air Conditioning Introduction Your ducted evaporative air conditioner is engineered to meet the rigours of our harsh Australian environment. Operated and maintained in accordance with this manual, it will provide you with years of quiet, cool and environmentally friendly operation. Please take the time to read this manual. The principal of your unit is to introduce fresh air, which is washed through the filter pads to provided cool fresh air.
Touch Pad Control Ducted Evaporative Air Conditioning Bleed-off All evaporative air conditioners need some water bleed-off to prevent build-up of mineral deposits in the system. The correct setting of the bleed rate will ultimately govern the life of the unit. With normal town water supply, bleed rate should be adjusted so that the discharge is not less than approximately 10 litres per hour. Increased water hardness may require a higher bleed rate and increased maintenance.
Touch Pad Control Ducted Evaporative Air Conditioning Operating the Touchpad To operate your touch pad control simply press the operating area required firmly until a “Beep” is heard. The unit will then display the next available options or it will be ready to operate. If the unit does not start immediately and the snow flake and fan icons are flashing, the unit will be going through the pre-cool mode setup up by the installer. MANUAL MODE Step 1 Press the ON / OFF button to turn the unit on.
Touch Pad Control Ducted Evaporative Air Conditioning THERMOSTAT MODE Step 1 Press the ON / OFF button to turn the unit on. Step 2 The Appliance will be in COOL mode. Step 3 To select the THERM (Thermostat) mode touch anywhere in the MODE outline. STEP 4 Press THERM and the selected icon will stop flashing. The remaining icons will flash 3 more times and then disappear. Step 5 . To adjust the comfort level use the Increase the graphics scale for more cooling, decrease for less cooling.
Touch Pad Control Setup & Commissioning Set-up & Commissioning Introduction Touch Pad Control: Low voltage control featuring touch control options and thermostat, timed delayed starting and stopping, and dump valve features. All Low Voltage Controls: Low voltage controls are connected to the air conditioner control box via a 20-metre low voltage loom. NOTE: Do not run the low voltage loom in long parallel runs with 240V mains cables.
Touch Pad Control Setup & Commissioning Control Location 1. Locate the wall switch on an internal wall of a conditioned room of the home, 1.5m above the floor level, in an easily accessible location as agreed with the customer. 2. The controller must not be installed into areas where a ceiling register may blow cold air over the control, or installed near appliances that may generate heat. This will cause erratic thermostat operation.
Touch Pad Control Setup & Commissioning Circuit Diagram TEK600 Series . The TOUCH PAD and the PROGRAMMABLE CONTROL HAVE a number of operation options for the installer to set before commissioning the unit.
Touch Pad Control Setup & Commissioning Setup Options. OPERATION DUMP DELAY PRE-COOL DUMP INTERVAL PRE-FILL TEK600 Series Control FUNCTION • This mode controls the dump valve. (If fitted). • The dump delay is used to set the dump valve to dump 40 seconds after the pump is turned off or can be set to dump one hour after the pump has turned off. • After 40 seconds or 1 hour the base is drained and left dry until the next cycle. • The pre-cool feature is used to let the pump wet the pads for 1.
Touch Pad Control Setup & Commissioning Setup In setup mode there are 2 setup mode icons and 4 function icons. To enter SETUP mode, touch anywhere within the SETUP outline. The accessible icons will be displayed. Accessible Icons Review Review is a feature that allows you to first view the current program settings. Each step remains visible for 3 seconds. Once the review procedure has started the FINISH icon will be illuminated. The FINISH icon can be used to stop the REVIEW process.
Touch Pad Control Setup & Commissioning Program Setup ……..Continued Step 6 Set the Minutes using the and Press ENTER Step 7 Select the MODE of operation and press ENTER. arrows Default Setup Evaporative Air Conditioning Program Step 8 Adjust the output using the arrows and press ENTER Step 9 Program the second period using steps 4 to 8. Step 10 If only 2 program periods are required press FINISH. If a 3rd period is required program using Steps 4 to 8.
Touch Pad Control Setup & Commissioning Setup Parameters There are a series of available parameters that can be modified to tailor the control to meet the customer’s requirements. Carefully read these tables before entering the maintenance modes. There are a number of potential product classes that the touch pad control system will control. The class is the first requirement for selection when entering the maintenance mode.
Touch Pad Control Setup & Commissioning Setting the Water Management Systems Parameters and values To enter into the installer setup mode the water management options the following steps must be followed. STEP 1 Ensure the control is in the OFF mode. STEP 2 A series of unseen icons must be pressed 1. Press and hold the ZONE 4 icon allowing for a BUZZ followed by a BEEP. 2. In quick succession press the unseen APPLIANCE COOL icon followed by the HEAT icon. 3.
Touch Pad Control Setup & Commissioning Setting the Water Level & Bleed rate To enter into the installer maintenance mode to check water level and pump function, the following steps must be used:- STEP 1 Ensure the control is in the OFF mode. STEP 2 A series of unseen icons must be pressed 1. Press and hold the ZONE 4 icon allowing for a BUZZ followed by a BEEP. 2. In quick succession press the unseen APPLIANCE COOL icon 2 times. 3. If successfully executed the clock LEDs will display tP:01. 4.
Touch Pad Control Setup & Commissioning Setting the Fan Speed To enter into the installer maintenance to adjust minimum and maximum fan speeds; the following steps must be followed. STEP 1 Ensure the control is in the OFF mode. STEP 2 A series of unseen icons must be pressed 1. Press and hold the ZONE 4 icon allowing for a BUZZ followed by a BEEP. 2. In quick succession press the unseen SETUP icons ENTER, REVIEW & CLOCK. 3. If successfully executed the clock LEDs will display tP:01. 4.
Touch Pad Control Setup & Commissioning Problem Solving PROBABLE CAUSE PROBLEM Unit fails to start REMEDY a Black – out a Wait b Tripped Circuit Breaker b Reset c Blown Fuse c Replace d Electrical Fault d Call Climate Technologies Service Provider a Pump Seized a Isolate power and then take off top of pump and try to free it. Some lubricant may help.
Touch Pad Control Setup & Commissioning INSTALLATION CHECK LIST Unit ! All equipment ordered by the customer is installed. ! The unit is level and secure. ! The water supply line has been flushed to clear swarf and debris and is free of leaks. ! The tank is free of foreign matter and debris and the water isolating tap is turned ON. ! Water drainpipe work is completed and sealed.
Touch Pad Control Setup & Commissioning Site ! All rubbish has been removed from inside and on the roof. Customer Hand Over ! The operation of the Controller.
Touch Pad Control Unit Maintenance Unit Maintenance Warning: Before commencing any maintenance work on your unit, isolate the power at the supply (Fuse Box). Note: It is essential that your evaporative air conditioner be maintained in accordance with this manual. Failure to do so will effect the life of the product and reduce the level of efficiency. Filter Pads Visually check CELDEK pads for damage or blockage. Hose down pads from both sides to remove any build up of salts, dust and pollen.
Touch Pad Control Unit Maintenance Bleed Off The bleed rate should be checked to ensure it is adequate and that there is no build up of mineral deposits in or on your air conditioner. White deposits indicate high mineral content and the Bleed Rate should be increased. If it is at maximum and the deposits are still forming, then more regular maintenance is required. Pump Check the pump spins freely and that the strainer is clean. Water Distribution Check the water distribution system for blockage.
Touch Pad Control Warranty – Australia ONLY Warranty Warranty Statement. Subject to the following conditions we provide, from the dated proof of purchase, the following warranty: Any part found to be defective in workmanship or material within the period of warranty will be replaced free of charge. The structural warranty covers any structural components within the unit, which fail to perform their intended function due to faulty manufacture or deterioration within the warranty period.
Touch Pad Control Warranty – Australia ONLY Warranty On Replacements Parts. Parts replace under warranty are warranted for the balance of the original warranty period. PERIODS OF WARRANTY – YEARS Unit Components RESIDENTIAL Parts Labour COMMERCIAL Parts Labour Corrosion on Cabinet 25 3 2 2 Structural Guarantee 10 3 2 2 ** All other components 3 3 1 1 ** Filter pads are a consumable item and therefore are not covered by the above warranty periods.
Touch Pad Control Warranty – Australia ONLY Service A qualified service technician should conduct any service work carried out on your ducted gas central heating or cooling product. It is important that periodical service is carried out on your product to ensure your will receive the efficiency benefits the product provides. An authorized Climate Technologies service provider must carry out warranty service. For Metro Service only ring the numbers below.
Manufactured by: ABN 13 001 418 042 Adelaide Site 26 Nylex Avenue SALISBURY SA 5108 Phone (08) 8307 5100 (08) 8283 0401 Fax Leeton Site 9-11 McKay Avenue LEETON NSW 2705 Phone (02) 6953 6444 Fax (02) 6953 6266 6052221 / C