
Instructions / Assembly


6
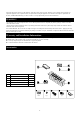
A
B
C
D
F
E
Pumice stones
ASSEMBLY
INSTRUCTIONS
* Please keep these owner's manual for future
reference.
*If you have opened the carton and removed all packages, please disregard the STEP 1 and 2. See the STEP 3
directly.
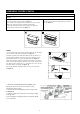
STEP 1. (1) Open the carton and turn it upside down, make sure the
4
pieces of the cartons open up as below in Figure A
.
(2) Lift off the carton carefully and be wary of the accessories
inside
falling away. Take away the box containing pumice stones
.
(3) Take all the packing materials away except for the
polyfoam
rounding the top of the fire table. See Figure A
.
STEP 2. (1) Turn the fire table heads up on a flat
ground.
(2) Remove
all
the polyfoam rounding the top of the
fire
table.
See Figure B
.
STEP
3.
(I) Check each part before using the product. Make sure the gas
supply
system is turned "OFF" before assembling. See Figure
C.
(II) Put the gas tank in the metal stand. Make sure the gas tank sits
on
the metal stand completely. Turn the wing screw on the outer part
of
metal stand clockwise to secure the gas tank tightly. See Figure
F.
(III) Locate the battery and remove the plastic cover first. Unscrew
the
rubber cap of the Electric Ignitor, place the AAA battery into the
battery
case. Make sure the positive pole ("+") towards the cap. Screw the
cap
back to the battery case tightly. See Figure
D.
(IV)
Evently distribute the pumice stones on the top of
the
irebowl.
See Figure
E.
** DO NOT COVER THE IGNITION SCREEN when
placing the pumice stones into the fire table. Always
keep Ignition Screen visible.
** Connect the Pressure-Regulating Valve to the gas tank.
See Figure G.
1) Turn the cylinder valve clockwise to close the gas supply
on the gas tank.
2) Screw Regulator coupling clockwise by hand only. Make
G
sure it is fastened.