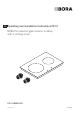
EN Operating and installation instructions PKI11 BORA Pro Induction glass ceramic cooktop with 2 cooking zones PKI11UMEN-004 www.bora.
Operating and installation instructions: Original Translation Manufacturer BORA Vertriebs GmbH & Co KG Innstraße 1 6342 Niederndorf Austria Contact T +43 (0) 5373 / 62250-0 mail@bora.com www.bora.com The distribution and duplication of this document, as well as the use and disclosure of its contents are prohibited unless expressly authorised. These operating and installation instructions have been drawn up with the greatest of care.
EN Table of Contents 1 General information 4 1.3 1.4 Target group......................................................... 4 Validity of the operating and installation instructions.......................................................... 4 Other applicable documents................................ 4 Presentation of information.................................. 5 2 Safety 6 1.1 1.2 2.1 2.2 2.3 2.4 2.5 2.6 General safety instructions..................................
General information EN 1 General information 1.1 Target group INFO These operating and installation instructions apply for the following target groups: Target group Requirements User The appliance can be used by children aged 8 and above as well as people with reduced physical, sensory or mental capacities or a lack of experience and/or knowledge if they are supervised or have been instructed how to safely use the appliance and understand the resultant risks. Children must be supervised.
General information 1.4 EN Presentation of information To make working with these instructions quick and easy, consistent formatting, numbering, symbols, safety instructions, terms and abbreviations are used throughout. Handling instructions are market with an arrow. XX Always carry out handling instructions in the sequence shown. Bullet points are indicated by a square bullet point at the edge of the line.
Safety EN 2 Safety 2.1 General safety instructions INFO The appliance complies with the stipulated safety requirements. The user is responsible for appliance cleaning and maintenance as well as its safe use. Improper use can lead to personal injury and damage to property. The operating and installation instructions contain important information about installation and operation. These enable you to protect yourself against injuries and prevent damage to the appliance.
Safety Households with children and people with special needs XX The appliance can be used by children aged 8 and above as well as people with reduced physical, sensory or mental capacities or a lack of experience and/or knowledge if they are supervised or have been instructed how to safely use the appliance and understand the resultant risks. XX Supervise children in the vicinity of the appliance. XX Children must not play with the appliance.
Safety EN WARNING! Risk of burns from hot cooktop! The cooktop and its exposed areas get hot during use. Once the cooking zone is switched off, it takes a little while to cool down below 60 °C. Touching hot surfaces can cause serious burns. XX Never touch the cooktop when it is hot. XX Keep children away from the cooktop when it is hot or ensure they are supervised at all times.
Safety CAUTION! Escaping hot liquids! Unattended pans can boil over allowing hot liquids to escape. Cooktop DANGER! Risk of electric shock! Incorrect connection of the device to the mains voltage could cause electric shocks. XX Always keep an eye on pans while cooking. cooking sessions must be constantly monitored. XX Short XX Make sure that the device is firmly connected to the mains voltage. XX Make sure the device is connected to a properly installed earth conductor system.
Safety EN 2.4 Safety instructions – disassembly and disposal The device must only be disassembled by trained specialists who are familiar with and comply with the standard national regulations and supplementary regulations of the local utility companies. Work on electrical components must only be conducted by trained electrical personnel. DANGER! Risk of electric shock! Incorrectly disconnecting the appliance from the mains results in a risk of electric shock.
Technical data Technical data Device dimensions cooktop 220 - 240 V Frequency 50/60 Hz Power consumption 3.7 kW Fuse protection 1 x 16 A Dimensions (width x depth x height) 370 x 540 x 52 mm Weight (incl. accessories/ packaging) 8.0 kg Cooktop Value Power levels 1 - 9, P Heat retention levels 3 Front cooking zone power setting Ø 230 mm 2300 W 3700 W Rear cooking zone Power setting Ø 165 mm 1400 W 2200 W 30 Ø2 Fig. 3.2 Cooktop energy consumption Front cooking zone Ø 230 mm 179.
Device description EN 4 Device description 1 Observe all safety and warning information during operation (see the Safety section). 2 3 The cooktop has the following features: QQ Automatic heat up function QQ Safety shut-down QQ Electronic power control (9 levels) QQ Power setting QQ Childproofing feature QQ Residual heat display QQ Pause function QQ Pan size recognition QQ Heat retention levels QQ Cooking zone indicator 4.1 4 Fig. 4.
Device description Knob operation All the cooking zones are controlled using a control knob. By twisting the control knob and pressing the touch surface, the power levels and functions for the relevant cooking zone are controlled (see Operation section).
Device description EN Power level Cooking duration in min:sec 1 2 3 4 5 6 7 8 0:40 01:00 02:00 03:00 04:20 07:00 02:00 03:00 XX Pay attention to the cookware bottom. The base of the cookware should not show any sign of curvature. Due to incorrect temperature monitoring of the hob caused by the air gap between the cookware and the temperature sensor underneath the hob, overheating may occur. The bottom of the cookware must not have any sharp grooves or sharp edges to avoid scratching the cooktop.
Device description Power level Switch off after hours:minutes 1 08:24 2 06:24 3 05:12 4 04:12 5 03:18 Timer function 6 02:12 INFO 7 02:12 8 01:48 9 01:13 P 00:10 4.3.7 Timer functions There are two different timer functions for each cooking zone. QQ t appears in the control knob display. INFO You can set a time range of between 1 and 120 minutes for the timer functions. The timer function is an automatic cut-off which automatically switches off a cooking zone which is in use.
Installation EN 5 Installation XX Observe all safety and warning information (see the Safety section). XX Follow the enclosed manufacturer’s information. INFO The cooktop must not be installed above cooling devices, dishwashers, stoves, baking ovens, washing machines or driers. INFO The contact surface of the worktops and wall sealing strips must be made of a heat-resistant material (up to approx. 100 °C).
Installation Cut-out dimensions flush installation 5.4 INFO All dimensions from the front edge of the front cover. Worktop overhang x Fig. 5.2 10 - 40 If there are plans for a cable protection floor (false floor) below the device, this must not impede the ventilation. Cut-out dimensions 14 7 +0,5 Fig. 5.3 XX Ensure there is sufficient ventilation underneath the cooktop. INFO ≥ 700 For sufficient air intake, an opening crosssection in the kitchen units of at least 50 cm2 is recommended.
Installation EN 5.5 5.4.2 Surface mounting ≤ ≥ 74 B ±2 Installing the cooktop Clearance of one millimetre should be planned between the built-in appliances. INFO A clearance of two millimetres should be planned around the built-in appliances. INFO A mounting rail should ideally be installed between adjacent cooktops (PZMS mounting rail available as an accessory). INFO Alternatively, the cooktop can be installed rotated by 180°. x Fig. 5.5 ≥ 700 ≥ 74 516 ±2 R5 INFO 5.5.
Installation 1 370 1 110 1 370 Ø5 0 EN 1 110 370 ±0 ,5 ≥70 90 90 196 Fig. 5.9 Installing the control knob Fig. 5.11 XX Pull off the selector ring. XX Unscrew the fixing nut. XX Push the control knob through the drilled hole in the floor unit’s panel from the front. XX Screw the fixing nut onto the control knob from the back and lightly tighten it. XX Vertically align the control knob in the 12 o’clock position based on the markings. XX Tighten the fixing nut.
Installation EN 1 INFO If the device is installed rotated by 180°, the connections for the control knob and the automatic extraction system are at the back. INFO I f the cooktop is installed rotated by 180°, the cooking zone indicator is automatically shown as rotated by 180°. INFO The scope of delivery includes sufficiently long cables. 2 Fig. 5.13 [1] [2] Cooktop and height adjustment plates 5.5.
Installation Connection on the control knob EN Standard connection for the cooking zones 1 2 3 4 5 1 Fig. 5.17 [1] Control knob connection at the back Control knob connection at the back Connections on the cooktop 7 1 2 Fig. 5.19 ZONE1 INTERF. COM1 ZONE2 Fig. 5.18 [1] [2] [3] Connections on the cooktop Control knob connection for the front cooking zone (zone 1) Connection for the automatic extraction system Control knob connection for the rear cooking zone (zone 2) www.bora.
Installation EN Connecting the cooking zones when the cooktop is installed rotated by 180° Connecting the automatic extraction system XX Connect the cooktop extractor to the connection provided for the automatic extractor system on the cooktop. 5.5.5 Establishing the power connection 7 XX Observe all safety and warning information (see the Safety section). XX Observe all national and regional laws and regulations as well as the supplementary regulations of the local utility companies.
Installation 5.6 Configuration menu Once installation is complete, you can configure certain basic settings for your cooktop, which you can also change again at any time. 5.6.1 Opening the configuration menu XX Turn the control knob to the 11 o’clock position. t appears on the control knob display. XX Tap the control knob’s touch-operated area. The display switches to 000 . XX Press the touch-operated area again within 3 seconds, retaining contact with it for 5 seconds.
Installation EN Availability of the pause function If you have confirmed menu item C 9 , you can permanently deactivate the pause function. Setting Pause function available/deactivated C 90 C9 1 C 92 Pause function activated Tab. 5.9 Factory default Pause function deactivated Pause function with power display activated Availability of the pause function 5.6.3 Changing the set value XX Turn the selector ring clockwise to increase the value.
Operation 6 Operation 6.2 XX Observe all safety and warning information during operation (see the Safety section). INFO The cooktop may only be operated when the stainless steel grease filter of the cooktop extractor is installed (see operating instructions for cooktop extractor). INFO Clean the cooking zone before using the cooktop for the first time (see the Cleaning section). 6.1 General operating instructions The cooktop is controlled using the control knobs.
Operation EN 6.2.3 Automatic heat up function INFO Switching on the automatic heat up function INFO The exact values for the heat-up time can be found in the Device description section. XX Select the desired power level (= later continuous cooking level). XX Within 3 seconds of setting the power level, press the touch surface of the control knob for at least 1 second. QQ The automatic heat up function is activated and the control knob shows an A in front of the continuous cooking level selected (e.g.
Operation Permanently deactivating the childproofing feature EN Activating the timer function XX Turn the knob ring from the 12 o-clock position to a power level. QQ L is displayed. XX Press the touch surface of the control knob for 5 seconds. QQ An acoustic signal can be heard and the control knob display shows the power level selected. QQ The childproofing feature is only deactivated for this cooking session and you can set the power level you want.
Operation EN Deactivate pause function XX Press the touch surface of the control knob for 1 second. QQ A signal tone is heard and the previously set power level is displayed. QQ The cooking session continues. 6.2.9 Switching off the cooking zone INFO When H is displayed, the cooking zone is still hot. INFO Turn the cooking zone off after use. Do not rely on the pan size recognition. Fig. 6.4 Switching off the cooking zone XX Twist the knob ring to the 12 o’clock position.
Cleaning and maintenance 7 Cleaning and maintenance XX Observe all safety and warning information (see the Safety section). XX Follow the enclosed manufacturer’s information. XX When conducting scheduled cleaning and other maintenance, make sure that the cooktop and cooktop extractor are fully switched off so as to prevent injury (see Operation section). QQ Regular cleaning and maintenance ensures the longevity of the product and optimal function.
Cleaning and maintenance EN 7.4 Cleaning the control knobs 2 1 3 Fig. 7.1 [1] [2] [3] Pull out the knob ring Knob casing Touch surface knob ring 7.4.1 Cleaning the knob ring The knob ring can only be cleaned by hand. XX Remove the knob ring from the knob housing. XX Use a cleaner and degreaser in one. XX Rinse the knob ring in hot water. XX Clean the knob ring with a soft brush. XX Rinse the knob ring well after cleaning. XX Dry the knob ring carefully.
Troubleshooting 8 EN Troubleshooting Observe all safety and warning information (see the Safety section). Operating situation Cause Remedy The cooktop cannot be switched on. Knob ring missing Place the knob ring on the control knob. The fuse or automatic circuit breaker of the electrical wiring system in the apartment and/ or house is defective. Replace the fuse. The fuse or the automatic circuit breaker trips multiple times Contact BORA Service Team The power supply is disconnected.
Decommissioning, d isassembly and disposal EN 9 Decommissioning, disassembly and disposal XX Observe all safety and warning information (see the Safety section). XX Follow the enclosed manufacturer’s information. 9.1 Decommissioning Decommissioning is understood as final shutdown and disassembly. Following decommissioning, the device can either be installed into other units, sold on privately or disposed of. INFO Electricity and gas connections may only be disconnected by qualified specialists.
Warranty, technical service, spare parts EN 10 Warranty, technical service, spare parts XX Observe all safety and warning information (see the Safety section). 10.1 Warranty The warranty period is 2 years. 10.2 Service BORA Service: see back page of operation and installation instructions +800 7890 0987 XX If there are faults which you are not able to resolve yourself, please contact your BORA specialist supplier or the BORA Service Team.
Notes EN 11 Notes 34 www.bora.
Nameplate: (please affix) Germany: Australia - New Zealand: BORA Lüftungstechnik GmbH Rosenheimer Str. 33 83064 Raubling Germany T +49 (0) 8035 / 9840-0 F +49 (0) 8035 / 9840-300 info@bora.com www.bora.com BORA APAC Pty Ltd 100 Victoria Road Drummoyne NSW 2047 Australia T +61 2 9719 2350 F +61 2 8076 3514 info@boraapac.com.au www.bora-australia.com.au Austria: BORA Vertriebs GmbH & Co KG Innstraße 1 6342 Niederndorf Austria T +43 (0) 5373 / 62250-0 F +43 (0) 5373 / 62250-90 mail@bora.com www.bora.