
Installation and Operation Guide


EN
23
Installation
www.bora.com
5.6 Configuration menu
Once installation is complete, you can configure certain
basic settings for your cooktop, which you can also
change again at any time.
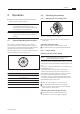
5.6.1 Opening the configuration menu
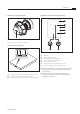
Turn the control knob to the 11 o’clock position.
t
appears on the control knob display.
Tap the control knob’s touch-operated area. The
display switches to
0
0
0
.
Press the touch-operated area again within 3 seconds,
retaining contact with it for 5 seconds.
C
appears on the control knob’s display, an acoustic
signal sounds and the configuration menu opens.
5.6.2 Selecting a menu item
Select the desired menu item by turning the selector
ring.
The following menu items are available for selection:
Menu items
C
0
Acoustic signal volume
C
1
Select an operating mode (normal operation or demo
mode)
C
2
Installation 0° or 180°
C
9
Availability of the pause function
Tab. 5.5 Menu items in the conguration menu
Tap the touch-operated area to confirm the selected
menu item.
The submenu opens and the display switches to a
three-digit combination (e.g.
C
2
3
).
INFO In the three-digit combination displayed, the
digit on the right indicates the value saved in
the system.
Setting the volume of the acoustic signal
If you have confirmed menu item
C
0
, you can set the
volume of the acoustic signal.
Setting Acoustic signal volume
C
0
0
100% (max. volume) Factory default
C
0
1
10% (min. volume)
C
0
2
20%
C
0
3
30%
C
0
4
40%
C
0
5
50%
C
0
6
60%
C
0
7
70%
C
0
8
80%
C
0
9
90%
Tab. 5.6 Acoustic signal volume
Selecting the operating mode
If you have confirmed menu item
C
1
, you can select the
operating mode.
Setting Operating mode
C
1
0
Normal operation Factory default
C
1
1
Demo mode
Tab. 5.7 Operating modes
INFO All control knob functions are available in
demo mode. The cooktop’s heating function
is deactivated. The demo mode is used for
showrooms, for example.
Installation 0° or 180°
Menu item
C
2
can be used to set whether the cooktop
has been installed rotated by 180°.
Setting
Display
C
2
0
Installation 0° Factory default
C
2
1
Installation 180°
Tab. 5.8 Installation direction
INFO If the cooktop is installed rotated by 180°, the
setting
C
2
1
correctly configures the cooking
zone assignment in the control knob display
and the cooking zone indicator is shown as
rotated by 180°.