
Installation Guide


3
General Safety Instructions for Power Tools
Using power tools of any kind can be dangerous if safe operating procedures are not followed. Recognizing the
hazards of each tool and using them with respect and caution will considerably limit the possibility of personal
injury. However, if safety precautions are ignored, personal injury will likely result. Always use common sense – your
personal safety-is your responsibility. Know your power tool. Read and understand the Operator’s Manual and
observe the warnings and instruction labels affixed to the tool.
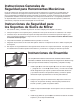
Safety Instructions for Miter Saw Stands
1. Use caution when folding or unfolding legs to limit any finger pinch points.
2. Place stand on flat and level surface to keep tool from rocking or tipping.
3. Make certain that work support extensions are within safe operating limits, and are properly locked in place before
using tool. Do not exceed 300 lbs. on main frame table.
4. Test the setup for stability before proceeding with work.
5. Be sure the miter saw is tightened securely at all mountings before use.
6. This stand will safely hold some 12” miter saws if the weight distribution is centered. For example, 12” sliding miter
saws are NOT to be used on this stand because the weight of the saw in the rear-most position can make the stand
unbalanced, becoming a tipping hazard.
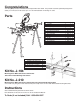
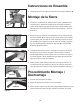
Assembly Instructions
Read all assembly instructions completely before attempting assembly.
See parts list on Page 2 for names and pictures of parts. Identify all
components and hardware. Do not discard box until after you have found all
the components and completed assembly
1. Install Leg
as shown in Figure 1 to Top Frame
and secure with
M6 x 45mm Bolt
and M6 Lock Nut
. Insure that Snap Pin is facing out
and securely latches in the open and closed positions.
Do not over tighten. Repeat on remaining three Legs.
Note: The two legs with the additional 4 holes need to be mounted on the
same end of the Top Frame.
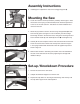
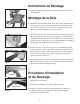
2. Place top frame upside down on your workbench or work surface. Open
the legs by depressing the snap pins and pivot the legs into the open
position.
3. Install the Outrigger Supports
into the Top Tube as shown in Figure 2.
4. Install 3-Point Knobs
J
into the threaded holes in the Top Tubes and
Outrigger Supports
.
Figure 1
Figure 2