
Installation Guide

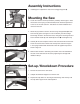


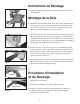
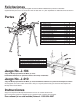
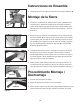

Figure 3
Assembly Instructions
5. Install Support T’s
into the ends of the Outrigger Supports
.
Mounting the Saw
6. Locate the machine mounts (Part# 3044). Carefully review Figure 3. Note
the location of the spring mounted handles; these should be positioned
to the rear of the saw as shown. This allows for easier installation and
removal of the saw.
7. Attach the (2) machine mounts to the saw using carriage bolts
K
at each
saw mounting point. See Figure 4. From the bottom, pass the carriage
bolt through the slot in the machine mount, through the mounting hole and
secure with flat washer
M
, lock washer
N
and nut
L
. Hand tighten only.
8. Carefully lift the saw and place onto the miter saw stand. Be sure the hook
end of the machine mount locks under the top tube as shown in Figure
5. The spring loaded handle should lock under the opposite top tube as
shown in Figure 6.
9. Slide the saw forward or back along the machine mount to best balance
the saw on the stand. Secure the saw by tightening the carriage bolts
installed in Step 7.
Set-up / Knockdown Procedure
1. Remove the saw from the work stand.
2. Collapse the Extension Supports to minimum size.
3. Depress the snap button on each leg and fold the leg under the Top until
the snap button pops into the closed position.
4
Figure 4
OPEN
LOCKED
Figure 6
Figure 5