
User's Manual


EN
33
Installation
www.bora.com
Fitting the installation clamps
click
click
1
2
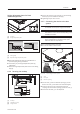
Fig. 6.31 Inserting the cooktop
[1] Retaining brackets
[2] Installation clamps
INFO 2 installation claps must be fitted to each side of
the cooktop.
Slide the 4 installation clamps [2] until they reach
the stop position in the retaining brackets [1] on the
bottom of the cooktop.
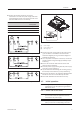
Extending the telescopic pull-out (optional)
INFO The telescopic pull-out is used to connect the
duct to the back wall of the kitchen unit. It
enables the distance between the cooktop and
the back wall of the unit to be flexibly bridged
(max. 80 mm). If necessary, the telescopic pull-
out can be extended by a further 105 mm with the
PULBTA extension (available as an accessory).
(68,5)
(222,5)
137
PUXU/PURU
Schablone für Rückwandausschnitt
Template for cut-out on rear wall
R12,5
PURUBP-001
132
125
445
132
10
20
30
40
0
10
20
30
40
0
10
20
30
40
0
10
20
30
40
0
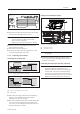
Fig. 6.28 Template for back wall cut-out
Position the template on the back wall of the unit with
the help of the markings and instructions.
INFO Centre of cut-out (horizontal):
125 mm from the top edge of the cooktop
Centre of cut-out (vertical):
Offset 132 mm from the centre of the cooktop.
Draw the bore hole accordingly with the aid of the
drilling template provided.
Saw out the return flow aperture.
Decrease the height of the skirting boards or create
corresponding openings in the plinth.
6.7.2 Preparing the cooktop
Attaching the sealing tape
2
1
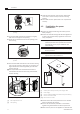
Fig. 6.29 Sealing tape for surface mounting
1
2
Fig. 6.30 Sealing tape, ush installation
[1] Black, heat-resistant silicone sealant
[2] Sealing tape
With surface mounting, attach the enclosed sealing
tape [2] to the underside of the cooktop before
installing it. Do not leave any gaps.
With flush installation, attach the enclosed sealing tape
[2] to the horizontal cutting edge in the worktop cut-
out, even if you are sealing the cooktop with a silicone
sealing compound [1] or similar.