
User's Manual


EN
39
Installation
www.bora.com
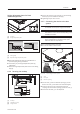
Fig. 6.50 Display Menu item C: Power management
Select the corresponding operating mode (tap the
corresponding segment on the slider).
Confirm and save the setting by moving to the next
menu item (tap the multi-function display/indicator
C
).
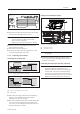
Menu item D:
Demo mode
The appliance can be set to demo mode, which includes
all operating functions, but the heating function of the
cooktops is deactivated.
INFO Pan size recognition is deactivated in demo mode.
Fig. 6.51 Display Menu item D: Demo mode
Tap the top slider segment.
The demo mode symbol
d
is displayed on all cooking
zones for one second.
o
n
is displayed.
Confirm and save the setting by moving to the next
menu item (tap the multi-function display/indicator
d
).
Closing the dealer and service menu
When you have been through all of the basic configuration
menu items:
Long press on the multi-function display.
The standard display appears.
6.9.2 Function test
Carry out a thorough function test on all devices.
In the event of error messages, see the
Troubleshooting chapter.
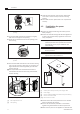
6.10 Sealing the device
1
Fig. 6.52 Silicone sealant in surface mounting
[1] Black, heat-resistant silicone sealant
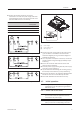
1
Fig. 6.53 Silicone sealant in ush installation
[1] Black, heat-resistant silicone sealant
Once all of the installation work is complete, seal the
device with black, heat-resistant silicone sealant [1].
Make sure that no silicone sealant gets under the
cooktop.
6.11 Handover to user
Once installation is complete:
Explain the main functions to the user.
Explain all safety-related aspects of operation and
handling to the user.
Provide the user with the accessories and operating
and installation instructions to be kept in a safe place.