
Installation Guide


2
VERSETTA STONE
®
MANUFACTURER’S INSTALLATION INSTRUCTIONS
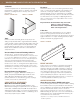
J Channel
J Channel requirements are determined by measuring
the perimeter of window and door openings, trim material
transitions, cladding transitions and any control joints.
See Figure 3.
Tools
Hammer, circular saw, hand grinder, chop saw (ex. 10"
sliding compound miter with a segmented diamond blade)
or wet saw with continuous diamond turbo blade, level, laser
level (optional), chalk line, tape measure, pneumatic roofing
nail gun (optional), tin snips, 5⁄16" rod or dowel (optional),
brush, small screwdriver. Follow the tool manufacturer’s
safety instructions.
Versetta Stone Textured Finishing Adhesive
Versetta Stone
™
Textured Finishing Adhesive is the
recommended adhesive for Versetta Stone. It may be used
to conceal any supplementary fasteners or odd material
terminations, and to install accessories and partial panels.
Likely areas where partial panels will be installed include:
under windows, eave terminations, and at horizontal material
transitions. Each 10 fl. oz. cartridge will adhere approximately
4 partial panels. Determine estimated length of these areas
and divide by 3 and then by 4. This will provide an estimated
number of 10 oz. tubes you may need.
Personal Protective Equipment
Safety glasses or goggles, ANSI Z87.1 Grinding Face
Shield, a properly fitted NIOSH approved N-95 series
disposable particulate filtering facepiece respirator
(formerly referred to as “dust masks”), gloves, ear plugs
or muffs, steel toe boots and hard hat.
SUNDRY MATERIAL REQUIREMENTS
Water Resistive Barrier (WRB)
Minimum one layer of Grade D building paper or other
WRB material meeting the requirements of ICC Acceptance
Criteria #38 or ASTM E 2556/E 2556M. #15 felt provides a
dark background that helps conceal any area where texture
or installation allow the WRB to show. Local building code or
climate may require 2 layers of WRB.
Fasteners
Fasteners must be corrosion-resistant galvanized roofing
nails or screws with head diameter 3⁄8" minimum and
shank 1⁄8", and length suitable to penetrate framing
material minimum 1". Electro-galvanized are acceptable
but may exhibit premature corrosion. Boral Stone Products
recommends the use of quality, hot-dipped galvanized
nails or screws. Boral is not responsible for the corrosion
resistance of fastener.
Important Note: Treated lumber may react with
metal or coating of fastener.
Determine material compatibility
when selecting fasteners.
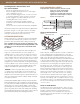
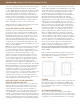
L Bracket
Some sill applications will require the use of a support
bracket. You may purchase the bracket from Boral or
source or fabricate a bracket to the specifications shown in
Figure 4. Material of “L” shape shall be galvanized to G90
and be of minimum 26 gauge thickness.
BEFORE YOU BEGIN
Inspect the area of installation to determine that framing
has been done 16" on center and that the sheathing
material is minimum 7⁄16" OSB or minimum ½" plywood.
Verify that an appropriate water resistive barrier, flashing
and caulking have been installed, or that they are part
of your installation package. Check walls for plumb and
square and identify any defects or protrusions. Contact
the builder, registered design professional or contractor to
correct any deficiencies before you proceed.
SURFACE PREPARATION
Water Resistive Barrier (WRB) Application
Cover sheathing with minimum one layer of WRB, following
the installation instructions provided by the manufacturer
and local building code requirements. Wrap WRB minimum
16" past all inside and outside corners to ensure no
vertical seam is present at the corner. A second layer of
WRB extending 16" past each corner is recommended for
additional protection.* Integrate WRB with all flashing. Do
not fasten bottom 12" at this time.
* Application of second layer must meet all WRB manufacturer's
installation guidelines.
FIGURE 4 - L BRACKET
FIGURE 3 - J CHANNEL
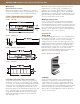
FIGURE 2 - STARTER STRIP