
Installation Guide


7
VERSETTA STONE
®
MANUFACTURER’S INSTALLATION INSTRUCTIONS
minimum of 1". Fasten electrical box extension to existing
electrical box keeping box level and plumb. If a telescoping
electrical box extension is being used, fasten it using 1-½"
screws. The extension box flange should be set equal
to the thickness of the Versetta Stone Accessory Box
thickness. Weatherproof the perimeter of box penetration
with additional flashing/caulk. Apply a self adhered
flashing material over top edge of flashing, overlapping 1".
Temporarily place Accessory Box stone over box extension
making sure it is level and plumb. Trace Accessory Box
stone perimeter onto flashing material. Remove Accessory
Box stone and store for installation later. Install Versetta
Stone panels, using standard installation, up and around
traced Accessory Box stone lines. Continue with balance
of the panel installation to complete the wall. Once the
wall is completed you are ready to install the Accessory
Box stone. Apply 3/8" beads of adhesive in an upside-
down “U” shape. Adhesive beads must be thick enough
to make substantial contact with back of Accessory Box
stone. Install Accessory Box stone and press into adhesive
to assure complete contact. Maintain pressure against
Accessory Box stone to ensure proper initial bond. It may
be necessary to insert a wedge or shim between box
extension and Accessory Box stone or Versetta Stone
panels, to hold level and plumb during curing.
CAUTION: TEMPORARY PRESSURE OR SUPPORT MAY
BE REQUIRED TO MAINTAIN FULL ADHESIVE CONTACT
UNTIL CURED.
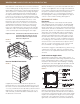
Refer to adhesive manufacturer installation instructions for
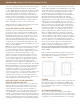
temperature and cure time recommendations. See Figure
15 and Figure 16 for examples of accessories.
CLEANING
Cutting dust and general construction dust can be removed
with clean water and a nylon bristle brush. Stubborn dirt
may require the addition of a granulated general detergent.
Do not clean with harsh chemicals or acid products. Do not
pressure wash.
SALT AND DE-ICING CHEMICALS
All concrete and masonry materials are vulnerable to
damage by salt and de-icing chemicals. Do not use salt or
de-icing chemicals on the product or in areas adjacent that
may splash onto it. See printed warranty for more details.
FIGURE 16 - RECEPTACLE BOX
FIGURE 15 - LIGHT BOX
7
section for “L” Bracket requirements. Extend this treatment
behind entire Versetta Stone Wainscot Cap mounting
location. Apply adhesive as directed to the entire mounting
location. Place Versetta Stone Wainscot Cap into place,
level, and press firmly into adhesive. It is important to
maintain full adhesive contact. Shim the Cap or bend “L”
brackets to achieve full adhesive contact and level status.
Install fasteners through available nail flange as outlined in
the “Installing Versetta Stone Wainscot Cap Product in a
Wainscot Application” section of these instructions.
Additional temporary support may be needed to maintain
full adhesive contact until adhesive cures.
INSTALLING VERSETTA STONE TRIM STONE
Prepare the surface as outlined in the “Partial Panels and
Accessories” section of these instructions. Apply quarter-
sized dabs of adhesive a minimum of ½" tall, every 3"- 4" to
flashing/lath, back of trim stone or both. Note: It is critical
that the adhesive bead be large enough to create contact
between stone and flashing. Place trim stone tight to
adjacent window/door/trim and press firmly into adhesive.
Continue trim stone installation by attaching stone to wall,
with 6 screws through pre-drilled nailing flange holes. Do not
use nails for this application.
Note: If the Versetta Stone Trim Stone will not be retained
by a Versetta Stone J Channel or Starter Strip, or other
wood/composite trim material, or the partial panel is
more than 4 feet above ground, supplementary fasteners
are required to hold panel during adhesive curing.
Additional fasteners are required through the masonry
portion of the panel. Screws are the fastener of choice
for this step. As a general rule, one additional fastener
every 16" will be sufficient to supplement the adhesive.
The Versetta Stone Trim Stone will need to be pre-
drilled with a masonry drill bit of an appropriate size, as
recommended by the fastener manufacturer. See “Sundry
Material Requirements” section for fastener requirements.
The head of this fastener will likely be visible when the
installation is complete. To conceal it, we recommend
a dab Versetta Stone Textured Finishing Adhesive.
Fasteners are easier to conceal in shaded or darker areas
of the stone, but may crack a panel if installed in the
simulated mortar joints. Do not over tighten fasteners.
Use enough force to pull the panel into the adhesive and
maintain substantial contact during curing.
INSTALLING VERSETTA STONE ACCESSORIES
RECEPTACLE BOX AND LIGHT BOX
Identify electrical box connection location and verify that
power has been disconnected. Prepare the surface as
outlined in the “Partial Panels and Accessories” section
of these installation instructions. Prior to installation of
metal flashing/lath, trace enclosed electrical box extension
onto the flashing or lath. Flashing material should be a
minimum of 4" larger than the product being installed. Cut
hole into flashing material to match outline of electrical box
extension. Install flashing material over existing outlet box.
Flashing/lath material fasteners should penetrate framing a