
Installation Guide


8
VERSETTA STONE
®
MANUFACTURER’S INSTALLATION INSTRUCTIONS
GOOD BUILDING PRACTICES
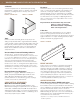
Make sure the product is being applied to a wall or structure that meets all building code requirements. Code-approved
flashing materials must be present at all terminations, penetrations and material transitions. Control water and minimize
penetration caused by roof run off, gutters and downspouts. If there is any question as to the integrity of the wall or water
management principles, contact the appropriate owner, registered design professional or builder for corrective measures.
REPAIR/REMOVE/REPLACE
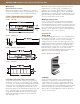
Using a masonry saw or grinder with a diamond blade and proper personal protective equipment, cut out the area to be
replaced. Take care to avoid damaging the weather resistive barrier behind the panel. Trim new panels to fit the area you just
cut out. Repair any damage to the water resistive barrier, making sure to lap and seal in shingle fashion. Follow the partial
panel installation method to install replacement panel.
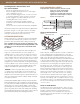
SPECIAL APPLICATIONS
Follow the instructions in the table below to apply Versetta Stone to additional substrates not addressed in the previous
sections. These instructions focus on the recommended fasteners to use for these applications. Except where noted
below, spacing and quantity of fasteners per Flat Panel, Universal Corner, Partial Panel and Accessory all remain the same
as the standard Versetta Stone installation instructions. Fasteners must be corrosion resistant and suitable for exterior
use and exposure. Fasteners must be compatible with galvanized sheet metal. Boral Stone Products LLC recommends
the use of quality, hot-dipped galvanized nails or screws. Boral Stone Products LLC is not responsible for the corrosion
resistance of the fasteners.
VersettaStone.com
©2019 Boral Building Products Inc. Item #10012480-UC | VS9263 8/19
Atlantic
®
Premium Shutters | Builders Edge
®
| Foundry
®
Specialty Siding | Grayne
®
Engineered Composite Shingle
Kleer
®
| Mid-America Siding Components
®
| SturdiMount
®
| Tapco Tools
®
| TruExterior
®
Siding & Trim
Vantage
®
Shutters | Versetta Stone
®
| Wellcraft Egress Systems
®
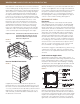
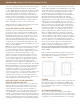
FASTENER RECOMMENDATIONS
Note 1: Concrete anchors may be reduced to 3 per Flat Panel when located with one at each end and one at center.
Note 2: Pre-drilled holes in Versetta Stone nail flange are 3/16". If you choose to increase the diameter of the fastener,
the pre-drilled holes will also need to be enlarged.
Note 3: Versetta
Stone can be installed over 1/2" rigid insulation if maintaining the prescribed penetration
*Panels may be difficult to remove if installed with roofing nails.
Recommended Installation Tools: Hammer, Circular Saw w/ Diamond Blade, Hand Grinder, Chop Saw or Wet Saw,
Level, Chalk Line, Tape Measure, Tin Snips, Brush, Small Screwdriver
Application
Groupings
Sheathing
Fastener
Description
Fastener
Image
Fastener
Penetration
Max. Head
Thickness
Min.
Head Dia.
Min.
Shaft Dia.
-Wood Framing
-7/16" OSB
-1/2" Plywood
-1/2" Drywall
-1/2"
Insulation Board
-Exterior Wood Screws
-Roofing Nails*
1" penetration
into framing
0.13 inch 0.375 inch 0.125 inch
-CMU Block
-Concrete
-Brick
N/A
Tapcon Flat Head
Concrete Anchors
1" penetration
into masonry
0.13 inch
0.375 inch 0.1875 inch
-Steel Framing
-7/16" OSB
-1/2" Plywood
#8 or #10
(ASTM C1513)
Self Tapping, Self
Drilling Screw
Minimum
3 thread
penetration
through framing
0.13 inch
0.375 inch 0.164 inch