• • • 1 • • • User Guide Ver s i o n 2 .
• • 2 •• • • Boris Calligraphy Version 2.0 The material contained herein is protected by copyrights. Permission to use materials may be granted upon written request and proper credit. Contact information Boris FX, Inc. 381 Congress Street Boston, MA 02210 Phone: (617) 451-9900 Fax: (617) 451-9916 E-mail: info@borisfx.com http://www.borisfx.com For information on site licenses, please call (617) 451-9900 or e-mail sitelicense@artelsoft.
• • Boris Calligraphy • 3 • • • Boris Calligraphy Release Information . . . . . . . . . . . . . . . . . . . . . . . . . . . . . . . . . . . . . . . . . . . . . . . . . . . 5 New Features in Boris Calligraphy 2.0 . . . . . . . . . . . . . . . . . . . . . . . . . . . . . . . . . . . . . . . 5 Understanding the Boris Text Generators . . . . . . . . . . . . . . . . . . . . . . . . . . . . . . . . . . . 6 Creating a Text Effect . . . . . . . . . . . . . . . . . . . . . . . . . . . . . . . . . . . . . . . . . .
• • 4 •• • • Creating Font Styles. . . . . . . . . . . . . . . . . . . . . . . . . . . . . . . . . . . . . . . . . . . . . . . . . 33 Naming and Deleting Styles . . . . . . . . . . . . . . . . . . . . . . . . . . . . . . . . . . . . . . . . . . . . . . 33 Applying Styles . . . . . . . . . . . . . . . . . . . . . . . . . . . . . . . . . . . . . . . . . . . . . . . . . . . . . . . . 34 Applying Text Styles. . . . . . . . . . . . . . . . . . . . . . . . . . . . . . . . . . . . . . . . . . . . . . . . .
• • Boris Calligraphy • 5 • • • Release Information Welcome to Boris Calligraphy 2.0. Boris Calligraphy 2,0 is an update to Boris Calligraphy 2.0 for Apple Final Cut Pro for Mac OS X. This section contains information regarding new features in Calligraphy 2.0. For information about other Boris products and additional resources, visit our web site at www.borisfx.com. New Features in Boris Calligraphy 2.0 Boris Calligraphy version 2.0 includes the following new features.
• • 6 •• • • Understanding the Boris Text Generators Boris Calligraphy includes four Final Cut Pro Generators: Title 3D, Title Crawl, Vector and Text Scrambler. Title 3D offers vector-based text that can be manipulated in 3D Space with full pivot control, animated tracking and other text transformations. For more information on vectors, see “Understanding Vector Graphics and Bitmaps” on page 8. Once you set the characteristics of the individual text characters, you can animate the text.
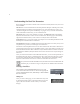
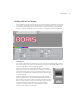
• • Boris Calligraphy • 7 • • • Understanding the Calligraphy Text Controls The following controls appear in the Calligraphy Text window. Working with Sliders You can adjust parameters that use sliders via three methods; drag the slider, scrub the numerical Þeld or manually enter values in the numerical Þeld that accompanies the parameter. Drag here to scrub. Some parameters allow values higher than the range of the slider, which you can enter into the numerical Þeld, then press Return.
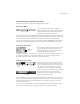
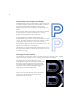
• • 8 •• • • Understanding Vector Graphics and Bitmaps A bitmap image is an image represented by a grid of pixels, each of which is assigned a speciÞc color. This produces a coherent image when viewed at the intended size, but if scaled dramatically the pixels become apparent and the image loses quality. The example at right shows the letter P represented as a bitmap. A video image is an example of a bitmap, as is an image produced in an application such as Photoshop.
• • Boris Calligraphy • 9 • • • Working with the Text Window The parameters in the Text window allow you to create, import, and edit text for inclusion in your effect. The upper portion of the Text window is the text preview area. You can type text in this area, then select one or more characters to make style changes using the Style, Page, Color, Border, and Shadow tabs. These tabs are explained in the following sections.
• • 10 •• • • Using Contextual Menus in the Text Window You can use contextual menus in the Text window to cut, copy, and paste text.You can also change the color of the Text window background. 1. Control-click or Right-click the Text window to open its contextual menu. 2. Choose the appropriate menu item: • • • • • Cut lets you delete the selected text and save it to your system clipboard. Copy lets you copy the selected text.
• • Boris Calligraphy • 11 • • • Tab justified right Tab justified left Resetting Text Styles To reset parameters in the selected text, click the Reset Style button. Any parameter changes that you made in any of the Text window’s tabs are reset to the default. You must select the text that you want to reset. To reset all text, press Command-A before clicking the Reset Style button.
• • 12 •• • • Previewing Text The Style Preview menu sets which styles display in the text preview area. All Styles previews the text as it will appear in the Viewer window. Basic Styles does not display shadows, borders, and some Style tab transformations (Style Skew, Style Scale, Style Baseline). This speeds previews without affecting the text in the Viewer window. Draft Typing does not display shadows, borders, and some text transformations while you type.
• • Boris Calligraphy • 13 • • • Working with the Style Tab The Style tab controls allow you to set the font, size, and style of the text, in addition to the tracking, leading and kerning of the characters. Use the Font menu to choose a font from the list of fonts available on your system. Then set the font size using the Size menu or by typing a custom font size and pressing Return. The font Size menu retains the three most recently used custom font sizes.
• • 14 •• • • Justifying Text To align text horizontally, click a JustiÞcation button. The text is justiÞed in relation to the page width and height. This parameter affects the text globally, regardless of which characters are currently selected. The JustiÞcation buttons in the second row justify the text to both margins when you work with more than one line of text. Flush Left JustiÞcation forces all lines of text to justify and left justiÞes the last line.
• • Boris Calligraphy • 15 • • • Leading adjusts the spacing, in pixels, between multiple lines of text. This parameter affects the currently selected lines of text. Style Skew X and Style Skew Y distort the selected character(s) along the horizontal and vertical axis, respectively. Like all parameters in the Text window, Style Skew is not animatable. To create an animated skewing effect, use the Letter Skew parameters in the Controls tab.
• • 16 •• • • Style Hue adjustments Style Hue= 90 degrees Style Hue=130 degrees Style Hue=180 degrees Style Baseline adjusts the vertical position of the selected character(s) in relation to the baseline of the text. Decrease this value to move the bottom of the character below the baseline, or increase this value to raise the character above the baseline.
• • Boris Calligraphy • 17 • • • Working with the Page Tab The Page tab controls allow you to adjust the margins and to set the size of the text page. Text Wrap controls the position of the text when the text is wider than the screen. • No Wrap creates an unbroken line of text, allowing you to use the text as a continuous crawl. • Wrap creates additional lines of text if the text exceeds the chosen Page Width value. As a word passes the limit of the Page Width, it moves to the next line.
• • 18 •• • • Working with the Fill Tab The Fill tab options allow you to set the Þll and opacity of the selected text. Select the Fill On checkbox to turn on the Þll. Deselect this option to create transparent text. For example, you could turn off the Þll and turn on a border to create hollow text. Style Color sets the color of the selected character(s). Click the color chip to access the system color picker, or use the eyedropper to choose a color from the screen.
• • Boris Calligraphy • 19 • • • Working with Gradients A gradient is a graduated blending of two or more colors. The Boris Text Generators let you map gradients to text. You can use the Gradient Editor to set the colors and opacity, the shape and direction of the gradient, and the gradient’s steepness—that is, how quickly each color changes to the next color. To access the Gradient Editor, in the Fill tab in the Text window, choose Gradient from the Text Fill menu and click the Gradient Editor icon.
• • 20 •• • • Drag midpoint to adjust where colors blend equally. Drag color stop to adjust iti f t t l Click anywhere in this area dd l Drag color stop to adjust ii f d l Adding and Deleting Color Stops A gradient can have up to sixteen color stops. You can add color stops by clicking in the area directly below the gradient editor.
• • Boris Calligraphy • 21 • • • The Color Ramp lets you quickly pick a color using the eyedropper. Click the color ramp before you select the eyedropper if you want to toggle the ramp to a grayscale image. Alpha sets the transparency of the selected stop. At the default value of 255, the gradient is totally opaque. At 0, the gradient is fully transparent. Intermediate values produce varying degrees of transparency. The Repeat Stops parameter allows you to repeat the gradient pattern.
• • 22 •• • • Angle=45° Angle=90° Radial Gradient Type A Radial gradient places the start color at the center and blends outward toward the end color. Center X determines the location of the gradient center on the X axis. This value scales as a percentage in which 0 represents the left edge of the frame, 50 represents the middle, and 100 represents the right edge of the frame. Negative values move the center out of the image frame on the left side.
• • Boris Calligraphy • 23 • • • Contour Gradient Type A Contour gradient places the start color along all four edges of the frame and blends inward toward the end color in the center of the frame. Fade determines the width of the gradient between the start and end colors. This value is measured as a percentage of the size of the image.
• • 24 •• • • Angle=10 Angle=80 Edge Gradient Type The Edge gradient type combines the contour and a bevel shapes. This creates a beveled pyramid effect in which the four colors of the sides of the pyramid move from the start to the end color and blend inward toward the middle color in the center of the frame. Fade sets the width of the gradient between the edge colors (controlled by Angle) and the middle color at the center of the frame. This is measured as a percentage of the image size.
• • Boris Calligraphy • 25 • • • Revolve Gradient Type A Revolve gradient emanates from a center point. By animating the Angle parameter, you can create a clock wipe type of gradient effect. Center X determines the location of the gradient center on the X axis. This value scales as a percentage in which 0 represents the left edge of the frame, 50 represents the center, and 100 represents the right edge of the frame. Negative values move the center out of the image frame on the left side.
• • 26 •• • • Working with the Border Tab The Border tab allows you to apply up to Þve different border styles to the edges of the selected text. The parameters in this tab can be used to create beveled or glowing text effects. Click one of the numbered Border Style tabs to create a new border style. Select the checkbox next to the tab to apply the appropriate style to the selected text. Each tab offers the following controls. Position sets the location of the border.
• • Boris Calligraphy • 27 • • • Plain applies a ßat border to the text. When Plain is chosen, Edge Softness softens the edge of the border. A value of 0 creates a border with a hard edge, and raising this value increasingly softens the border. Bevel creates a beveled border effect. When Bevel is chosen, Highlight Color sets the color of the lightest parts of the bevel. Shade Color sets the color of the darkest parts of the bevel.
• • 28 •• • • Working with the Shadow Tab The Shadow tab applies up to Þve different shadows to the selected text. Like the other parameters in the Text window, the Shadow tab parameters cannot be animated. If you want to animate text shadows, create text without shadows in the Text window. You can then apply and animate drop shadows using the Generator’s Motion tab. Click one of the numbered Shadow Style tabs to create a new shadow style.
• • Boris Calligraphy • 29 • • • Shadow Color sets the color of the shadow. Click the color chip to access the system color picker, or use the eyedropper to choose a color from the screen. You can also enter RGB values into the numerical Þelds associated with the color control and press Return. Shadow Distance sets the distance between the shadow and the text. Use a small value to offset the text slightly; use a larger value to create distinct shadows that appear to fall on another surface.
• • 30 •• • • Working with the Style Palette The Style Palette allows you to save and categorize styles for text for future use. The styles are organized into tabs. The Style Palette also includes a collection of preset styles.
• • Boris Calligraphy • 31 • • • Opening the Style Palette Click the Style Palette button in the Text window. Categorizing Styles Use the Add Category button to create categories to organize your styles. For example, to use a group of styles in one project, create a category for that project. The Style Palette must include at least one category for you to create new styles. To create a new category, click the Add Category button. A dialog box allows you to name the category.
• • 32 •• • • Creating and Saving Styles The procedure for creating and saving styles depend on the type of style you are creating. Creating Text Styles 1. Use the parameters in the Text window to adjust the style as desired. 2. Click the Style Palette button in the Text window. 3. In the Style Palette, click to select the appropriate Apply checkboxes. The Apply controls select attributes of the style to save as a new style. For example, save the current style’s Font and Border only.
• • Boris Calligraphy • 33 • • • Creating Font Styles The Style Palette lets you save thumbnails of all the available fonts on your system in the Fonts tab. The Þrst time you launch this tab you have to add a category. After that you only need to rebuild the category if you add more fonts to your system. Unlike the other tabs in the Style Palette, you cannot save styles to the Font tab, so the Apply controls as well as the Add Style and Rename Style buttons do not appear when you are in the Font tab. 1. .
• • 34 •• • • Applying Styles The procedure for creating and saving styles depend on the type of style you are creating. Applying Text Styles 1. In the Text window, select the text to which you want to apply the style. Select individual characters or press Command-A to select all text. 2. Click the Style Palette button to open the Style Palette. 3. In the Text tab in the Style Palette, click to select the parameters to apply. The choices are Fonts, Size, Face, Fill, Edge, Shadow and Transform. 4.
• • Boris Calligraphy • 35 • • • Editing Styles You can edit styles directly in the Style Palette using the Edit Selected Style button. This applies to Gradient and Color styles. For example, if you select a Color style and click the Edit Selected Style button, the system color picker opens. This button dims if no style is selected. If you select a Gradient style and click the Edit Selected Style button, the Gradient Editor opens. Make the appropriate changes and click OK.
• • 36 •• • • Working with the Title 3D Generator Title 3D offers vector-based text that can be manipulated in 3D Space with full pivot control, animated tracking and other text transformations including type on effects. Once you set the characteristics of the individual text characters in the Text window, you can animate the text. Unlike the parameters in the Text window, the parameters in the Controls tab apply to the text globally.
• • Boris Calligraphy • 37 • • • Scale X and Scale Y change the size of the object along the X and Y axes, respectively. These parameters are scaled as percentages of the object’s original width or height. Thus, a Scale X setting of 200 produces text twice as wide as the original text. Tumble, Spin, and Rotate change the text’s perspective along the X, Y, and Z axes respectively.
• • 38 •• • • Letter Skew X and Letter Skew Y distort text along the horizontal and vertical axis. Letter Skew X= –25 Letter Skew X=0 Letter Skew X=25 Letter Skew Y= –25 Letter Skew Y=0 Letter Skew Y=25 Letter Scale X and Letter Scale Y set the scale of the text along the horizontal and vertical axis. These parameters differ from the Page Transformations parameter group’s Scale X and Scale Y parameters, which scale the entire text layer.
• • Boris Calligraphy • 39 • • • Working with the Type On Parameter Group The Type On parameter group offers several options for creating animated writing or “typeon” effects. Text Type On adjusts the percentage of the text that is visible in each frame, allowing you to create animated typing effects. This value is measured as a percentage of the complete text. For example, if Text Type On is set to 50, the Þrst half of the text is visible. If Text Type On is 100, all the text is visible.
• • 40 •• • • Press the Apply To menu and choose the appropriate option. • • • Letter applies the effect to individual letters and characters. Word applies the effect to individual words. Words are deÞned as characters that are separated by a space in the Text window. Line applies the effect to individual lines. Lines are deÞned as characters that are separated by a carriage return in the Text window. Click the Always Visible checkbox to force all text characters to remain visible.
• • Boris Calligraphy • 41 • • • character Fades, Shifts, Skews, Tumbles, Spins, and/or Rotates for 0.5 seconds (50% of 1), and subsequently remains stationary for the rest of the effect. In this case, the next letter does not appear for another 0.5 seconds after the previous letter stops animating. Acceleration allows you to gradually accelerate the effect. Overshoot allows you to create bouncing text effects, when combined with any parameters except Fade.
• • 42 •• • • Scale X and Scale Y adjust the starting size of the characters. The default value is 100, in which the text types on full size. If you decrease the value, the text appears to grow as it types on; if you increase the value, the text appears to shrink onscreen.
• • Boris Calligraphy • 43 • • • Working with the Title Crawl Generator The Title Crawl Generator enables you to easily animate a text page. The Title Crawl Generator automatically keyframes the text page to roll or crawl across the screen. This Generator automatically aligns and animates the text page so that you do not have to set keyframes in the timeline. You can also manually adjust the keyframes for precise control over the effect.
• • 44 •• • • Animating Text The Controls tab in the Viewer contains parameters which control the movement of the text tracks. Selecting the 1:2:1 Deßicker checkbox applies a vertical blur to the effect to help eliminate ßickering and reduce jagged edges on moving graphics with hard edges. Select 1:2:1 Deßicker if the Animation Style menu is set to Roll. Leave this option deselected for any other type of effect. Note that the 1:2:1 DeFlicker option does not apply if Continuously Rasterize is enabled.
• • Boris Calligraphy • 45 • • • The Animation Style menu determines what type of animation is applied to the text track. When the Animation Style menu is set to None, the text tracks are not animated. To create a roll, choose Roll from the Animation Style menu.When you create a text roll, the Title Crawl Generator automatically keyframes the text page to roll up the screen. This Generator automatically aligns and animates the text page so that you do not have to set keyframes in the timeline.
• • 46 •• • • Blend Start and Blend End soften the edges of the mask, causing titles to “fade” into and out of the masked region. Text roll with blended mask Time 00:00:01:00 Time 00:00:02:00 The Reverse Direction checkbox reverses the direction of the roll or crawl, causing tracks to move from top to bottom instead of bottom to top (text roll) or from left to right instead of right to left (text crawl). Position X/Y set the coordinates of the text’s center point.
• • Boris Calligraphy • 47 • • • When the Lock Pivot to Position checkbox is selected, the text tumbles, spins, and rotates around its own center. If this option is deselected, you can set an external pivot point around which to tumble, spin, or rotate. Pivot X/Y and Pivot Z set the X, Y, and Z coordinates of the pivot point. If the Lock Pivot checkbox is selected, moving the pivot point has no affect.
• • 48 •• • • The Use Percent Completion checkbox determines whether the text auto-animates or is animated manually. When this checkbox is selected, Percent Completion animates the position of the text. When this checkbox is deselected, Percent Completion has no affect. When the Continuously Rasterize checkbox is selected, the vector form of the text is forced to recalculate based on Transformations parameter changes.
• • Boris Calligraphy • 49 • • • Working with the Vector Shape Generator The Vector Shape Þlter allows you to quickly create color backdrops behind text using rectangular or oval shapes. You can add a border and set the Þll of the backdrop using the Border and Fill parameter groups. To create a backdrop behind text, you can apply the Vector Shape Þlter to a layer below the text layer in the timeline.
• • 50 •• • • When using the Continuously Rasterize option, set up the effect with the option disabled to improve preview performance. Then select the option as a Þnal step to improve the quality of the render. You only need to select the Continuously Rasterize checkbox for any Transformations. The Vector form of the backdrop is always recalculated for any scaling or rotating or repositioning in the Primitive Shape, Border 1, Border 2, Border 3, Shape Fill and Shadow parameter groups.
• • Boris Calligraphy • 51 • • • Corner Type=Convex Corner Type=Concave Corner Type=Straight Working with the Oval When the Shape Primitive menu is set to Oval, Shape Left, Shape Top, Shape Right, and Shape Bottom control the positions of the corners of a rectangle in which the oval is inscribed. These values are scaled as percentages of the width and height. When the Shape Primitive menu is set to Oval, the other controls in this parameter group have no effect.
• • 52 •• • • Color sets the color of the border. Click the color chip to access the system color picker, or use the eyedropper to choose a color from the screen. Width sets the width, in pixels, of the border. Opacity adjusts the opacity of the border. A setting of 100 makes the border completely opaque, while a setting of 0 makes the border completely transparent.
• • Boris Calligraphy • 53 • • • Flat Miter Flat/Round Round Flat/Bevel Bevel Working with the Shape Fill Parameter Group The Shape Fill parameters set the Þll of the backdrop. Select the Fill On checkbox to turn on the Þll. Deselect this option to leave the backdrop unÞlled. Fill Opacity determines the opacity of the Þll. Fill Color sets the color of the Þll. Click the color chip to access the system color picker or use the eyedropper to choose a color from the screen.
• • 54 •• • • Master Scale lets you adjust Scale parameters globally. Parameters can still be changed independent of one another by using the individual Scale parameters. For example, you set Scale X to 100 and Scale Y to 200 to create a backdrop that is stretched vertically. If you then set Master Scale to 200, the resulting backdrop is twice as wide and four times as tall as the original. Scale X and Scale Y change the size of the backdrop along the X and Y axes, respectively.
• • Boris Calligraphy • 55 • • • If you rotate your backdrop using the Tumble, Spin or Rotate parameters, PreRotate Position Z positions the backdrop ignoring any of these transformations and uses the original coordinates of the plane. This parameter can show a different result than adjusting the Position Z parameter which positions the backdrop after any rotations are applied.
• • 56 •• • • Working with the Shadows Parameter Group The Shadows parameter group applies one of three types of shadows to the backdrop. The Shadow Type menu determines what type of shadow is created. • • • • None does not apply a shadow. Drop shadows fall a speciÞed distance from the object. Cast shadows appear to fall on another object; the appearance of this type of shadow depends on the Shadow Distance and Shadow Angle that you set.
• • Boris Calligraphy • 57 • • • Working with the Text Scrambler Text Scrambler randomizes or shufßes text characters and text styles in a variety of ways and will jitter the size, position, hue and angle of text characters. Many of the Text Scrambler parameters are similar to the Title 3D parameters. For instance, you could use either Þlter to create a type on effect. However, the Text Scrambler also allows you to randomize text.
• • 58 •• • • When using the Continuously Rasterize option, set up the effect with the option disabled to improve preview performance. Then select the option as a Þnal step to improve the quality of the render. You only need to select the Continuously Rasterize checkbox for any Page Transformations. The Vector form of the text is always recalculated for any scaling or rotating or repositioning of text characters in the Variations, Letter Transformations, Type On, and Jitter parameter groups.
• • Boris Calligraphy • 59 • • • Text entered into Text window • Alphabetical Text uses only alphabetical characters, offset by the Letter Variation amount. For example, all the “l” characters from the original “Grilled” word are now “w.” • Random Text uses only alphabetical characters, but the characters are randomized. So the “l” characters from the original “Grilled” word would not necessarily be the same.
• • 60 •• • • • Style Shufße randomly shufßes the styles assigned to each character to that of another style used in the Text window. The text must use multiple styles or this choice has no affect. • Style by Word looks at the style of the Þrst letter of each word and assigns that style to entire words at random.
• • Boris Calligraphy • 61 • • • Scramble Characters allows you to vary the characters from frame to frame. When you use Letter Variation parameter to adjust the characters, the characters are offset by the same amount. For example, all the “e” characters from the original “Generator” text are now “x.” You can randomize this, using the Scramble Characters parameter. The Loop parameter cycles through the characters, determining which character starts the line.
• • 62 •• • • Tumble, Spin, and Rotate move the text around the X, Y, and Z axis respectively. Tumble, Spin, and Rotate can animate over values greater than 360° to make the image complete more than one full revolution. Tumble =-65 Degrees Spin=65 Degrees Rotate=65 Degrees If you rotate your text using the Tumble, Spin or Rotate parameters, PreRotate Position X/Y positions the text ignoring any of these transformations and uses the original coordinates of the plane.
• • Boris Calligraphy • 63 • • • Working with the Letter Transformations Parameter Group Tracking controls the global horizontal spacing of the characters in the effect. Unlike the Tracking parameter in the Text window, you can animate this tracking parameter. Tracking= 0 Tracking= 25 Tracking= 50 Leading adjusts the spacing, in pixels, between multiple lines of text. This parameter affects the currently selected lines.
• • 64 •• • • Letter Tumble, Letter Spin, and Letter Rotate rotate the text characters around their baseline’s X, Y, and Z axis, respectively. Compare how this appears with the Page Transformations parameter group’s Tumble, Spin and Rotate parameters which move the entire text layer around the axis. Letter Tumble Letter Spin Letter Rotate Working with the Type On Parameter Group The Type On parameter group offers several options for creating animated writing or “typeon” effects.
• • Boris Calligraphy • 65 • • • Click the Always Visible checkbox to force all text characters to remain visible. The Type On feature applies transformations progressively to text characters. When this checkbox is deselected, characters progressively appear or disappear from the frame. Selecting the Always Visible checkbox forces characters to remain visible while the transformations are progressively applied. One way to think of this effect is like “the wave” that crowds perform at football stadiums.
• • 66 •• • • Overshoot allows you to create bouncing text effects, when combined with any parameters except Fade. Each character moves past its destination position or scale by the value speciÞed in Overshoot before returning to its destination position or scale. This parameter only affects animations created with the Shift, Scale, Skew, Tumble, Spin, and/or Rotate parameters. If all of these parameters are set to the default, Overshoot has no affect.
• • Boris Calligraphy • 67 • • • Skew X and Skew Y set the starting Skew values for the characters in relation to their Þnal skew values (controlled by the Skew X and Skew Y values set in the Text window and in the Page Transformations parameter group). Each character animates from its starting Skew values to its ending Skew values as it appears on screen. Type-on effect with Skew X set to 180.
• • 68 •• • • Working with the Jitter Parameter Group The Jitter parameters randomize text parameters including Position, Angle, Scale, Hue and Opacity. Jitter parameters are expressed as a percentage and are applied to individual characters. All parameters have a range of 0 to 100, except Scale which has a range of 0 to 600. Jitter parameters apply to all characters and are applied after each character types on. Jitter Seed varies the amount of Jitter from frame to frame.
• • Boris Calligraphy • 69 • • • About the Tutorial Exercises The following tutorial exercises provide step-by-step instructions for creating various kinds of text effects. These tutorials do not require any speciÞc media Þles, although the Þrst exercise uses an imported text Þle. If you do not have the text Þle, you can complete the exercise by typing or importing text. Some of the exercises use fonts that you may not have on your system. You can replace them with any fonts that you like.
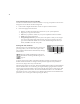
• • 70 •• • • 7. Select all the text that you just typed by pressing Command-A. 8. In the Style tab in the Text window, use the Font and Font Size menus to set the font and size of the text. 9. Click the Center JustiÞcation button to center justify the text. The illustrations in this exercise use the word “Boris” with Arial Black font at 96 points, but you can use whatever type of text you like. Style tab Font menu Font size menu Center Justification button 10.
• • Boris Calligraphy • 71 • • • 11. Click the Shadow tab to open the shadow controls. Click to select the Shadow On checkbox next to the Shadow 1 tab to apply the appropriate style. The illustrations in this exercise use a Solid Shadow, with the parameters set as illustrated below, but you can apply whatever type of shadow you like. Shadow tab Shadow On Checkbox If the Style Preview menu is set to Basic Styles you will not see the Shadow appear on your text.
• • 72 •• • • Exercise Two: Creating an Animated Tracking Effect Upon completion of the exercise in the section you should be able to: • • • • • Create and format text in the Text window. Use the Gradient Editor to map a gradient to text. Save text styles to the Style Palette. Use the parameters in the Controls tab to fade in your animation. Create an animated tracking effect. Creating Text 1. Double-click a clip that you will add to your sequence and play it in the Viewer.
• • Boris Calligraphy • 73 • • • 3. Click the Gradient Editor icon to open the Gradient Editor window. Click here to create additional color stops. Selected color stop 4. Adjust the color for each color stop by selecting the color stop, then use the Selected Color Stop controls to choose the color you want. When a color stop is selected, its point turns black. An unselected color stop has a clear point. A color stop must be selected to apply changes to it. 5.
• • 74 •• • • The Style Palette opens with the style you are currently using displayed in the thumbnail in the left column. 2. To create a category, click the Add Category icon. 3. Type “My Styles” in the dialog box and click OK. 4. To add the current style to the selected category, select the text in the Text window and click the Add Style icon. 5. Click the thumbnail for the new style, click the Rename Style button, type a name for the style in the dialog box and click OK.
• • Boris Calligraphy • 75 • • • A dot appears at the beginning of the green line in the Viewer, indicating a keyframe has been added. 9. Set the Opacity value to 0 by dragging the slider or clicking the numerical Þeld, typing 0, and pressing Return. The text disappears from the Viewer window, since an Opacity value of 0 makes it completely transparent. 10. Move the playhead to frame 20 (Time 00:00:00:20).
• • 76 •• • • Exercise Three: Creating a Credit Roll Upon completion of the exercise in the section you should be able to: • • • • Create and format credit rolls using a text page. Import text into the Text window. Adjust the speed of credit rolls. Mask the edges of credit rolls. Importing and Formatting the Text In this exercise you will import text to create a title page then save the styles from the page and apply them to other pages.
• • Boris Calligraphy • 77 • • • Style tab Font menu Font size menu Center Justification button 8. Click the Apply button save your changes and close the Text window. 9. Complete the steps in the next section to animate your effect. Creating the Credit Roll 1. Select your background track in the timeline. 2. Drag the image from the Viewer to the Canvas. When the Edit Overlay appears, position the image in the Superimpose section and release the mouse button. The clip appears in the Timeline. 3.
• • 78 •• • • 6. Position the playhead somewhere in the middle of the clip. This allows you to see the text as you make your adjustments. 7. Set the Mask Start and Mask End values to .13 by dragging the slider or clicking the numerical Þeld, typing .13, and pressing Return. 8. Set the Blend Start and Blend End values to .1 by dragging the slider or clicking the numerical Þeld, typing .1, and pressing Return. 9.
• • Boris Calligraphy • 79 • • • The illustrations in this exercise use Eddie Fisher font at 132 points, but you can use whatever type of text you like. 7. Click the Force Center JustiÞcation button. 8. When the text appears the way that you want, click Apply then close the Text window. Make sure that Text Wrap is set to No Wrap. This parameter is found in the Page tab in the Text window. By default it is set to No Wrap. 9. Make sure the playhead is at the beginning of the clip.
• • 80 •• • • 15. Preview the animation. The text now scales and shifts as it types on screen. Time 00:00:01:00 Time 00:00:02:00 Time 00:00:03:00 16. In the Type On parameter group, set Overshoot to -100. 17. Preview the animation. The text now appears to bounce as it scales and shifts. Exercise Five: Creating Text with a Backdrop In this exercise you will create text with a backdrop using both the Title 3D and Vector Shape Þlters. 1.
• • Boris Calligraphy • 81 • • • 8. Choose Boris from the Generator menu in the Viewer. Then choose Vector Shape from the submenu. 9. Drag the backdrop from the Viewer to the Canvas. When the Edit Overlay appears, position the image in the Superimpose section and release the mouse button. The clip appears in the Timeline. 10. Make sure that the Title 3D Þlter is above the Vector Shape Þlter in the timeline. 11. Select the Vector Shape track and click the Controls tab in the Viewer window. 12.
• • 82 •• • • 18. In the Border 1 parameter group, click the Add Keyframe button for the Border End parameter. 19. Move the playhead to time 00:00:01:00. Set Border End to 100. The Border now animates on. Time 00:00:00:00 Time 00:00:00:20 Time 00:00:01:00 Exercise Six: Creating a Text Scrambler Effect In this exercise you will create a random text effect using the Text Scrambler Þlter.
• • Boris Calligraphy • 83 • • • 7. In the Page Transformations parameter group in the Controls tab, adjust Position X/Y so that the text appears at the bottom third of the screen. Set Master Scale to 22. Set Scale X to 90. 8. Move the playhead to the beginning of the clip. In the Variations parameter group, click the Add Keyframe button to create a keyframe for the User Text Variation parameter and set this parameter to 14.
• • 84 •• • • 17. In the Type On parameter group, set Text Type On to 100. Setting this parameter to 100 stops characters from typing on until the end of the effect. 18. Preview the effect. The words reveal themselves in a wave-like effect. . Time 00:00:00:00 Time 00:00:02:03 Time 00:00:02:14 Time 00:00:02:24 19. Play the effect without the Always Visible checkbox selected. Notice how the effect changes and you cannot see all of the letters when they are not animating.