
Installation Guide


All information is subject to change without notice Page 4 of 12
Borroughs Document Number: DOC-MDC-0011 Rev. 2.0
www.borroughs.com 1-800-748-0227
Basic Workbench
Do not tip bench on its side, without a shelf attached as it is unstable and may cause
damage. Must use two people to rotate bench.
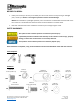
STEPS
Lay bench top face down on a flat clean surface; such as blanket
or cardboard to protect from scratching.
Insert leg attachment channel into bench top with open area of
channel facing upward. Position attachment channel so that
holes in end flanges are in line with oval and first hole in front
and back flanges of benchtop. Use four (4) 07792-00 screws and
17213-00 nuts to loosely fasten leg and channel together.
Repeat procedure on the other end.
Stand leg weldment in place (leg fits inside attachment channel).
Position leg so that holes in sides of leg weldment are in line
with the holes in the side of the attachment channel. Loosely
fasten leg and channel together with four (4) 07792-00 screws
and 17213-00 nuts. Repeat procedure on the other end.
Do not tip bench on its side, without a shelf
attached as it is unstable and may cause damage.
Must use two people to rotate bench.
Attach stringer to legs along back edges of bench (Borroughs is
stamped in front edge of bench). Position stringer so
that holes in end of stringer are in line with holes in
leg. Fasten stringer to leg with four (4) 07792-00
screws and 100530-00 weldnuts. Repeat procedure
at the other end. Tighten screws holding leg
weldments and attachment channels together.
Insert adjustable foot or caster bracket into leg so
that holes in the sides of foot or bracket are aligned
with holes in sides of leg. At desired height, fasten
foot to leg with four (4) 07792-00 screws and 17213-
00 nuts or fasten caster bracket with two (2). Repeat
procedure for other legs. Tighten all hardware. This
completes assembly of Basic workbench. Put bench
in upright position.