Model year 2014 USER MANUAL
WARRANTY Terms and conditions BOS MTB offers warranty on its products on the following terms: BOS MTB guarantees to the original purchaser that the BOS product for which they received this warranty is free from defects in material and workmanship for one year from the date of original retail purchase. A proof a purchase will be asked for any warranty claim. This warranty is not transferable to a subsequent purchaser.
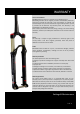
1 . Assembly Fitting your Dizzy onto your bike requires care and attention. For your safety, please follow these instructions. 1.1 The steer tube Before cutting the steer tube, first take some measurements: height of the headset, length of the headtube of the frame, height of the stem, and then add 5 to 10mm. Calculate the length as below: Add the length of the headtube, the height of the headset, the height of the stem, plus 5 to 10mm.
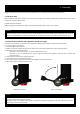
1.3 Installing the 15mm axle To install the front wheel, follow these instructions: 1. Undo the quick release (1). 2. Unscrew the axle to remove it (2). 3. Position the wheel. 4. Insert the axle and tighten it completely. Close the quick release to lock the wheel. (1) (1) (2) (A) Removing the wheel is done by reversing the preceding instructions. 1.4. Disk brake installation The Dizzy uses standard post mount 160 (PM160) mount points. To assemble the disc brakes, follow this procedure: 1.
2. Settings 2.1 Air Spring The first adjustment that should be done on the fork is to set the air pressure. This adjusts the stiffness of the air spring according to your weight. The stiffness of the air spring induces a degree of fork travel when you sit on your bike. This value, commonly called sag, can vary based on your usage.
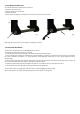
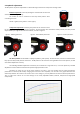
2.2 Hydraulic adjustments The Dizzy offers suspension adjustments in rebound through a knob and in compression through a lever. Rebound adjustment is done by rotating the red knob that can be found at the bottom of the right fork leg. The number of clicks is counted from the fully closed position while unscrewing the knob. Harder = tighten (close) / Softer = loosen (open) Compression adjustment is done by the position of the red lever at the top of the right fork leg. This lever has three positions.
The S position is for comfort. The H position is used for pedaling efficiency. The H position considerably stiffens the fork in an effort to limit suspension oscillations during pedaling, but without locking out the fork completely. Thus, BOS remains faithful to the principle of keeping an active fork, even in its restrained state. This allows for the suspension to move over unexpected bumps, which is a simple matter of security. The M position maintains hydraulic control and grip.
3. Maintenance11 3.1. Service It is compulsory to clean your forks immediately after every use! Nothing is worse for your fork’s seals than dry mud. It is very simple to clean your forks: wipe off the stanchion with a clean rag and then slightly lube the stanchion (with fork oil). Warning: Do not under any circumstances use degreaser. On the same note, do not power wash the forks! It will only push the mud inside the forks and get it stuck between the stanchion and the seals.
4. FAQ11 My fork is leaking when I connect the high pressure pump, what can I do? Check with a Schrader valve tool if it is correctly tightened. At rest position, the fork sits slightly in its travel (small SAG), is this normal? The BOS air spring system is designed to offer the lowest engagement threshold. Some forks may come with a slightly negative travel. Where can I get the original stickers or valve cap? Those items are available on the online store at bosmtb.com.