Model year 2014 USER MANUAL
WARRANTY Terms and conditions BOS MTB offers warranty on its products on the following terms : BOS MTB guarantees the original purchaser that the BOS product for which they received this warranty is free from defects in material and workmanship for one year from the date of original retail purchase. A proof of purchase will be asked for any warranty claim. This warranty is not transferable to a subsequent purchaser.
1. ASSEMBLY Fitting your Idylle onto your bike demands care and attention. For your safety, please do respect the following instructions. 1.1 The steerer tube Before cutting the steerer tube, first you have to take some measurements : Height of the headset, length of the headtube of the frame, height of the stem and then add 5 to 10mm. With a standard stem clamped on the steerer tube : Add the length of the headtube of the frame to the height of the headset and to height of the headset plus 5 to 10mm.
1.3. Installing the front wheel To assemble the front wheel, check the following procedure : 1. 2. 3. 4. Loosen the four axle pinch bolts on the lower leg with a 5 mm hex key wrench. Using a 6 mm hex key wrench, turn the axle counter-clockwise to loosen and remove. Install the front wheel into the dropouts and install the axle into the lower leg. Put a small amount of grease on the thread of the axle and, using a 6 mm hex key wrench, turn clockwise and lightly tighten the axle to the lower leg. 5.
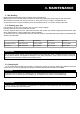
2.2. Coil spring (IDYLLE) To get the best performance from your Idylle fork, it is necessary to set and occasionally preload the spring rate. By default, your forks come with the orange spring within. Two extra springs (green and grey) come in the box in order to adjust to most of the riders. See the Idylle coil spring setting table below for reference. You may need to install a coil spring having a different spring rate.
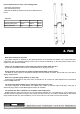
2.3. HYDRAULIC ADJUSTMENTS IDYLLE Rare IDYLLE Rare comes with 3 hydraulics adjustments: low speed compression, high speed compression, and rebound The low speed compression adjustment seats at the bottom of the right hand leg using a flat head screwdriver(1-A). The high speed compression adjustment seats at the bottom of the right hand leg using a 14mm 6 points socket wrench (1-B). (1-B) (1-A) The rebound adjustment is on the top of the right hand tube using a flat screwdriver(2).
IDYLLE Air & IDYLLE IDYLLE Air and IDYLLE comes with 2 hydraulics adjustments: compression and rebound The compression adjustment seats at the bottom of the right hand leg (flat head screw) (1) The rebound adjustment is on the top of the right hand stanchion (the non-disc side) (2) Always start from fully tighten position, then tighten down counting the clicks to adjust your settings.
3. MAINTENANCE 3.1 Air bleeding Idylle is fitted with a bleeding screw on the top of the right stanchion. Bleeding your forks on regular basis will reduce the pressurising effect that always happens with those forks. We recommend to bleed your fork every 5 rides in racing use or every 10 rides in recreationnal use. All you have to do is to undo the bleeding screw and put them back on, no need to compress the forks. 3.2.
How to measure the oil level, in the cartridge side : - Push down the stanchion - Pull out the rebound rod - Measure the distance between the top of the stanchion and the oil Oil level IDYLLE Rare IDYLLE Air IDYLLE Damping side (right) 110mm 185mm 190mm Spring side (left) 10ml 10ml 140ml 4. FAQ What initial settings for the fork? The "Idylle Chart list" is available on the download section of the bosmtb.com website.