WARANTY Terms and conditions BOS MTB offers warranty on its products on the following terms : BOS MTB guarantees to the original purchaser that the BOS product for which they received this warranty is free from defects in material and workmanship for one year from the date of original retail purchase. A proof a purchase will be asked for any warranty claim. This warranty is not transferable to a subsequent purchaser.
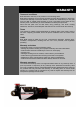
1. INTRODUCTION Thank you for purchasing a Bos Vip'R2 shock. Your shock has been assembled specifically for one bike - obviously yours ! - which means that the internal valving and the air chamber volume are settled for your bike. The adequate mounting kit is also provided with the shock. CAUTION Never try to disassemble your shock. Limit yourself to the instructions given in this manual. This shock is pressurized, for your own safety, do not try to open it.
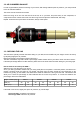
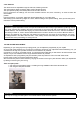
3.2. AIR CHAMBERS BALANCE In order to guarantee a perfect functioning of your shock, after having settled up the air pressure, you must proceed to the air chambers balance. The shock must be mounted on the bike. Place the O’ring at 15 mm from the seal of the shock, sit on your bike, and push slowly on the suspension, to compress the shock until the seal come onto the O’ring.Let the suspension extend itself, still slowly. Repeat 15 times those up and down movements, always at low speed. 15 mm 3.3.
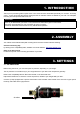
3.4. HYDRAULIC SETTINGS Your Vip'R2 damper features 2 hydraulic ways of settings:. B The compression adjusted through the lever A. A The Rebound adjusted through the knob B 3.4.1. Compression The compression setting offers two positions : «hard» et «soft». The lever must be turned on one of these two positions, never between. The soft position is used for normal riding conditions. The suspension is 100% efficient. The hard position changes the whole compression curve.
3.4.2. Rebound The rebound can be adjusted through the red knob, featuring 30 clicks. The close position (totally screwed), offers a stiff or SLOW rebound. The open position (totaly unscrewed) offers a soft or FAST rebound. Prior to proceed to the settings, turn the knob clockwise until the end, then unscrew by 15 clicks to reach the intermediate position. From that position, on the track, adjust the rebound depending on your riding style.
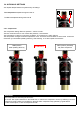
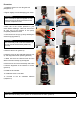
Procedure 1. Install the shock in a vice using the soft jaws(picture 1). 2 1 2.Tighten slightly to avoid damaging your shock. CAUTION Make sure that the jaws are applied on a flat surface and do not touch the rebound knob nore the compression lever. 3.Take note of the current pressure in your shock before deflating it. Take into account the air loss, due to the insertion of the pump. Completely deflate the shock. 4 3 a 4. Unscrew the air can (b), by firmly handling the shock body (a) (picture 2).
4. MAINTENANCE Cleaning Clean your shock after each ride using a non-aggressive, non-alkaline cleaning product, let it dry then spray with silicon spray and protective grease. Check it regularly and remove any dust/dirt from the bottom-out bumper. Recreational use Racing use Cleaning Oil service After single ride once a year Full service Every 2 years once a year CAUTION The oil service and full service must be performed by a BOS approved center.
5. FAQ What is the basic set up ? Your shock has been set up for your bike, with a specific internal valving and a specific air chamber volume. It is delivered with a standard pressure of 80 to 100psi. You can find in the download section of our website all the infos about standard settings for each bike. There is air leaking when I connect the high pressure pump, what can I do ? Check your pump : make sure that the shell of the shrader valve is correctly mounted.