BOSCH Use and Care Manual for Bosch Electric Built-in Single & Double Oven Models HBL 63.J64.J65.J66.. HBN 64../65../66.. Manuel d 'utilisation et d 'entretien Four #lectrique Bosch encastr_, Modeles HBL 63../64../65../66.. HBN 64../65../66.. Ed.
Dear Bosch Oven Owner: Thank you and congratulations on your choice and purchase of a Bosch oven. Whether you are an expert chef or a beginning cook we believe that you will find your Bosch oven meets and exceeds your expectations. Bosch engineers have spent years developing these units to be the most versatile and energy efficient so that you may take great pride in the quality of construction of these fine ovens. We also ask that you read this manual thoroughly before using your new oven.
BOSCH Use and Care Manual for Bosch Electric Built-in Single & Double Oven Models HBL 63..164..165..166.. HBN 64.365../66..
Table of Contents Important Safety Product Instructions Features ......................................................................................................... ............................................................................................................................... About Your Oven ......................................................................................................................... Cooling Racks Fan ................................................
IMPORTANT SAFETY INSTRUCTIONS WARNING - When using this appliance, basic safety precautions should always the risk of fire, electric shock, and/or injury to persons, including the following. to reduce I. Read All Instruction 2. Proper Installation - Be sure your appliance is properly installed and grounded by a qualified technician. Have the installer show you where the fuse or breaker box is located and how to turn off the power to the oven. 3. Do Not Operate the Oven if it is Damaged 4.
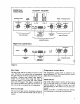
Product Features Halogen lights Broiland top elements Control panel level no. 4 level no. 3 Convection element (not visible) and fan located on back of oven cavity (Convection Models Only) level no. 2 level no. 1 Modeland sedal numberplate Bake elements (under oven floor) Figure About 1. Your Oven Above you will find an illustration of a Bosch oven showing the components of the oven.
Baking Elements The Bosch oven uses two baking elements: one located at the top of the oven and the second located below the floor of oven cavity to provide ease in cleaning the oven cavity. conventional thermal oven. Below you will find a brief explanation of how a convection oven works and its advantages. In Bosch Ovens, the Genuine European Convection TM system (the 3 elements, fan and venting panel) circulates even, heated air throughout the oven.
Before Using for the First Time Oven Operation Oven Models There are 21 different models of Bosch ovens, see Tables 1 & 2, below. Bosch ovens are available in 27" or 30", in white, black or stainless steel, in single or double oven configurations as well as being provided as either standard, thermal-type ovens or convection type, with the double ovens being available with either a single convection oven or with two convection ovens.
Double Oven Control Panel lower oven llghts temperature convo, sel_or lower oven controls _ [_ upper oven lights _ p¢ogrammer .lector _ tempumtum control upper ovon controls push-buttons J programmer controls Single Oven Control Panel Temperature P BOSCH -° Itq_-- _ O _..O Umm'/,,T_nu_ selector temperaturecon_I mode selector push-buttons Figure 3. Heat Light Temperature The heat light will be lit when you turn on your oven.
Cooking Function Settings Thermal Oven Function Information Broil - Used for broiling. When set on Broil the two top elements operate whenever heating. May be used with door open or closed. Bake (Roast) - This mode is used for baking, roasting and heating of casseroles, etc. When set on Bake the top element and the bottom element operate whenever heating. Note: Lower element shown for clarity only.
Oven Programmer The oven programmer can be used to electronically control the cooking in your oven. Figure 4 shows all the call-outs that are available on the display and their locations• The buttons directly adjacent to the display are the programming buttons. These are used to program the oven, including setting the clock. properly set depress the Set Clock button again to enter the time. A "beep" will sound and the Set Clock symbol, in the upper right, will disappear.
• The indicator word TIMER will remain in the display during timer countdown. • The timer will countdown in minutes until the last minute when it will switch over and countdown in seconds. • At the end of the timing word TIMER will blink "beeps" will be heard. interval the indicator on and off and three • The display will return to time of day or any active programmed function and "beeping" will continue every 10 seconds until any button is touched.
Using the Oven Controls _ Figure 7. Double Oven Control i Panel, HBL/HBN66 The oven controls may be used to operate the oven manually or under control of the oven programmer. Manual operation will be discussed first and then use of the oven programmer. oven while the upper oven may be operated manually. Once you have set the mode selector or, if you have a double oven, decided you are going to use: .
Electronic Control Immediate of Oven Start/Automatic Then press either the plus (+) or minus (-) button, to the right of the display, to set the the timer to the time interval desired. Maximum cooking time is 11 hours and 50 minutes (minimum cooking time is 1 minute). , Shut-Off To use the electronic control so that your cooking starts immediately and then shuts-off automatically: 1. Set the oven rack(s) food in the oven, as desired Make sure that the oven correct time. . 3.
Set oven Temperature desired temperature. cooking special consideration must be given to avoid potential sickness and spoiling of food: to the Then press either the plus (+) or minus (-) button, to the right of the display, to set the timer to the start time desired. After the time has been entered a "beep" will be heard an the indicator words DELAY-START-TIME will appear briefly.
Be sure to turn the Mode Temperature programmed Selector knob and the knob to their Off positions after cooking has been completed. To Check Start Time/before begins the Start Time/before To Change Cooking Depress Start Time button. A "beep" will sound and the display will show SET - START - TIME on the right hand side of the display. Then press either the plus (+) or minus (-) button to the right of the display, to set the timer to the start time desired.
racks by leaving them in the oven ning the Self Clean function. Care & Cleaning The Bosch line of ovens feature a pyrolytic selfcleaning function that eliminates the difficult and time consuming manual scrubbing of the oven interior. During self-cleaning the oven uses very high temperature (approx. 850°F) to burn away soil and grease.
could move or damage the gasket. The areas outside the gasket area must be cleaned by hand because these areas do not become hot enough during Self Clean to burn away the soiled spots. play. 3:/313 .o, Also wipe up excess grease and other food spills with a damp cloth. This will minimize the amount of smoke created during self cleaning. . f 30/3 • Figure ld.
sembly consists of a removable lens, a light bulb as well as a light socket housing that is fixed in place, see Figure 15. Light bulb replacement is considered to be a routine maintenance item. To replace a light bulb: 1. Read WARNING on this page. 2. Turn off power at the main power supply (your fuse or breaker box). Screws In multifunction ovens remove the fan cover by unscrewing the four screws. . 4. Remove the lens by unscrewing it. 5. Remove the light bulb from its socket by pulling it. 6.
_ Hinge bracket O t Figure Figure 4. 16. . Hold the door firmly on both sides using both hands and pull the door straight out of the hinge slots. Hold firmly; the door is heavy. 5. Place the door in a convenient location for cleaning. After cleaning the door can be replaced by reversing the above procedure. Be sure to slide the door straight into the slots, as shown in Figure 17.
Problem Solving Ovens may exhibit problems that are unrelated to a malfunction of the oven itself. Service calls for such items, not covered by warranty, must be paid for by you. The following may serve to answer your questions about a problem you are having without having to call a service person. PROBLEM POSSIBLE CAUSE Nothing works Oven not connected circuit, SUGGESTION(S) to correct electrical Have oven connected to properly sized electrical power supply by a qualified electrician.
If You Need Assistance or Service If after reviewing Table 4 you decide that you do require service for your oven contact your dealer or installer or the Bosch Authorized Service Contractor in your area. Do not attempt to repair the appliance yourself. Any work performed by unauthorized personnel may void the warranty.
Statement of Limited Warranty The warranties provided by BSH Home Appliances ("Bosch") in this Statement of Limited Warranty apply only to the Bosch Electric Built-In Ovens ("Built-In Oven") sold to you, the first using purchaser, provided that the Built-ln Oven was purchased (1) for your use and not for resale and (2) in the United States or Canada and is located in the country of purchase.