
Security Camera User Manual
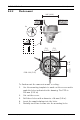
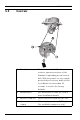
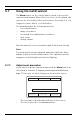
Table Of Contents
- Table of Contents
- 1 Safety
- 2 Introduction
- 3 System Information
- 3.1 Network video server
- 3.1.1 Progressive scan
- 3.1.2 True Day/Night function
- 3.1.3 Multiple streams
- 3.1.4 ONVIF (Open Network Video Interface Forum)
- 3.1.5 Audio
- 3.1.6 Alarm I/O
- 3.1.7 Tamper detection and motion detection
- 3.1.8 Video encoding
- 3.1.9 Multicast
- 3.1.10 Power-over-Ethernet
- 3.1.11 Encryption
- 3.1.12 Recording
- 3.1.13 Configuration
- 3.2 Operation with external systems
- 3.1 Network video server
- 4 Planning
- 5 Installation
- 6 Camera configuration
- 7 Browser connection
- 8 Troubleshooting
- 9 Maintenance
- 10 Technical Data

FLEXIDOME HD VR Installation | en 21
Bosch Security Systems Installation Manual AM18-Q0637 | v1.1 | 2013.08
5.2.2 Flush mount
To flush mount the camera in a wall or ceiling:
1. Use the mounting template to mark out the recess and to
mark the holes indicated in the drawing. The PCD is
133 mm (5.25 in)
2. Cut out the recess.
3. Drill three holes with a diameter of 8 mm (0.3 in).
4. Insert the supplied plugs into the holes.
5. Partially insert two screws into the mounting holes.
Ø8 mm
3x
3x
57.6
(2.27)
57.6
(2.27)
33.3
(1.31)
66.5
(2.62)
PCD: 133 (5.25)
105 (4.13)