
Security Camera User Manual
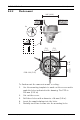
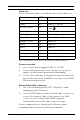
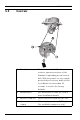
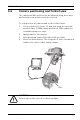
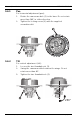
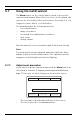
Table Of Contents
- Table of Contents
- 1 Safety
- 2 Introduction
- 3 System Information
- 3.1 Network video server
- 3.1.1 Progressive scan
- 3.1.2 True Day/Night function
- 3.1.3 Multiple streams
- 3.1.4 ONVIF (Open Network Video Interface Forum)
- 3.1.5 Audio
- 3.1.6 Alarm I/O
- 3.1.7 Tamper detection and motion detection
- 3.1.8 Video encoding
- 3.1.9 Multicast
- 3.1.10 Power-over-Ethernet
- 3.1.11 Encryption
- 3.1.12 Recording
- 3.1.13 Configuration
- 3.2 Operation with external systems
- 3.1 Network video server
- 4 Planning
- 5 Installation
- 6 Camera configuration
- 7 Browser connection
- 8 Troubleshooting
- 9 Maintenance
- 10 Technical Data

30 en | Installation FLEXIDOME HD VR
AM18-Q0637 | v1.1 | 2013.08 Installation Manual Bosch Security Systems
5.7 Using the install wizard
The Menu button on the control panel is used to access the
camera install wizard. When there is a choice in the wizard, the
options are selected by either a short press (less than 2 s) or a
long press (more than 2 s) of the button.
The wizard handles the following functions:
– Lens identification
– Image orientation
– Zoom and focus adjustment conditions
–Auto focus
–Analog output
Run the wizard to select orientation and field-of-view (zoom).
Note:
The zoom and focus are adjusted again later (with the dome
bubble in place) via the web browser. This optimizes picture
sharpness in both bright and low-level lighting.
5.7.1 Adjustment procedure
If you have set up the camera and pressed the Menu button as
described in Section 5.6 Camera positioning and field-of-view,
page 27 then you see the following on the monitor screen:
– The lens type is identified and shown on the screen.
– The iris is opened to its maximum value.
Lens type: State: Focus Indicator: 0
CONTINUE
<press short>
180° ROTATE
<press long>
Timeout: 300