
user manual


D8125MUX | Operation and Installation Guide | 3.0 Installation
10 Bosch Security Systems, Inc. | 10/09 | F01U034973-02
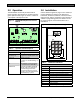
3.7 Installing a Multiplex Device
3.7.1 Adding Multiplex Devices to the Control
Panel
As shown in Table 6, several types of multiplex
devices are available. Each multiplex accessory
device is packaged with instructions connecting to the
multiplex bus output.
Table 6: Multiplex Devices
Product Point Type
Off board points for the D9412GV2, D9412G, D9124,
D9412, and D9112 are numbered 9 through 127 and
129 through 247 (D7412GV2, D7412G, D7412, and
D7212 use off board Points 9 through 75 only;
D7212GV2 and D7212G use off board Points 9
through 40 only). The D9412GV2, D9412G, D9412,
and D9112 reserves Points 128 and 248 for internal
use. The D8125MUX connected to Zonex 1 monitors
Points 9 through 127, whereas the D8125MUX
connected to Zonex 2 monitors Points 129 through
247.
DS7432 Eight Input Remote Module 6
DS7450 Flush Mount Single Multiplex
Contact Point
1
DS7452 Surface Mount Single Multiplex 1
Contact Point
The D8125MUX and multiplex points
connected to Zonex 2 must be
DS7457 Single Multiplex Input Module 2
DS7460 Dual Zone Input Module 6
DS7465 Input/Output Module 3
MX775 (DS7470) Multiplex PIR Intrusion
Detector – 50 ft (15 m) Mirror
2
MX934 (DS7471) Multiplex PIR Intrusion
Detector – 35 ft (11 m) Mirror
2
MX938 (DS7472) Ceiling Mount Multiplex
PIR Intrusion Detector
2
MX540 (DS7473) Multiplex PIR Intrusion
Detector – 40 ft (12 m) Fresnel Lens
2
MX794 (DS7474) Multiplex Long Range
PIR Intrusion Detector
2
MX950 (DS7476) Multiplex
PIR/Microwave TriTech Intrusion Detector
2
MX835 (DS7477) Multiplex
PIR/Microwave TriTech Intrusion Detector
with Pet Immunity
2
MX250 Photoelectric Smoke or Photo with
Heat Detector and MXB2W Base
4
D7050/D7050TH Photoelectric or Photo
with Heat Detector and D7050-B6 Base
Lot #249 and greater
4
programmed in the D8125MUX with DIP
switches as Points 9 through 127. Refer
to Table 7 on page 11.
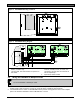
3.7.2 Removing Multiplex Devices from the
Control Panel
To remove a multiplex device from the system:
1. Connect the device to the D5060.
2. Enter the address.
3. Enter 0 for the point type.
Ensure that the D8125MUX is not
powered before connecting or
disconnecting multiplex devices.
Connecting or disconnecting a multiplex
device while the D8125MUX is powered
causes the multiplex device address
setting to reprogram or scramble.
After any programming or hardware
change, do a functional test of the system
as required by local codes.