
Installation Manual

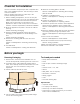
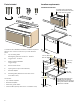


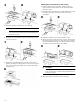
Table Of Contents
- Microwave
- Table of ContentsInstallation instructions
- Safety DefinitionsSafety Definitions
- IMPORTANT SAFETY INSTRUCTIONS
- READ AND SAVE THESE INSTRUCTIONS
- Appliance Handling Safety
- Safety Codes and Standards
- Electric Safety
- WARNING
- For appliances equipped with a cord and plug, do not cut or remove the ground prong. It must be plugged into a matching grounding type receptacle to avoid electrical shock. If there is any doubt as to whether the wall receptacle is properly grounded,...
- If required by the National Electrical Code (or Canadian Electrical Code), this appliance must be installed on a separate branch circuit.
- Installer – show the owner the location of the circuit breaker or fuse. Mark it for easy reference.
- Before installing, turn power OFF at the service panel. Lock service panel to prevent power from being turned ON accidentally.
- Be sure your appliance is properly installed and grounded by a qualified technician. Installation, electrical connections and grounding must comply with all applicable codes.
- Microwave Safety
- PRECAUTIONS TO BE OBSERVED BEFORE AND DURING SERVICING TO AVOID POSSIBLE EXPOSURE TO EXCESSIVE MICROWAVE ENERGY
- GROUNDING INSTRUCTIONS
- This appliance must be grounded. Grounding reduces the risk of electric shock by providing a safe pathway for electric current in the event of a short circuit.
- This appliance is equipped with a cord having a grounding wire with a grounding plug. The plug must be plugged into an outlet that is properly installed and grounded.
- Related Equipment Safety
- Remove all tape and packaging before using the appliance. Destroy the packaging after unpacking the appliance. Never allow children to play with packaging material.
- Never modify or alter the construction of the appliance. For example, do not remove leveling legs, panels, wire covers or anti-tip brackets/screws.
- State of California Proposition 65 Warnings:
- WARNING
- Checklist for Installation
- Use this checklist to verify that you have completed each step of the installation process. This can help you avoid common mistakes.
- Refer to detailed instructions for each step in the sections following this checklist.
- 2. Move the appliance into place in front of the cabinet opening.
- 3. Remove packaging materials, leaving the bottom packaging on the appliance to avoid damage to the floor.
- 4. Remove the mounting plate from the rear of the appliance.
- 5. Find wall studs.
- 6. Attach the mounting plate to the wall.
- 7. Adapt the microwave blower.
- 8. Prepare the cabinet for mounting.
- 9. At least two persons are needed to lift the appliance; tilt and hook the appliance to the holding plate.
- 10. Push the appliance all the way into place and fasten the holding screws through top cabinet holes.
- 11. Use correct hood exhaust.
- 12. Test the microwave oven for proper functioning.
- 3. Pull the carton up and off the oven.
- Tools and parts needed
- Parts included
- Location requirements
- Power Requirements
- Electrical Installation
- The model stated on the front cover is rated at 120V AC, 60 Hz and uses a NEMA 5-15 plug to connect to a dedicated 120 V microwave circuit.
- Electrical Requirements:
- This product must be connected to a supply circuit of the proper voltage and frequency. Wire size must conform to the requirements of the National Electric Code or the prevailing local code for this rating. The power supply cord and plug should be br...
- The voltage used must be the same as specified on this microwave oven. Using a higher voltage is dangerous and may result in a fire or oven damage. Using a lower voltage will cause slow cooking. The manufacturer is not responsible for any damages res...
- 2. Remove the screws from the mounting plate.
- Finding the wall studs
- Possible wall stud configurations
- Attaching the mounting plate to the wall
- Preparing rear wall
- Note:
- 1. Draw a vertical line on the wall at the center of the cabinet space.
- 2. Cabinet with front overhang: Draw a line on the back wall equal to the depth of the front overhang.
- 3. Tape the REAR WALL TEMPLATE onto the wall matching the centerline and touching the bottom of the cabinet or the level line.
- 4. Draw a horizontal line on the wall at the bottom of the Rear Wall Template.
- 5. Drill holes at locations A and B:
- 6. Wall venting installation only: Cut out the shaded area “F” on the REAR WALL TEMPLATE using a saber or keyhole saw.
- 2. Insert the bolts into the mounting plate through the holes designated to go into drywall.
- 3. Attach toggle wings from the back of the mounting plate onto each bolt. Leave enough space for toggle wings to go through the wall and to open.
- 5. Finger tighten the bolts to make sure toggle wings have opened against drywall.
- Adapting microwave blower
- Adapting microwave blower for roof venting
- 1. Remove and save the screws holding the blower motor and the blower plate. Lift up the blower plate and put it aside.
- 2. Carefully pull out the blower unit and rotate 90º so that fan blade openings are facing out the top of the microwave.
- 3. Place the blower unit back into the opening.
- 4. Replace the blower plate and secure with the screws removed in step 1.
- 5. Attach the exhaust adapter to the top of the blower plate by sliding it into the guides. Push in securely until it is in the locking tabs. Make sure the damper hinge swings freely.
- Adapting microwave blower for wall venting
- 1. Remove and save the screws holding the blower motor and the blower plate. Lift up the blower plate and put it aside.
- 2. Carefully pull out the blower unit and rotate 90º so that fan blade openings are facing out the top of the microwave.
- 4. Gently remove the wires from the grooves. Reroute the wires through the grooves on other side of the blower unit. Rotate blower unit 90º so that fan blade openings are facing out the back of the microwave.
- 6. Replace the blower plate and secure with the screws removed in Step 1.
- Preparing cabinet
- 1. Remove power to outlet.
- 3. Tape the TOP CABINET TEMPLATE onto the bottom surface. Make sure the template centerline aligns with the vertical line on the wall. Rear wall arrows must be against rear wall.
- 4. Drill 3\8" (10 mm) holes at "A", "B" and "C".
- 5. Cut out the 2" (51 mm) hole at "D". This hole is for the power supply cord.
- Mounting the microwave oven
- Notes
- 1. Lift the microwave, tilt it forward, and hook slots at back bottom edge onto four lower tabs of the mounting plate.
- 2. Rotate the front of the oven up against cabinet bottom.
- 4. Insert the two remaining self-aligning screws through outer top cabinet holes. Turn two full turns on each screw.
- 6. Tighten the outer two screws completely to the top of the microwave oven.
- 7. Install grease filters by sliding the two pins at the rear side of the filter into the slots at the rear of the filter opening, then push up filter at the front until the catch locks in place with a click (image shows bottom view of appliance).
- Hood exhaust
- When venting exhaust to the outside, hood exhaust ducts will be required. Read the following carefully.
- The hood exhaust has been designed to mate with a standard 3¼" x 10" (82 x 254 mm) rectangular duct. If a round duct is required, a rectangular-to-round transition adaptor must be used. Do not use less than a 6" (152 mm) diameter duct.
- For satisfactory air movement, the total duct length of 3¼" x 10" (82 x 254 mm) rectangular or 6" (152 mm) diameter round should not exceed 120 equivalent feet (36.5 m).
- Elbows, transitions, wall and roof caps etc. cause additional resistance to airflow and are equivalent to a section of straight duct which is longer than their actual physical size. When calculating the total duct length, add the equivalent lengths o...
- * If a rectangular-to-round transition adapter is used, first make sure the damper hinge of the microwave swings freely. If necessary, cut the damper to fit, using the tin snips, in order to allow free movement.
- 2. Test the oven mode:
- 4. Test the microwave:
- 5. Verify that the oven light comes on and the water is heated.
- 6. If any of the tests do not result as explained above, contact Service for assistance. Otherwise, the installation is complete at this time.
- Bosch® Support
- See the Use and Care Manual for troubleshooting information. Refer to the “Statement of Limited Product Warranty” in the Use and Care Manual.
- To reach a service representative, see the contact information at the front of the manual or in the following section. Please be prepared with the information printed on your product data plate prior to calling.
- Data Plate
- The data plate shows the model and serial number. Refer to the data plate on the appliance when requesting service.
- The data plate can be found on the inside of the appliance.
- To avoid having to search for each piece of information when calling, you can enter the four items needed in the spaces provided below.
- Keep your invoice or escrow papers for warranty validation if service is needed.
- Service
- We realize that you have made a considerable investment in your kitchen. We are dedicated to supporting you and your appliance so that you have many years of creative cooking.
- Please don’t hesitate to contact our Customer Support Department if you have any questions or in the unlikely event that your Bosch® appliance needs service. Our service team is ready to assist you.
- USA
- 800-944-2904
- www.bosch-home.com/us/support
- Canada
- 800-944-2904
- www.bosch-home.ca/en/support
- Parts and Accessories
- ÍndiceInstrucciones de instalación
- Definiciones de seguridadDefiniciones de seguridad
- INSTRUCCIONES DE SEGURIDAD IMPORTANTES
- LEA Y CONSERVE ESTAS INSTRUCCIONES
- Seguridad de manejo del electrodoméstico
- La unidad es pesada y se requieren al menos dos personas o un equipo adecuado para trasladarla.
- No levante el electrodoméstico tomándolo del asa de la puerta.
- Las superficies ocultas pueden tener bordes filosos. Proceda con cuidado al intentar tomar el electrodoméstico por la parte trasera o desde abajo.
- Códigos y normas de seguridad
- Seguridad eléctrica
- ADVERTENCIA
- Para los electrodomésticos equipados con cable y enchufe, no corte ni retire la espiga de conexión a tierra. Debe enchufarse en un receptáculo de conexión a tierra compatible para evitar descargas eléctricas. Si tiene alguna duda respecto de si ...
- Si el Código Nacional Eléctrico (o el Código Eléctrico Canadiense) así lo requiere, este electrodoméstico debe instalarse en un circuito derivado por separado.
- El instalador debe mostrar al propietario la ubicación del disyuntor o el fusible. Márquela para recordarla más fácilmente.
- Antes de realizar la instalación, apague la alimentación eléctrica en el panel de servicio. Trabe el panel de servicio para impedir que se encienda accidentalmente la alimentación eléctrica.
- Asegúrese de que el electrodoméstico sea correctamente instalado y conectado a tierra por un técnico calificado. La instalación, las conexiones eléctricas y la conexión a tierra deben cumplir con todos los códigos correspondientes.
- Seguridad con el microondas
- PRECAUCIONES QUE DEBE TENER EN CUENTA ANTES DEL SERVICIO TÉCNICO Y DURANTE ESTE PARA EVITAR LA POSIBLE EXPOSICIÓN A UN EXCESO DE ENERGÍA DE MICROONDAS
- INSTRUCCIONES PARA LA CONEXIÓN A TIERRA
- Este aparato debe estar conectado a tierra. En caso de un cortocircuito eléctrico, la conexión a tierra reduce el riesgo de descarga eléctrica proporcionando un cable de escape para la corriente eléctrica.
- Este aparato viene equipado con un cable que tiene un alambre de conexión a tierra con un enchufe de conexión a tierra. El enchufe debe colocarse en una toma de corriente que esté instalada y conectada a tierra en forma adecuada.
- Seguridad del equipo relacionado
- Retire toda la cinta y el embalaje antes de usar el electrodoméstico. Destruya el embalaje después de desembalar el electrodoméstico. Nunca deje que los niños jueguen con el material de embalaje.
- Nunca modifique ni altere la construcción del electrodoméstico. Por ejemplo, no retire las patas niveladoras, paneles, cubiertas para cables ni soportes/ tornillos antivuelco.
- Advertencia en virtud de la Proposición 65 del estado de California:
- ADVERTENCIA
- Lista de verificación de instalación
- Use esta lista de verificación para verificar que haya completado cada paso del proceso de instalación. Esta lista puede ayudarlo a evitar errores comunes.
- Consulte las instrucciones detalladas para cada paso en las secciones que se encuentran a continuación de esta lista de verificación.
- 2. Mueva el aparato a su lugar, en frente de la abertura del gabinete.
- 3. Retire los materiales de embalaje, pero deje el embalaje de la parte inferior en el aparato para evitar daños al piso.
- 4. Retire la placa de fijación de la parte posterior del aparato.
- 5. Busque los pasadores de pared.
- 6. Acople la placa de fijación a la pared.
- 7. Adapte el ventilador del microondas.
- 8. Prepare el gabinete para la installación del aparato.
- 9. Con ayuda, levante el aparato; inclínelo hacia adelante y enganche los slots en la placa de fijación.
- 10. Deslice completamente el aparato en su lugar y sujete el aparato en la abertura del gabinete con los tornillos suministrados.
- 11. Use el conducto correcto para escape de la campana.
- 12. Asegúrese de que el aparato funciona.
- 3. Levante la caja de cartón y retírela del horno.
- Herramientas y piezas necesarias
- Piezas incluidas
- Requisitos de ubicación
- Requisitos de electricidad
- Instalación eléctrica
- El modelo mencionado en la tapa frontal está diseñado para conectarse a una fuente de alimentación de 120 V CA y 60 Hz. Se utiliza un conector NEMA 5-15 para conectarlo a un circuito específico de microondas de 120 V.
- Requisitos eléctricos:
- Este producto se debe conectar a un circuito de alimentación de voltaje y frecuencia adecuados. El tamaño del cable debe cumplir con los requisitos del Código Eléctrico Nacional o del código local vigente para esta especificación. El cable de a...
- El voltaje utilizado deber ser el mismo que el que se especifica en este horno de microondas. Utilizar un voltaje mayor es peligroso y podría ocasionar un incendio o dañar el horno. Utilizar un voltaje menor causará una cocción lenta. El fabrican...
- 2. Retire los tornillos de la placa de fijación.
- Búsqueda de los pasadores de pared
- Posibles configuraciones de los pasadores de pared
- Estas representaciones muestran ejemplos de las configuraciones preferidas de instalación con la placa de fijación.
- Si el pasador de pared se encuentra dentro de 6¼ pulg. (159 mm) de la línea central vertical, únicamente pueden realizarse las instalaciones de ventilación de ambiente (recirculación) o de ventilación de techo.
- Acoplamiento de la placa de fijación a la pared
- Preparación de la pared trasera
- Nota:
- 1. Dibuje una línea vertical en la pared en el centro del espacio del gabinete.
- 2. Gabinete con voladizo delantero: dibuje una línea en la pared trasera igual a la profundidad del voladizo delantero.
- 3. Pegue la PLANTILLA DE LA PARED TRASERA con cinta en la pared de modo que coincida con la línea central y esté en contacto con la parte inferior del gabinete o la línea de nivel.
- 4. Dibuje una línea horizontal en la pared en la parte inferior de la plantilla de la pared trasera.
- 5. Taladre orificios en los lugares A y B:
- 6. Únicamente para la instalación de ventilación de pared: Corte la sección sombreada “F” en la PLANTILLA DE LA PARED TRASERA utilizando una sierra de vaivén o de punta.
- 2. Inserte los pernos en la placa de fijación a través de los orificios designados para atravesar el panel de yeso.
- 3. Acople las alas de anclaje de la parte trasera de la placa de fijación en cada perno. Deje espacio suficiente para que las alas de anclaje atraviesen la pared y se abran.
- 5. Ajuste con la mano los pernos para asegurarse de que las alas de anclaje de se hayan abierto contra el panel de yeso.
- Adaptación del ventilador del microondas
- Adaptación del ventilador del microondas para la ventilación de techo
- 1. Retire y conserve los tornillos que sostienen el motor del ventilador y la placa del ventilador. Levante la placa del ventilador y déjela a un costado.
- 2. Retire la unidad del ventilador con cuidado y rótela 90º de modo que las aberturas de los álabes del ventilador miren hacia la parte superior del microondas.
- 3. Vuelva a colocar la unidad del ventilador en la abertura.
- 4. Vuelva a colocar la placa del ventilador y asegúrela con los tornillos que se retiraron en el paso 1.
- 5. Acople el adaptador del escape a la parte superior de la placa del ventilador deslizándolo en las guías. Empújelo hacia adentro en forma segura hasta que se encuentre en los fijadores. Asegúrese de que la bisagra del regulador se mueva libremente
- Adaptación del ventilador del microondas para la ventilación de pared
- 1. Retire y conserve los tornillos que sostienen el motor del ventilador y la placa del ventilador. Levante la placa del ventilador y déjela a un costado.
- 2. Retire la unidad del ventilador con cuidado y rótela 90º de modo que las aberturas de los álabes del ventilador miren hacia la parte superior del microondas.
- 4. Retire suavemente los cables de las ranuras. Redirija los cables a través de las ranuras en el otro lado de la unidad del ventilador. Rote la unidad del ventilador 90° de modo que las aberturas de los álabes del ventilador miren hacia la parte ...
- 6. Vuelva a colocar la placa del ventilador y asegúrela con los tornillos que se retiraron en el paso 1.
- Preparación del gabinete
- 1. Retire la alimentación a la toma de corriente.
- 3. Pegue la PLANTILLA DEL GABINETE SUPERIOR con cinta en la superficie inferior. Asegúrese de que la línea central de la plantilla esté alineada con la línea vertical en la pared. Las flechas de la pared trasera deben ubicarse contra la pared tra...
- 4. Taladre orificios de 3\8 pulg. (10 mm) en “A”, “B” y “C”.
- 5. Corte el orificio de 2 pulg. (51 mm) en “D”. Este orificio es para el cable de alimentación eléctrica.
- Montaje del horno microondas
- Notas
- 1. Levantar el horno de microondas, inclinarlo hacia adelante y enganchar las ranuras del extremo inferior de la parte posterior en las cuatro lengüetas inferiores de la placa de fijación.
- 2. Girar la parte frontal del horno hacia el fondo del armario.
- 4. Insertar los dos tornillos autoalineables restantes en los agujeros exteriores del armario superior. Girar cada tornillo dos vueltas completas.
- 6. Apretar los dos tornillos exteriores por completo a la parte superior del horno de microondas.
- 7. Para instalar el filtro de ventilación, introducir las dos clavijas de la parte trasera del filtro en las ranuras situadas en la parte trasera de la abertura del mismo. (la imagen muestra una vista de la parte inferior del aparato).
- Escape de la campana
- Para ventilar aire de escape al exterior, se requieren conductos de escape de la campana. Lea lo siguiente con cuidado.
- El escape de la campana ha sido diseñado para acoplarse con un conducto rectangular estándar de 3¼ pulg. x 10 pulg. (82 x 254 mm). Si se requiere un conducto redondo, debe utilizarse un adaptador para la transición de rectangular a redonda. No ut...
- Para el movimiento satisfactorio del aire, la longitud total del conducto rectangular de 3¼ pulg. x 10 pulg. (82 x 254 mm) o del conducto redondo de 6 pulg. (152 mm) de diámetro no debe superar el equivalente de 120 pies (36.5 m).
- Los codos, las transiciones, las tapas de pared y techo, etc. provocan una resistencia adicional al flujo de aire y son equivalentes a una sección de conducto recto de mayor longitud que su tamaño físico real. Al calcular la longitud total del con...
- * Si se utiliza un adaptador de transición de rectangular a redonda, primero asegúrese de que la bisagra del regulador del microondas se mueva con libertad. De ser necesario, corte el regular para que calce, utilizando las tijeras de hojalatero, a ...
- 2. Pruebe el modo del horno:
- 4. Pruebe el microondas:
- 5. Verifique que la luz del horno se encienda y que el agua se caliente.
- 6. Si alguna de las pruebas no funciona según se explicó anteriormente, comuníquese con el Servicio técnico para obtener asistencia.De lo contrario, la instalación finaliza en este momento.
- Soporte de Bosch®
- Para obtener información sobre resolución de problemas, consulte el Manual de uso y cuidado. Consulte la “Declaración de Garantía Limitada del Producto” en el Manual de uso y cuidado.
- Para consultar a un representante de servicio técnico, remítase a la información de contacto que aparece en el frente del manual o en la siguiente sección. Cuando llame, tenga a la mano la información impresa en la placa de datos de su producto.
- Placa de datos
- La placa de datos muestra el modelo y el número de serie. Al solicitar servicio técnico, consulte la placa de datos del aparato.
- La placa de datos puede encontrarse en el interior del aparato.
- Para evitar tener que buscar los datos de su aparato cuando los precise, es aconsejable anotarlos aquí conjuntamente con el número de teléfono del Servicio de atención al cliente:
- Conserve su factura o los papeles de depósito para la validación de la garantía si necesita solicitar servicio técnico.
- Servicio técnico
- Sabemos que usted ha realizado una inversión considerable en su cocina. Nos dedicamos a brindar asistencia a usted y a su aparato de manera que tenga muchos años de cocina creativa.
- No dude en comunicarse con nuestro Departamento de Atención al Cliente si tiene alguna pregunta o en el caso poco probable de que su aparato Bosch® necesite servicio técnico. Nuestro equipo de servicio técnico está listo para asistirlo.
- EUA
- 800-944-2904
- www.bosch-home.com/us/support
- Canadá
- 800-944-2904
- www.bosch-home.ca/en/support
- Piezas y accesorios

8
Install Appliance
Removing the mounting plate
Note: To avoid possible damage to the work surface or
to the bottom of the appliance, cover the work surface.
1.
Remove any remaining contents from the microwave
oven cavity.
2.
Remove the screws from the mounting plate.
The mounting plate will be used as the rear wall
template and for mounting.
3.
Reinstall the screws into the holes where they were
removed.
Note: To avoid damage to the microwave oven, do not
grip or use the door or door handle while the microwave
oven is being handled.
Finding the wall studs
Note: The microwave must be connected to at least one
wall stud. If no wall studs exist within the cabinet
opening, do not install the microwave oven.
1.
Locate the edges of the wall studs within the cabinet
opening by using:
- a stud finder or
- a hammer (tapping lightly across the mounting
surface to find a solid sound).
2.
Place a mark halfway between the edges and draw a
line down the center of the studs (See possible wall
studs configuration).
Possible wall stud configurations
These depictions show examples of preferred installation
configurations with the mounting plate.
Note: Care must be taken when drilling holes. Electrical
wires may be concealed behind the wall covering and
contact with them could result in electrical shock.
No wall studs at corner holes
If wall stud is within 6¼" (159 mm) of the vertical
centerline, only Room Venting (recirculation) or Roof
Venting installations can be done.
Wall stud at one corner hole
Wall studs at both corner holes