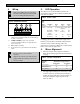
DS840LSN Installation Guide EN TriTech PIR/Microwave Intrusion Detector
DS840LSN | Installation Guide | 1. 1. General Information General Information The DS840LSN is a microprocessor-based TriTech Passive Infrared/Microwave Intrusion Detector. Patented Passive Infrared and Microwave signal processing provides excellent catch performance with freedom from false alarms. EN | 2 3. Mounting 3.
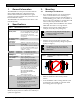
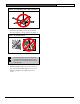
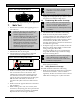
DS840LSN | Installation Guide | 3. Mounting Figure 2: Avoid installing near rotating machines • Select a location likely to intercept an intruder moving across the coverage pattern (see Figure 3). Figure 3: Coverage Pattern Avoid mounting the detector in locations (such as above a doorway) where people can pass in close proximity (0.5 m / 1.5 ft.) of the detector. • The surface should be solid and vibration-free. • Mounting height range is 1.8 m to 2.4 m (6 ft. to 8 ft.).
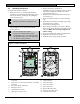
DS840LSN | Installation Guide | 3. 3.2 Mounting EN | 4 3. Remove the Mirror Assembly (9). Carefully press with two fingers on the top end of the mirror assembly (9) and slide it out of the spring loaded tracks (11). 4. Break away the needed Wire Knockouts for the wire entrance (4). 5. Open two holes for surface or corner mounting (13). 6. Mark the location for the mounting screws using the enclosure as a template. 7. Pre-start the mounting screws. 8. Route wiring as necessary (see Section 4. Wiring).
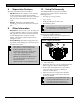
DS840LSN | Installation Guide | 4. 4. Wiring Wiring EN | 5 5. Apply power ONLY after all connections have been made and inspected. Do NOT coil excess wiring inside the detector. LED Operation The detector uses 3 colored LEDs to indicate the various alarm and supervision trouble conditions that that exist. See Table 2. Table 2: Status of LEDs Figure 5: DS840LSN Terminals 1 2 3 4 1 - aLSN1 & bLSN1: coming from the preceding LSN element.
DS840LSN | Installation Guide | 7. Walk Test EN | 6 Figure 6: Mirror Adjustment Markings The center of the pattern should be pointed toward the center of the intended protection area. 1 6. 1 - Adjust frame marks 3. See Section 10. Using Pet Immunity for Pet Applications 7. 1. 1. 2. Wait at least two minutes, after applying power, to start walk tests. 1. 2. 3. 4. Establishing PIR Pattern Coverage Enable Walk Test via the keypad.
DS840LSN | Installation Guide | 8. 8. Supervision Features Supervision Features The supervision features function as follows: • • 9. • • PIR/Microwave: The complete circuit operation of these subsystems is checked approximately every 12 hours. If the PIR or microwave subsystem fails, this will be communicated to the control panel. Default: The detector will default to PIR technology protection if the microwave subsystem fails. EN | 7 10.
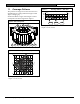
DS840LSN | Installation Guide | 11. 11. Coverage Patterns Coverage Patterns EN | 8 Figure 11: The protected coverage area is where the microwave and PIR patterns overlap (indicated in Figure 10 and Figure 11 in light gray). 10 6.5 Numbered callouts in Figure 10 and Figure 11 below correspond to the mirror segments in Figure 9.
DS840LSN | Installation Guide | 11.
DS840LSN | Installation Guide | 11.
DS840LSN | Installation Guide | 11.
DS840LSN | Installation Guide | 11.
DS840LSN | Installation Guide | 11.
DS840LSN | Installation Guide | 11.
DS840LSN | Installation Guide | 11.
Bosch Security Systems 130 Perinton Parkway Fairport, NY 14450-9199 Customer Service: (800) 289-0096 Technical Support: (888) 886-6189 © 2003 Bosch Security Systems PRELIMINARY 4998132113Ar11