
User Manual


English | 13
Bosch Power Tools 1 609 92A 2PE | (22.8.16)
Assembly
Before any work on the machine itself, pull the mains
plug.
Dust/Chip Extraction
Dusts from materials such as lead-containing coatings,
some wood types, minerals and metal can be harmful to
one’s health. Touching or breathing-in the dusts can cause
allergic reactions and/or lead to respiratory infections of
the user or bystanders.
Certain dusts, such as oak or beech dust, are considered
as carcinogenic, especially in connection with wood-treat-
ment additives (chromate, wood preservative). Materials
containing asbestos may only be worked by specialists.
– As far as possible, use a dust extraction system suita-
ble for the material.
– Provide for good ventilation of the working place.
– It is recommended to wear a P2 filter-class respirator.
Observe the relevant regulations in your country for the
materials to be worked.
Prevent dust accumulation at the workplace. Dusts can
easily ignite.
External Dust Extraction
Mount a vacuum hose onto the extraction outlet 10. Connect
the vacuum hose with a vacuum cleaner. An overview for the
connection of various vacuum cleaners can be found at the
end of these instructions.
The vacuum cleaner must be suitable for the material being
worked.
When vacuuming dry dust that is especially detrimental to
health or carcinogenic, use a special vacuum cleaner.
Integrated Dust Extraction with Dust Bag
For small sanding jobs, a dust bag 7 (accessory) can be con-
nected. Attach the sleeve of the dust bag firmly onto the outlet
piece 10. To maintain optimum dust collection, empty the
dust bag 7 in good time.
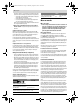
Changing the Sanding Belt (see figure A)
– Completely pivot out the clamping lever 3. The sanding
belt 2 is now loose and can be removed.
– Mount the new sanding belt 2. Pay attention that the direc-
tion of the arrows on the inside of the sanding belt corre-
spond with the arrow direction on the machine housing.
– Pivot the clamping lever 3 back to its initial position.
– Pick up the power tool and switch it on. Adjust the belt run
with adjustment knob 9 until the edge of the sanding belt
runs flush with the guide plate 14.
Pay attention that the sanding belt 2 does not move exces-
sively and make contact with the housing. Check the belt run
regularly and readjust with the adjusment knob 9.
Selecting the Sanding Belt
Depending on the material to be worked and the required rate
of removal, different sanding belts are available:
Operation
Starting Operation
Observe correct mains voltage! The voltage of the pow-
er source must agree with the voltage specified on the
nameplate of the machine. Power tools marked with
230 V can also be operated with 220 V.
Switching On and Off
To start the machine, press the On/Off switch 5 and keep it
pressed.
To lock the pressed On/Off switch 5, press the lock-on button
6.
To switch off the machine, release the On/Off switch 5 or
when it is locked with the lock-on button 6, briefly press the
On/Off switch 5 and then release it.
To save energy, only switch the power tool on when using it.
Preselecting the Belt Speed
The necessary belt speed can be preselected with the thumb-
wheel 4, even during operation.
The required belt speed depends on the material being sand-
ed and on the working conditions, and can be determined by
practical testing.
Working Advice
The sanding removal rate and the surface quality are mainly
determined by the selection of the sanding belt as well as by
the preselected belt speed. The higher the belt speed, the
more material is removed and the finer the sanded surface.
Only flawless sanding belts achieve good sanding capacity
and make the machine last longer.
Work using the least possible sanding pressure in order to in-
crease the service life of the sanding belts. The machine’s own
weight is sufficient for a good sanding performance. An exces-
sive increase of the sanding pressure does not lead to an in-
crease of the sanding capacity, but to increased wear of the
machine and the sanding belt.
Grain size
For the working of all wooden
materials
40—320
For coarse-sanding, e. g. of
rough, unplaned beams and
boards coarse 40, 60
For face sanding and planing
small irregularities medium
80, 100, 120,
150
For finish and fine sanding of
hard woods fine
180, 220, 280,
320
OBJ_BUCH-459-006.book Page 13 Monday, August 22, 2016 10:05 AM