
Use and Care Manual


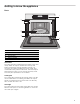
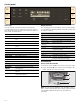
Table Of Contents
- Built-In Microwave Oven
- Table of ContentsUse and care manual
- Produktinfo
- IMPORTANT SAFETY INSTRUCTIONS
- READ ALL INSTRUCTIONS BEFORE USING THE APPLIANCE
- 9 PRECAUTIONS TO AVOID POSSIBLE EXPOSURE TO EXCESSIVE MICROWAVE ENERGY
- WARNING
- WARNING
- Grounding Instructions
- TV / Radio Interference
- Intended Use
- Child Safety
- Cleaning Safety
- Cooking Safety
- In Case of Fire
- Liquids
- Cooking Items
- Cooking Utensils
- Glass Tray / Turntable Ring
- Thermometers
- Pacemakers
- Fan Motor Operation
- State of California Proposition 65 Warnings
- SAVE THESE INSTRUCTIONS.
- Causes of damage
- Protecting the environment
- Getting to know the appliance
- Before using the appliance for the first time
- Microwave
- Microwave utensil guide
- Microwave power levels
- Setting the microwave
- 1. Enter the desired cook time with the number keys. The timer display will fill in from right to left. Example: To set a microwave time of 20 minutes and 30 seconds, enter the numbers 2 0 3 0.
- 2. You can start microwave operation with the default power level 10 by touching Start/Enter, -or - you can set a different power level. Touch Power Level. ‚‹ and start/enter are blinking in the upper left section of the display.
- 3. Enter the desired power level using the number keys, or by touching Power Level repeatedly.
- 4. Touch Start/Enter to start microwave operation.
- Change power level
- 1. Touch Power Level.
- 1. Enter the desired cook time with the number keys. The timer display will fill in from right to left. Example: To set a microwave time of 20 minutes and 30 seconds, enter the numbers 2 0 3 0.
- Suggestions for best results
- Automatic programs
- Auto Defrost
- Ovenware for defrosting
- Stand time
- Setting Auto Defrost
- 1. Take the food out of the packaging and weigh it, then place it in a suitable dish on the ceramic tray.
- 2. Touch Auto Defrost.
- 3. Select the desired program from the label at the oven cavity. For Ground Meat touch the number key 1. -or- Touch Auto Defrost or +Amount repeatedly to scroll through all Auto Defrost modes.
- 4. Enter the weight of the food you want to defrost using the number keys. For example, to enter 2 lbs type 2 0 0. The weight and start/enter are blinking.
- 5. Touch Start/Enter.
- Note:
- Opening appliance door during operation
- Cancel operation
- Auto Defrost programs
- Tips for defrosting
- Popcorn
- Beverage
- Keep Warm
- Melt
- Soften
- Auto Defrost
- Sensor cooking
- Kitchen timer
- Panel Lock
- Automatic Shutoff
- Basic settings
- Cooking Charts
- Cleaning and Maintenance
- Troubleshooting
- Bosch® Support
- STATEMENT OF LIMITED PRODUCT WARRANTY
- READ ALL INSTRUCTIONS BEFORE USING THE APPLIANCE
- Table des MatièresNotice d’utilisation
- Produktinfo
- CONSIGNES DE SÉCURITÉ IMPORTANTES
- LISEZ TOUTES LES INSTRUCTIONS AVANT D'UTILISER L'APPAREIL
- 9Mesures de précaution pour éviter l'exposition excessive à l'énergie micro-onde
- AVERTISSEMENT
- AVERTISSEMENT
- Instructions de mise à la terre
- Interférences radio/télévision
- Utilisation prévue
- Sécurité des enfants
- Consignes en matière de nettoyage
- Sécurité de cuisson
- En cas d’incendie
- Liquides
- Articles de cuisson
- Utensiles de cuisson
- Plateau en verre/Anneau du plateau tournant
- Thermomètres
- Pacemakers
- Fonctionnement du moteur du ventilateur
- Avertissements de la Proposition 65 de l’État de la Californie
- CONSERVEZ CES INSTRUCTIONS.
- Causes des dommages
- Protection de l'environnement
- Découvrir l'appareil
- Avant la première utilisation
- Micro-ondes
- Guide des ustensiles pour micro-ondes
- Niveaux de puissance du micro-ondes
- Réglage du micro-ondes
- 1. Entrez le temps de cuisson souhaité avec les touches numérotées. L’écran de la minuterie se remplira de droite à gauche. Exemple : Pour régler un temps de micro-ondes de 20 minutes et 30 secondes, entrez les numéros 2 0 3 0.
- 2. Vous pouvez relancer le fonctionnement du micro-ondes avec le niveau de puissance par défaut de 10 en touchant Start/Enter (Démarrer/Entrer), -ou - vous pouvez régler un autre niveau de puissance. Touchez Power Level (Niveau de puissance). ‚...
- 3. Réglez le niveau de puissance souhaité avec les touches numérotées, or en touchant Power Level (Niveau de puissance) à plusieurs reprises.
- 4. Touchez Start/Enter (Démarrer/Entrer) pour lancer le fonctionnement du micro-ondes.
- Modification du niveau de puissance
- 1. Touchez Power Level (Niveau de puissance).
- 1. Entrez le temps de cuisson souhaité avec les touches numérotées. L’écran de la minuterie se remplira de droite à gauche. Exemple : Pour régler un temps de micro-ondes de 20 minutes et 30 secondes, entrez les numéros 2 0 3 0.
- Suggestions pour les meilleurs résultats
- Programmes automatiques
- Décongélation automatique
- Plat de cuisson pour la décongélation
- Temps de repos
- Réglage de la décongélation automatique
- 1. Sortez l’aliment de son emballage, pesez-le, puis mettez-le dans le four dans un plat approprié ou sur un plateau de céramique.
- 2. Touchez Auto Defrost (Décongélation automatique).
- 3. Sélectionnez le programme souhaité à partir de l'étiquette dans la cavité du four. Pour la viande hachée, touchez la touche numérotée 1. -ou- Touchez la touche Auto Defrost (Décongélation automatique) ou +Amount (+Montant) à plusieurs r...
- 4. Entrez le poids de l’aliment à décongeler avec les touches numérotées. Par exemple, pour entrer 2 lbs (0,9 kg), touchez 2 0 0. Le poids et start/enter (démarrer/entrer) clignoteront.
- 5. Touchez Start/Enter (Démarrer/Entrer).
- Remarque :
- Ouverture de la porte de l’appareil en cours de fonctionnement
- Annuler le fonctionnement
- Programme de décongélation automatique
- Conseils pour la décongélation
- Popcorn
- Boisson
- Keep Warm (Garder chaud)
- Melt (Fondre)
- Soften (Ramollir)
- Décongélation automatique
- Capteur cuisson
- Capteur réchauffage
- Réglage du Capteur Réchaffage
- 1. Touchez Sensor Reheat (Capteur Réchauffage). Le symbole de micro-ondes Ý et SENSOR REHEAT (CAPTEUR RÉCHAUFFAGE) s’affichent.
- 2. Touchez Start/Enter (Démarrer/Entrer). sensing (détection en cours) s'affiche. L’appareil est en marche prendant la détection.
- 3. Une fois la détection terminée, un signal sonore retentira et le compte à rebours du temps de cuisson calculé est lancé.
- Remarque :
- Remarques
- Suggestions pour le réchauffage des aliments
- Capteur cuisson
- Programmes Capteur cuisson
- Réglage du Capteur Cuisson
- 1. Touchez Sensor Cook (Capteur Cuisson).
- 2. Sélectionnez le programme souhaité à partir de l'étiquette dans la cavité du four. Pour la viande hachée, touchez la touche numérotée 5. -ou- Touchez Sensor Cook ou +Amount (+Montant) à répétition pour faire défiler les modes Capteur C...
- 3. Touchez Start/Enter.
- Remarque :
- Ouverture de la porte de l’appareil en cours de fonctionnement
- Annuler le fonctionnement
- Capteur réchauffage
- Minuterie de cuisine
- Verrouillage du panneau de commande
- Extinction automatique
- Réglages de base
- Tableaux de cuisson
- Nettoyage et entretien
- Dépannage
- Soutien Bosch®
- ÉNONCÉ DE LA GARANTIE LIMITÉE
- LISEZ TOUTES LES INSTRUCTIONS AVANT D'UTILISER L'APPAREIL
- ContenidoManual de instrucciones
- Produktinfo
- INSTRUCCIONES DE SEGURIDAD IMPORTANTES
- LEER TODAS LAS INSTRUCCIONES ANTES DE UTILIZAR EL APARATO
- 9Precauciones para evitar una posible exposición a una excesiva cantidad de energía de microondas
- ADVERTENCIA
- ADVERTENCIA
- Instrucciones para la conexión a tierra
- Interferencia con la TV/radio
- Uso previsto
- Seguridad de los niños
- Seguridad en la limpieza
- Seguridad al cocinar
- En caso de incendio
- Liquidos
- Artículos de cocina
- Utensilios de cocina
- Charola de vidrio/anillo de la bandeja giratoria
- Termómetros
- Marcapasos
- Funcionamiento del motor del ventilador
- Advertencias en virtud de la Proposición 65 del estado de California
- CONSERVE ESTAS INSTRUCCIONES.
- Causas para los daños
- Protección del medio ambiente
- Conozca el equipo
- Antes de usar el horno por primera vez
- Microondas
- Guía de utensilios para microondas
- Niveles de potencia del microondas
- Configurar el microondas
- 1. Introducir el tiempo de cocción deseado con el teclado numérico. El display del temporizador se llena de derecha a izquierda. Ejemplo: para ajustar un tiempo de funcionamiento del microondas de 20 minutos y 30 segundos, pulsar los números 2 0 3 0.
- 2. Para poner en marcha el microondas con el nivel de potencia 10 predeterminado pulsar Start/Enter (Comenzar/Intro), o seleccionar un nivel de potencia diferente. Pulsar Power Level (Nivel de potencia).‚‹ y start/enter (Comenzar/Intro) parpadean...
- 3. Introducir el nivel de potencia deseado con las teclas numéricas o pulsando Power Level (Nivel de potencia) repetidas veces.
- 4. Pulsar Start/Enter (Comenzar/Intro) para poner en marcha el microondas.
- Cambio del nivel de potencia
- 1. Pulse Power Level (Nivel de potencia).
- 1. Introducir el tiempo de cocción deseado con el teclado numérico. El display del temporizador se llena de derecha a izquierda. Ejemplo: para ajustar un tiempo de funcionamiento del microondas de 20 minutos y 30 segundos, pulsar los números 2 0 3 0.
- Sugerencias para obtener los mejores resultados
- Programas automáticos
- Auto Defrost (Descongelar automáticamente)
- Utensilios para horno para la descongelación
- Tiempo de reposo
- Ajustar Auto Defrost (Descongelación automática)
- 1. Extraer la comida del envase y pesarla; colocarla en un plato adecuado sobre la bandeja de cerámica.
- 2. Pulsar Auto Defrost (Descongelación automática).
- 3. Seleccionar el programa deseado de entre los que aparecen en la etiqueta adherida a la cavidad de horno. Para carne molida pulsar la tecla numérica 1. o Pulsar Auto Defrost (Descongelación automática) o +Amount (+Cantidad) repetidas veces para ...
- 4. Introducir el peso de la comida que se quiera descongelar utilizando las teclas numéricas. Por ejemplo, para introducir 1 kg, pulsar 1 0 0. El peso y start/enter (iniciar/confirmar) parpadean.
- 5. Pulsar Start/Enter (Iniciar/Confirmar) .
- Nota:
- Abertura de la puerta del aparato durante el funcionamiento
- Cancelación del funcionamiento
- Programas de Auto Defrost (Descongelar automáticamente)
- Consejos para descongelar
- Popcorn (Palomitas de maíz)
- Beverage (Bebida)
- Keep Warm (Mantener caliente)
- Melt (Derretir)
- Soften (Ablandar)
- Auto Defrost (Descongelar automáticamente)
- Cocción por sensor
- Sensor Reheat (Recalentar por sensor)
- Sensor Cook (Cocción por sensor)
- Programas de Sensor Cook (Cocción por sensor)
- Programación de Sensor Cook (Cocción por sensor)
- 1. Pulse Sensor Cook (Cocción por sensor).
- 2. Seleccione el programa deseado de la etiqueta en la cavidad del horno. Para Ground Meat (Carne molida), pulse la tecla numérica 5. o bien Pulse Sensor Cook o +Amount (+Cantidad) repetidas veces para desplazarse por los modos de Sensor Cook.
- 3. Pulse Start/Enter.
- Nota:
- Abertura de la puerta del aparato durante el funcionamiento
- Cancelación del funcionamiento
- Temporizador de cocina
- Bloqueo de panel
- Cierre automático
- Valores básicos
- Cuadros de cocción
- Limpieza y mantenimiento
- Resolución de problemas
- Soporte de Bosch®
- DECLARACIÓN DE GARANTÍA LIMITADA DEL PRODUCTO
- LEER TODAS LAS INSTRUCCIONES ANTES DE UTILIZAR EL APARATO

9 IMPORTANT SAFETY INSTRUCTIONS
READ ALL INSTRUCTIONS BEFORE USING THE APPLIANCE
6
▯ Do not store anything directly on top of the
appliance surface when the appliance is in
operation.
▯ Oversized food or oversized metal utensils
should not be inserted in a microwave oven as
they may create a fire or risk of electric shock.
▯ Do not clean with metal scouring pads. Pieces
can burn off the pad and touch electrical parts
involving a risk of electric shock.
▯ Do not store any materials, other than
manufacturer’s recommended accessories, in
this oven when not in use.
▯ Do not cover racks or any other part of the oven
with metal foil. This will cause overheating of the
oven.
In Case of Fire
If materials inside an oven should ignite:
1.
Keep door closed
2.
Turn appliance off
3.
Unplug the appliance or shut off at fuse or circuit
breaker
Liquids
Liquids, such as water, coffee, or tea could be
overheated. They can be heated beyond the boiling point
without appearing to boil. For example, visible bubbling
or boiling when the container is removed from the
microwave oven is not always present. THIS COULD
RESULT IN VERY HOT LIQUIDS SUDDENLY BOILING
OVER WHEN THE CONTAINER IS DISTURBED OR A
UTENSIL IS INSERTED INTO THE LIQUID.
When heating liquids, always place a glass rod/spoon in
the container. This will prevent delayed boiling.
CAUTION
Metal e.g. a spoon in a glass must be kept at least 1 in
(25 mm) from the oven walls and the inside of the door.
Sparks could irreparably damage the glass on the inside
of the door.
▯ Take ready meals out of the packaging. They will heat
up more quickly and evenly in microwaveable
ovenware. The different components of the meal may
not require the same amount of time to heat up.
▯ Always cover the food. If you do not have a suitable
cover for your container, use a plate or special
microwave foil.
▯ Stir or turn the food several times during cooking.
Check the temperature.
▯ After heating, allow the food to stand for a further 2 to
5 minutes so that it can achieve an even temperature.
▯ Always use an oven cloth or oven gloves when
removing plates from the oven.
Cooking Items
Eggs: Do not cook or reheat whole eggs, with or without
shell. Steam buildup in whole eggs may cause them to
explode, and possibly damage the oven or cause injury.
Reheating sliced hard-boiled eggs and cooking
scrambled eggs is safe.
Popcorn: Use only popcorn in packages designed and
labeled for microwave use, or pop it in a microwave oven
corn popper. Follow popcorn manufacturers’ directions
and use a brand suitable for the wattage of your oven.
Do not continue to heat after popping has stopped.
Popcorn will scorch or burn. Do not leave oven
unattended.
CAUTION
When using pre-packaged microwave popcorn, check
package weight before using the popcorn function. Set
the oven for the weight of the popcorn package. If these
instructions are not followed, popcorn may not pop
adequately or may ignite and cause fire.
Foods with nonporous skins: Potatoes, tomatoes, sweet
potatoes, apples, whole squash and sausages are
examples of foods with nonporous skins. These types of
foods must be pierced before cooking to prevent them
from exploding.
Baby food / Baby formula: Do not heat baby bottles or
food in microwave oven. The glass jar or the surface of
food may appear warm while the interior can burn the
infant’s mouth and esophagus.
Deep fat frying: Do not deep fat fry in oven. Oil can be
heated beyond ideal temperatures very quickly in a
microwave oven. Temperatures can climb high enough
for the cooking oils to reach their respective flash points
and burst into flames. The heated oil may bubble and
spatter causing possible damage to the oven and
perhaps result in burns. Additionally, microwave–safe
utensils may not be able to withstand the temperature of
the hot oil, and could result in the utensil shattering, if it
contains a slight imperfection, scratch or chip.
Home Canning / Drying foods / Small quantities of
foods: Do not use microwave oven for home canning or
heating of any closed jar. Pressure will build up and the
jar may explode. In addition, the oven cannot maintain
the food at the proper canning temperature. Improperly
canned food may spoil and be dangerous to consume.
Small quantities of food or foods with low moisture
content can dry out, burn or catch on fire.