
Use and Care Manual

41
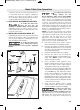
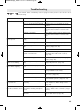
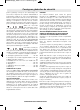
original positions (see page 18 for details). It
is important that the original equipment
washers are in the proper positions so that
the saw blade always aligns with the perma-
nently installed riving knife (Fig. 63).
ADJUSTABLE OR WOBBLE DADO SETS
To reduce the risk of in-
jury, do not use ad-
justable or “wobble” dado sets on this saw.
Adjustable dado sets can be easily set to po-
sitions that may interfere with working com-
ponents of this saw.
INSTALLING A MOLDING HEAD SET
A Molding Head Set may be used to add a
variety of decorative edges to a wood work
piece. These edges are commonly seen on
trim moldings and furniture.
To reduce the risk of in-
jury, always disconnect
plug from power source before changing
blades.
To reduce the risk of in-
jury, always use the
Bosch Molding Table Insert No.TS1009.
Never make molding head cuts without this
insert. Do not use molding head sets larger
than 7” diameter and with cutters wider than
1”. Never set molding cutters to any bevel
angle other than the vertical 0° angle. Follow
all warnings and instructions shown here and
those that accompany your molding head set.
Failure to comply with these warnings may re-
sult in serious bodily injuries.
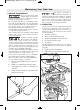
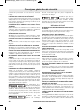
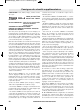
NOTE: Leave the inner washer in its original
sawing position. Install molding head, then
outer washer, and then arbor nut. Check that
all cutters and the arbor nut are securely
tightened. Some molding head sets come
with an additional thick washer/spacer; this
part is not used on the 4100 table saw.
A. Disconnect plug from power source.
Raise saw blade to maximum height.
B. Remove the Barrier Guard Assembly
and Anti-Kickback Device (see page 15
and 16). Lower and lock the Riving Knife
in its lowest position.
C. Remove standard table insert plate.
D. Remove the arbor nut and only the
outer blade washer and saw blade (see
page 18). NOTE: Leave inner blade
washer on arbor shaft.
E. Place molding head against inner
washer (with cutters facing to front of
saw). Then place on the outer washer
and tighten arbor nut on arbor shaft.
F. Lower the cutters below the table top
and insert the Bosch Molding Table In-
sert TS1009 (Fig. 66). Raise the cutters
to the desired depth of cut (above the
insert). Check that the tool is not
plugged into a power source; then care-
fully rotate the cutters by hand to make
sure all components are tightly held and
no interferences exist.
G. Plug saw into power source. Using
scrap wood, make practice molding
cuts and adjust height accordingly.
To reduce the risk of in-
jury, never pass your
hands over the cutting molding head cut-
ters. Molding cuts are non-thru (blind) cuts.
Many times the cutters can not be seen dur-
ing cutting. See page 38 for instructions on
MOLDING
HEAD
OUTER
WASHER
ARBOR
NUT
MOLDING
TABLE INSERT
INNER BLADE
WASHER
Fig. 65
Fig. 66
Basic Table Saw Operation
2610048783.qxp_4100 11/17/17 9:10 AM Page 41